
I had a great time at the 2008 RPCA convention. I'll write more, but first, news of three regulations I've recently become aware of.
First, cars with fluorescent lighting are affected by the Federal Ballast Energy Law (public law 100-357) of 1988, part of the National Appliance Energy Conservation Amendments (NAECA '88), and the National Energy Policy Act of 1992 (EPACT '92.) This means the original ballasts and T12 bulbs are typically no longer manufactured. Compatible T10 bulbs, or T12's with altered chemistry, are listed as being able to use the existing ballast. Another alternative is replacing both ballast and bulb with T8 equipment.
Second, I've been hearing about a new Federal EPA rule, to take effect in 2011, which many automotive hobbyists feared would end sale of automotive finishes to anyone not owning a $100,000 paint booth. The final rule appeared in the January 9, 2008 Federal Register. It is now part of Title 49 of the Code of Federal Regulations, Part 63. This rule does apply to railroad rolling stock, but there are several exemptions for the hobbyist.
Third, at the RPCA conference, Harold Weisinger of Amtrak announced that, in the absence of any current standards for propane fuel supplies on passenger cars, effective April 1st (?) Amtrak will no longer accept cars with propane equipment, unless that equipment is deactivated.
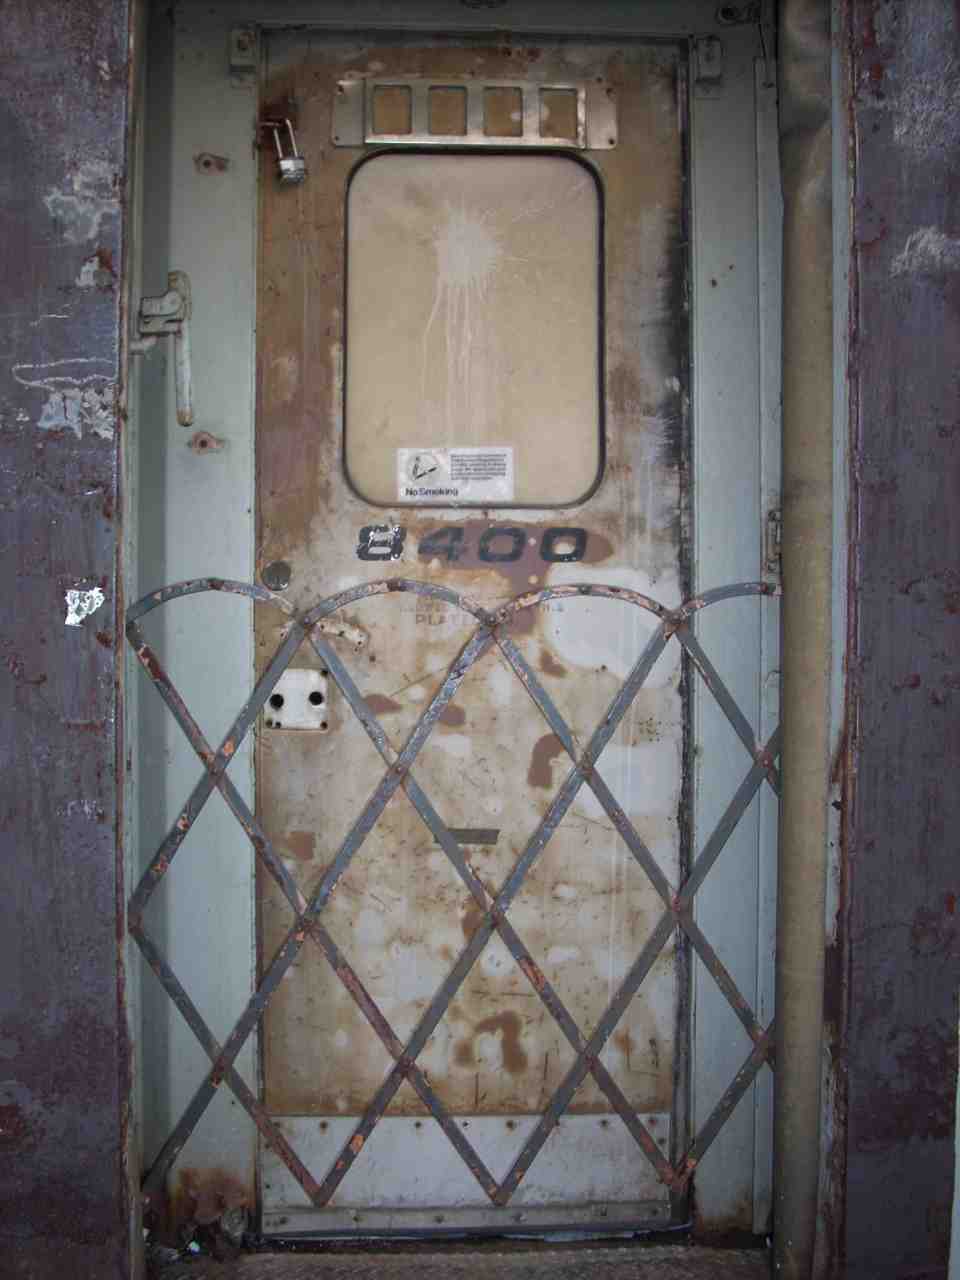
One treat, while at the RPCA convention, was being allowed to take pictures of Great Northern 1116, one of two GN International coaches owned by the Lake Superior Railroad Museum. Like 1146, 1116 was built by ACF in 1950 for the Seattle-Vancouver Internationals, and it has examples of many of the small hardware items 1146 is missing.
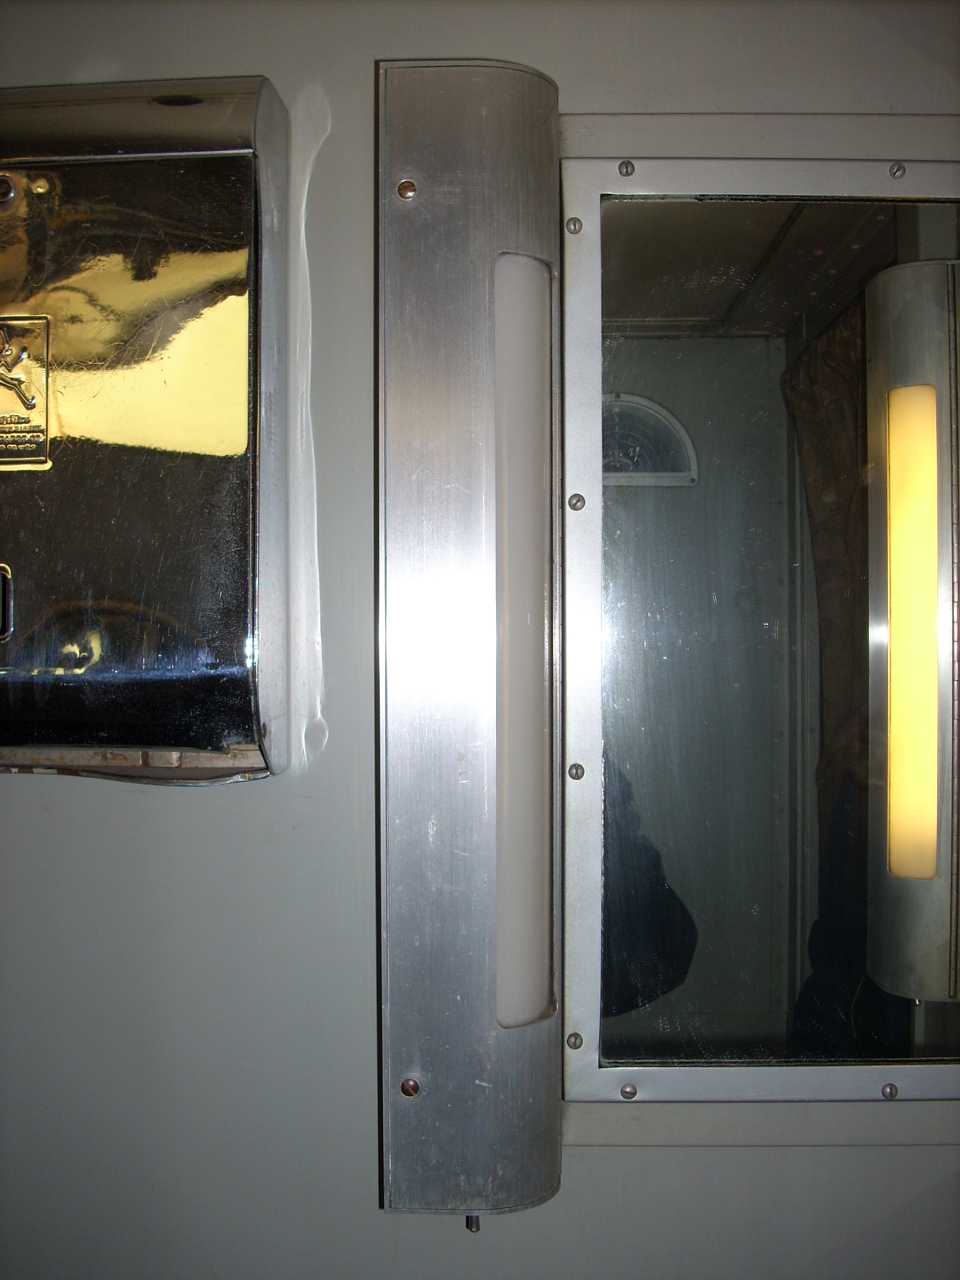
| 1116's men's lounge has the same style of mirror light. |
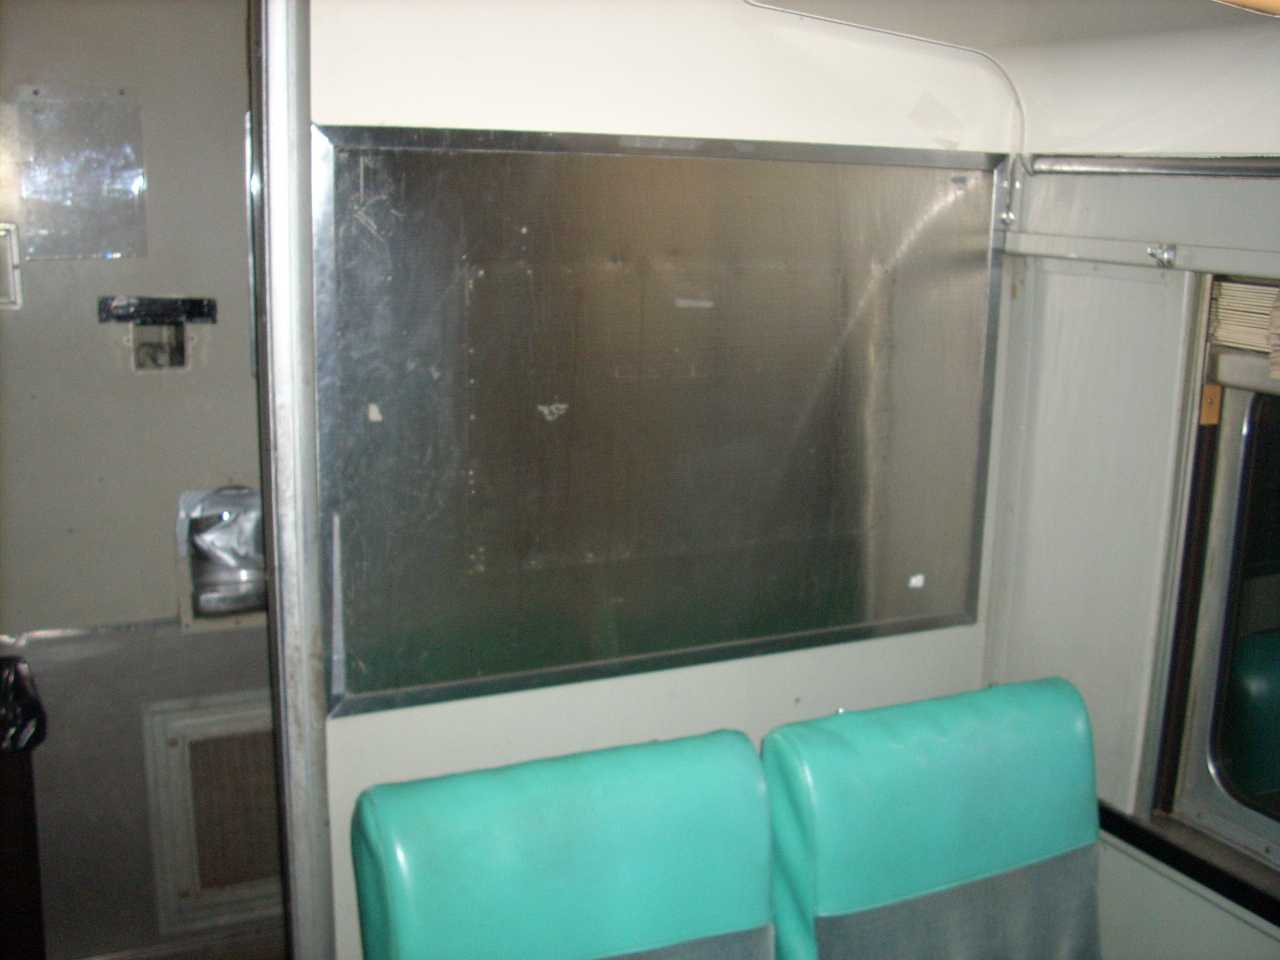
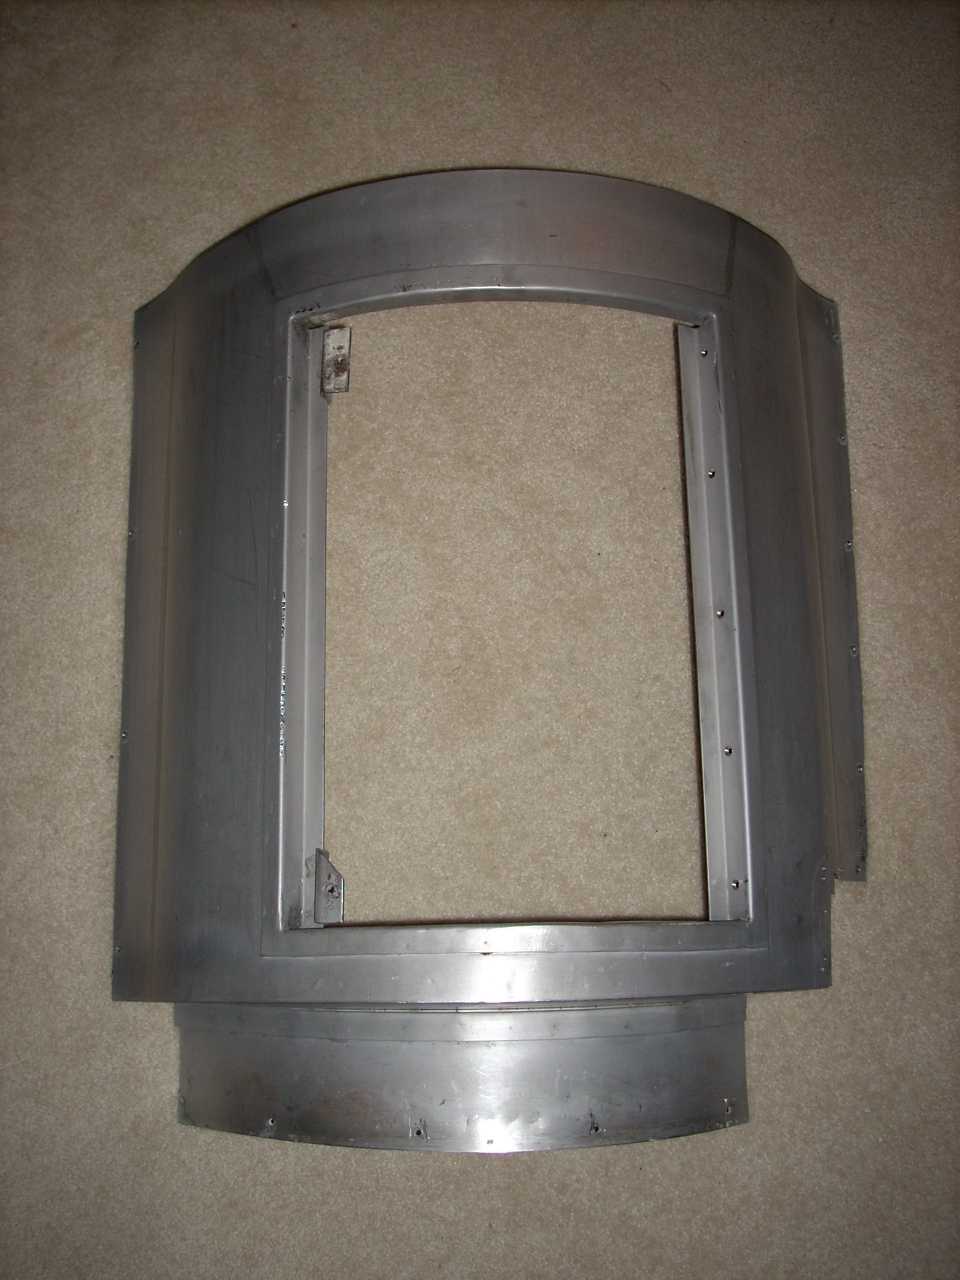
| 1116's bulkhead walls had the same kind of etched-stainless artwork as 1146. The artwork is gone, but the "frames" remain. |
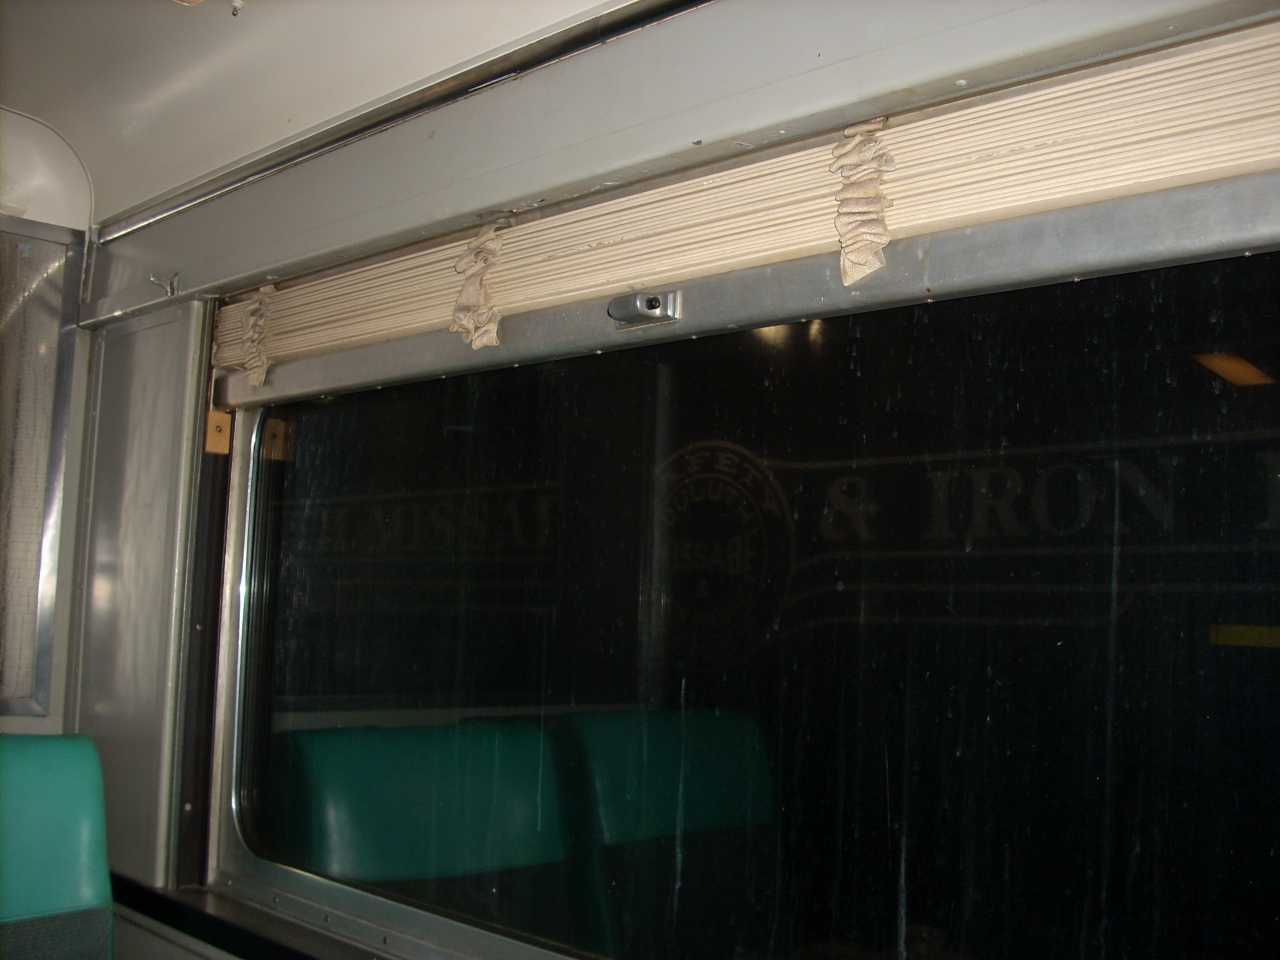
| 1116 still has venetian blinds, which 1146 started out with. (Coach and Dining only - the hallway always had roll-up blinds.) |
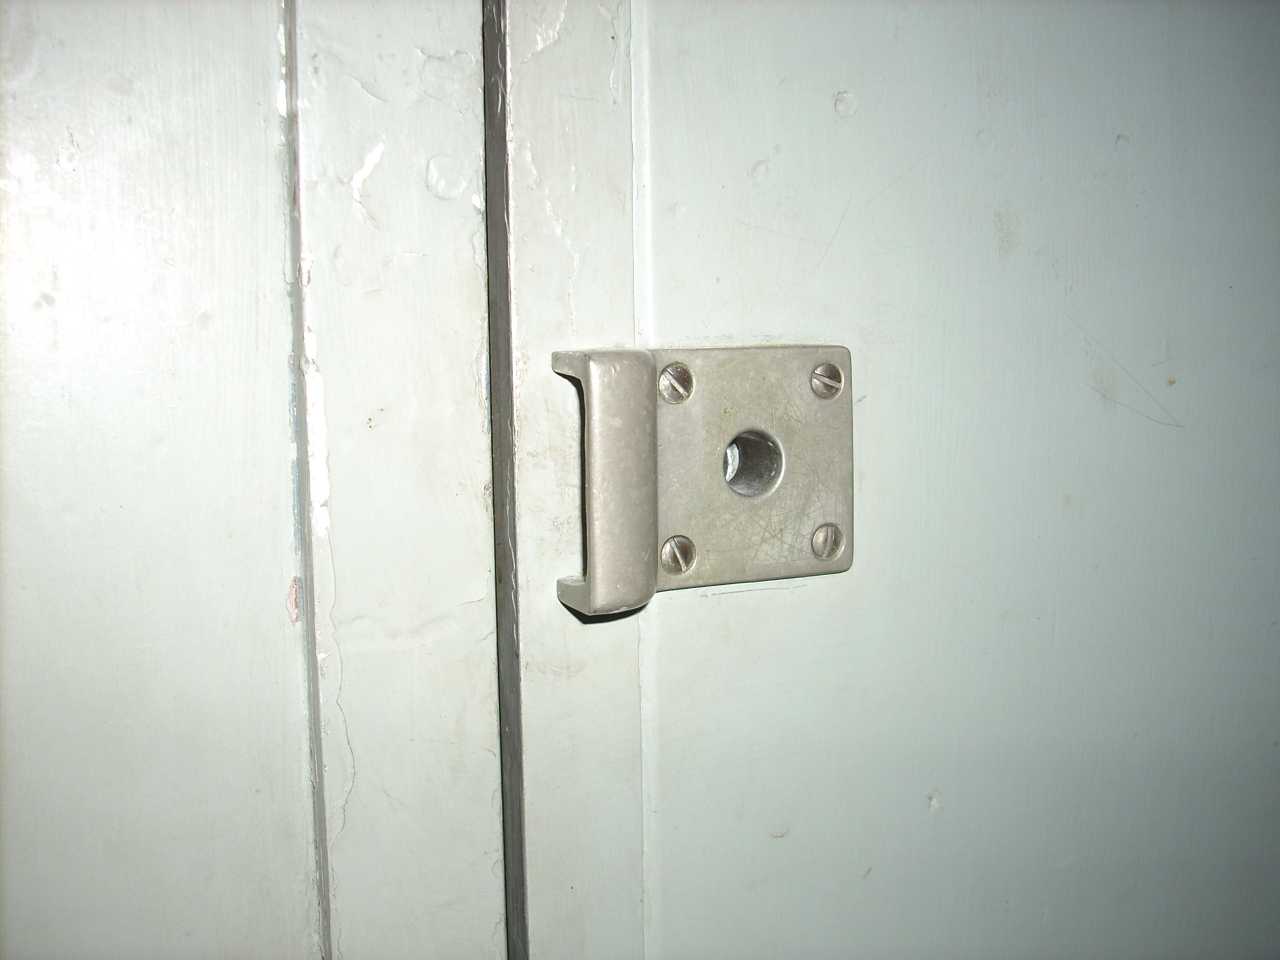
| 1116 exhibits the sort of escutcheon plate 1146 had on its electric locker and water cooler doors. Push a pencil into the hole to unlatch. |
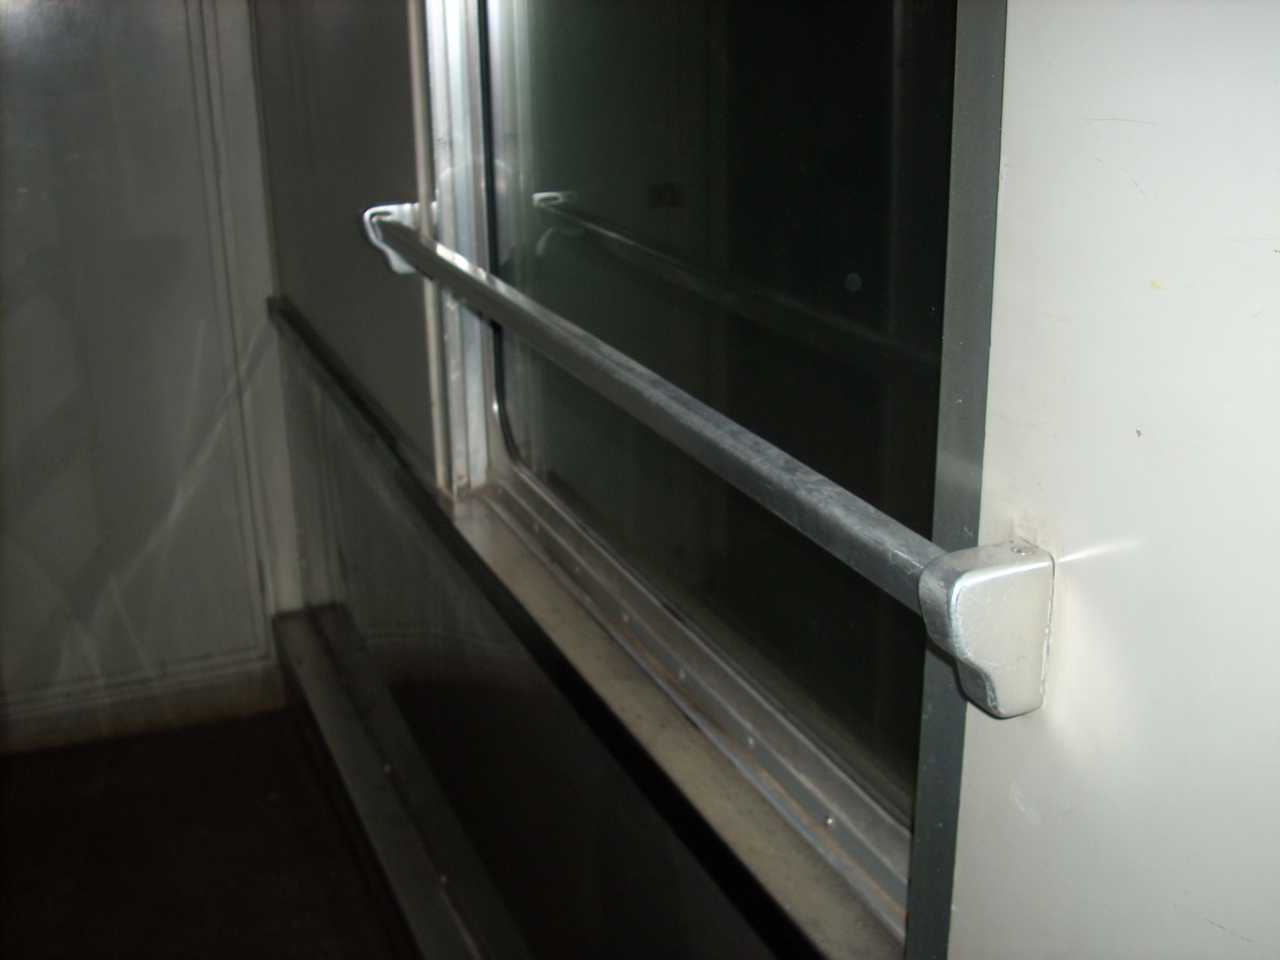
| 1116 also has the correct style of window handrail, similar to what protected 1146's hallway windows. |
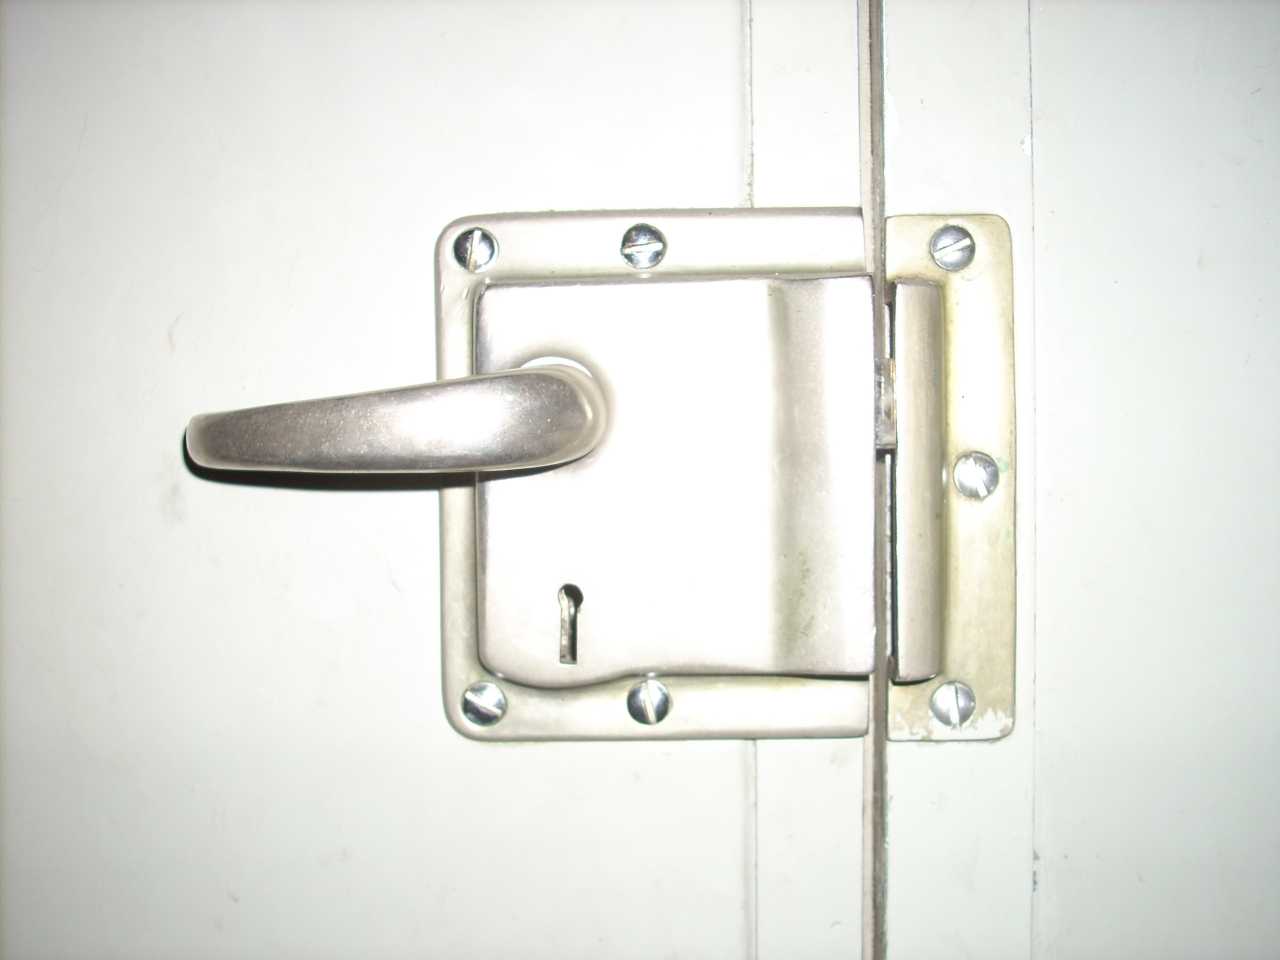
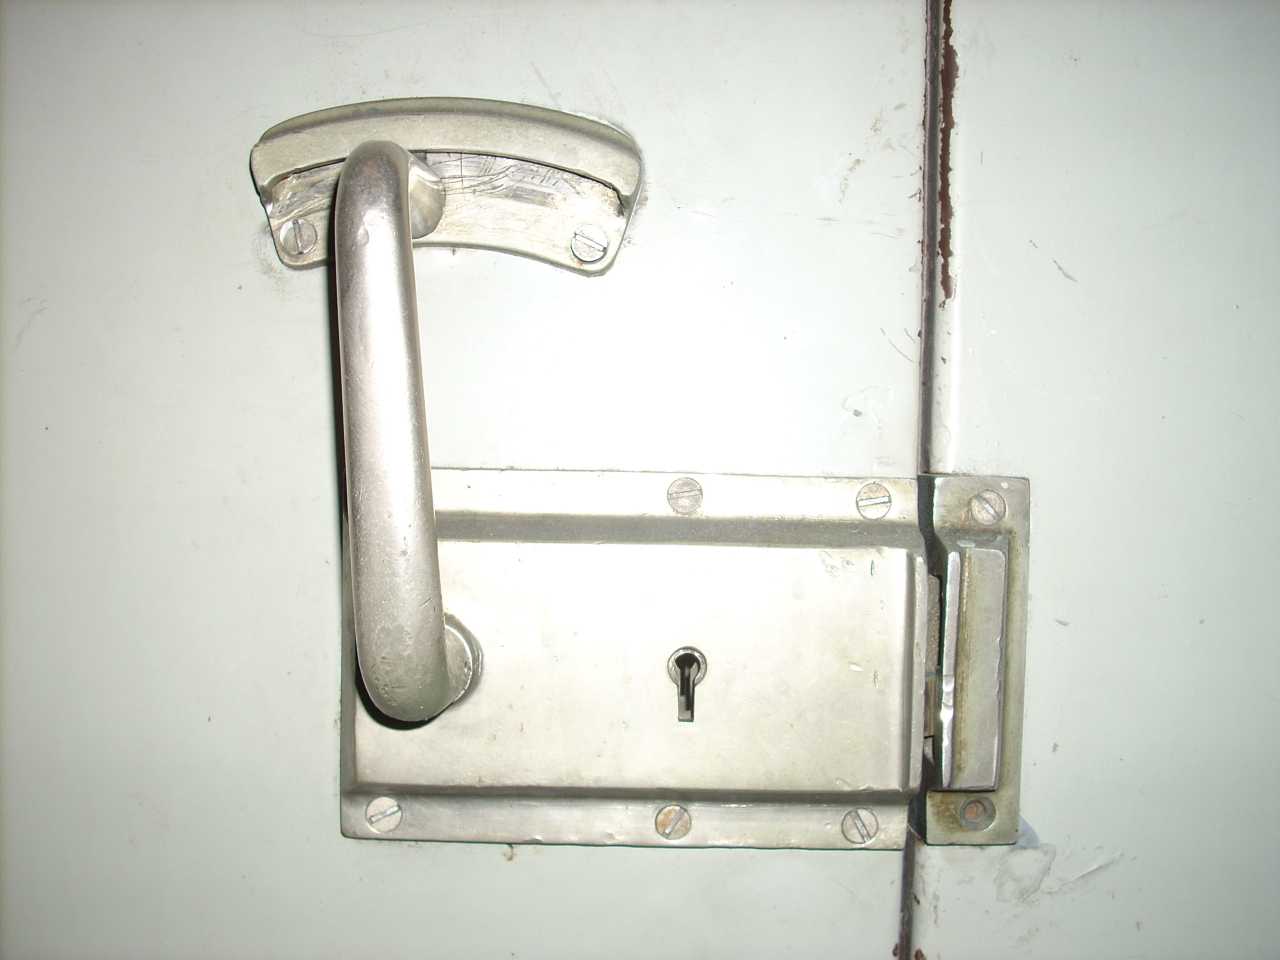
| 1116's correct restroom door latch. (Outside.) |
| 1116's correct restroom door latch. (Inside.) |
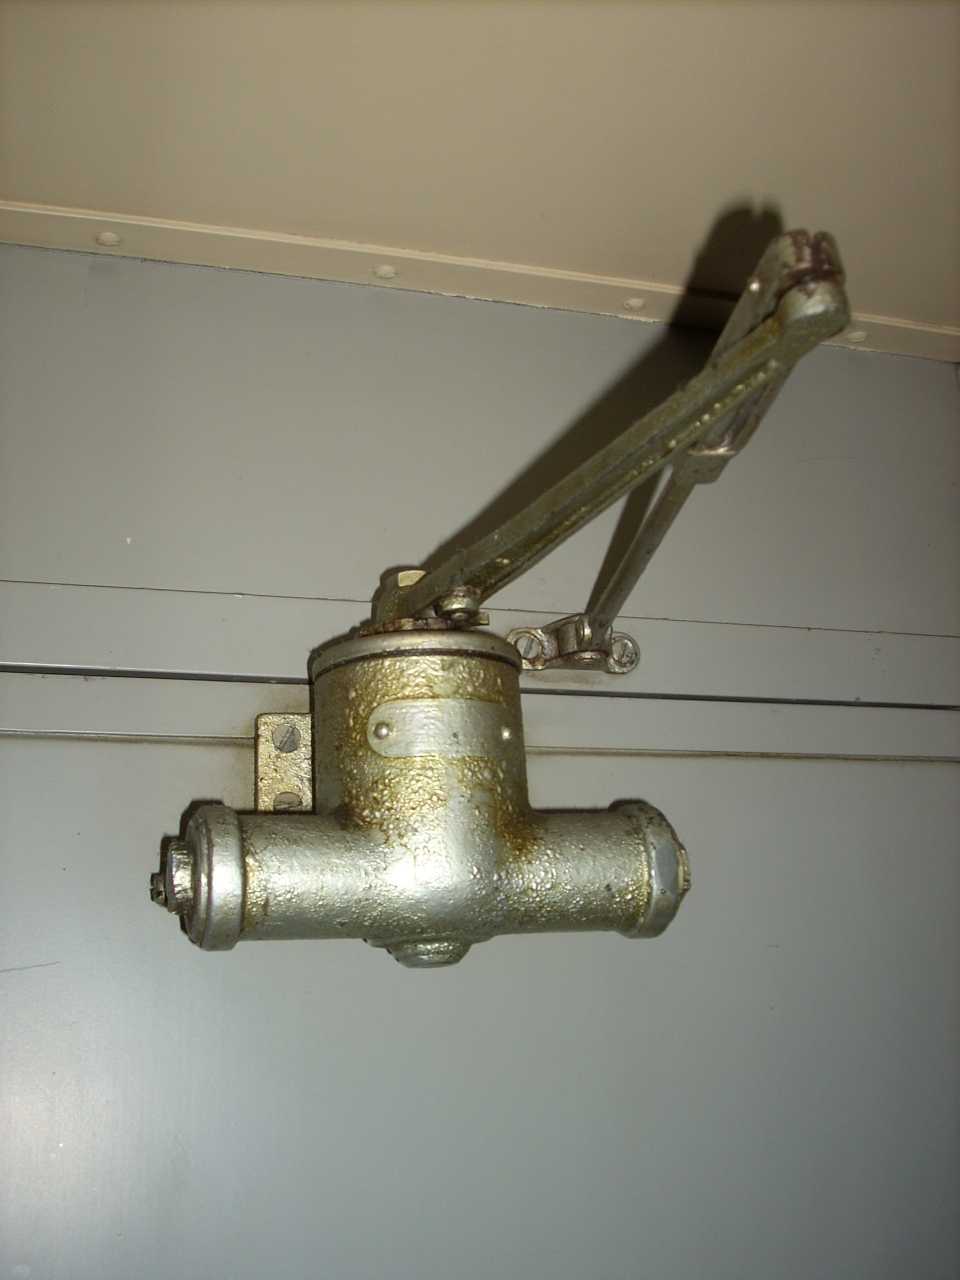
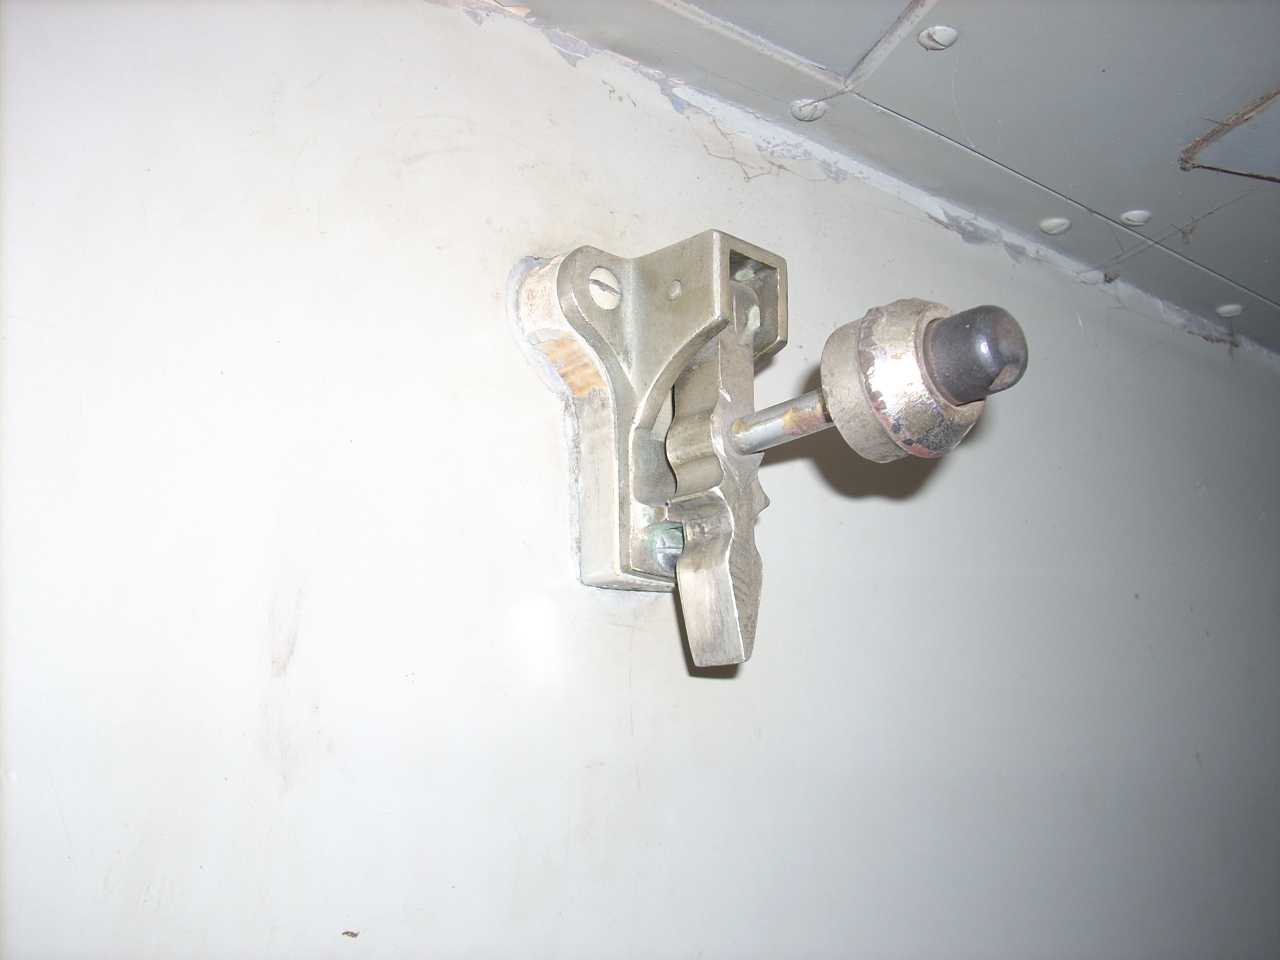
| 1116 models the restroom door closer. |
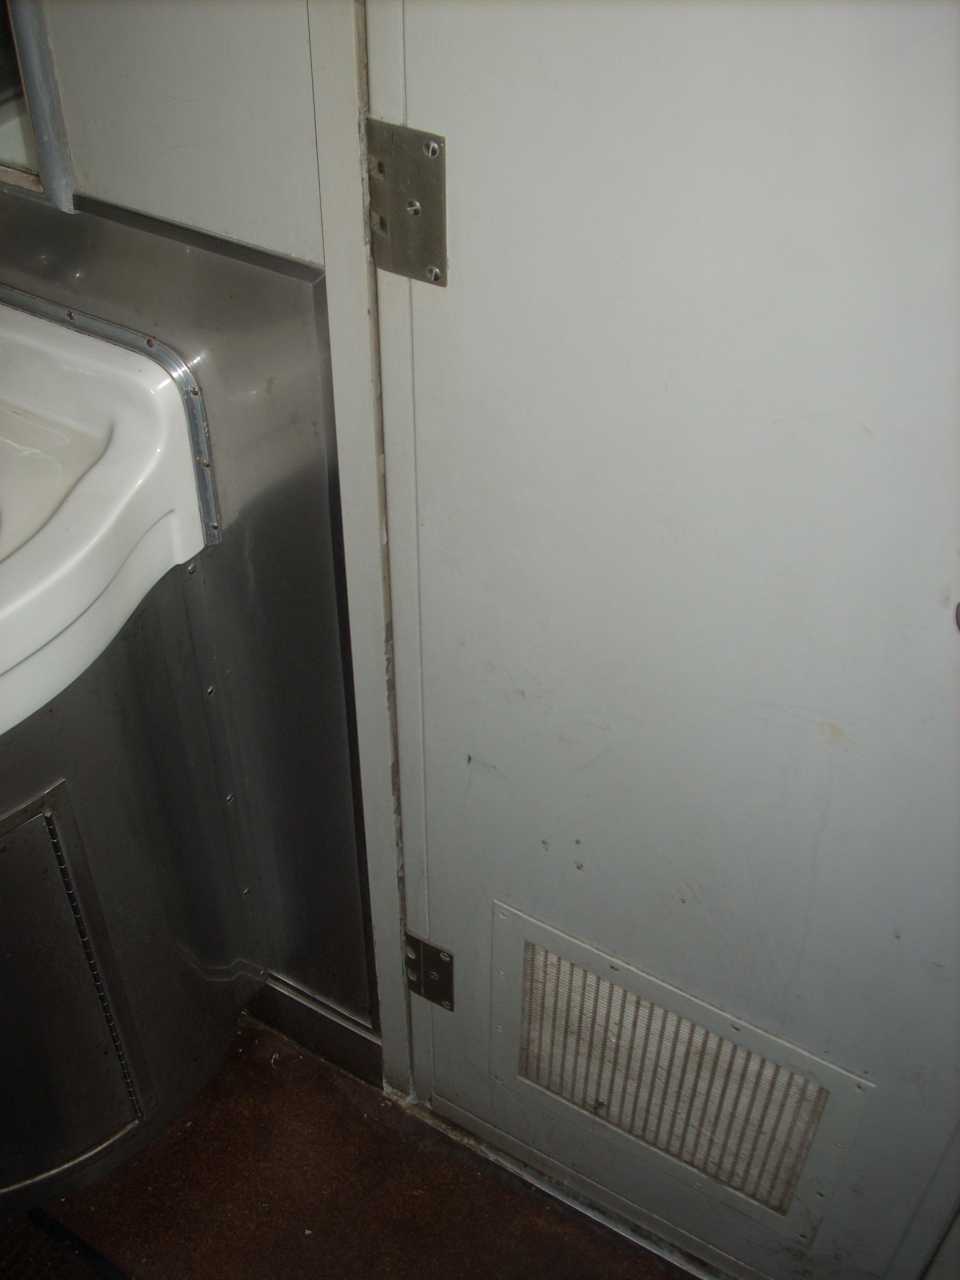
| Based on 1116, I'm guessing 1146's restroom door hinges should be unpainted. Amtrak painted them. |
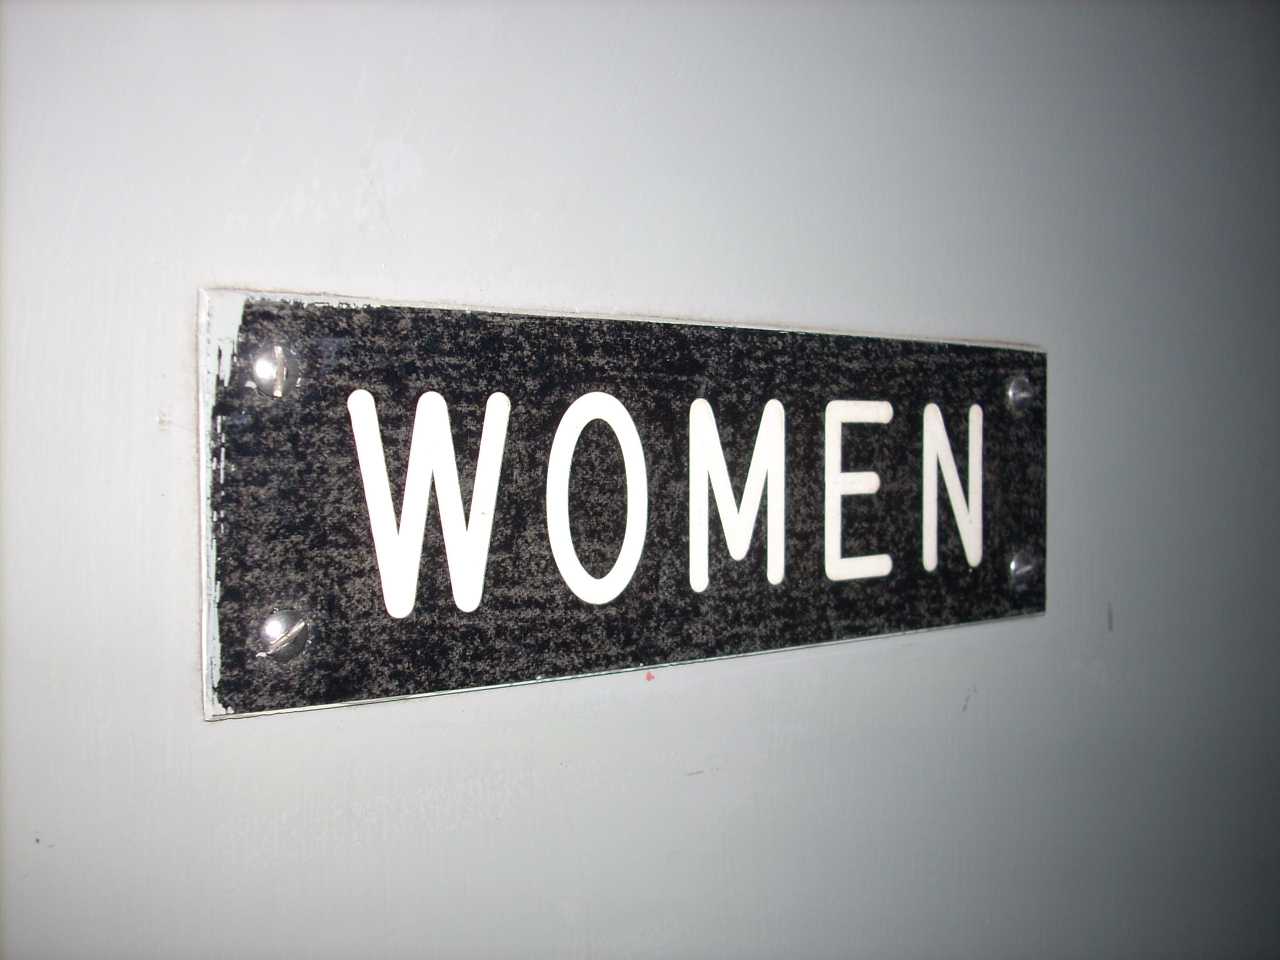
| I'll also guess that 1116 still has original restroom signage. (Based on screw holes in 1146's restroom doors.) |
| Correct end door bumpers/hold-opens. |
| Correct end door handle races. |
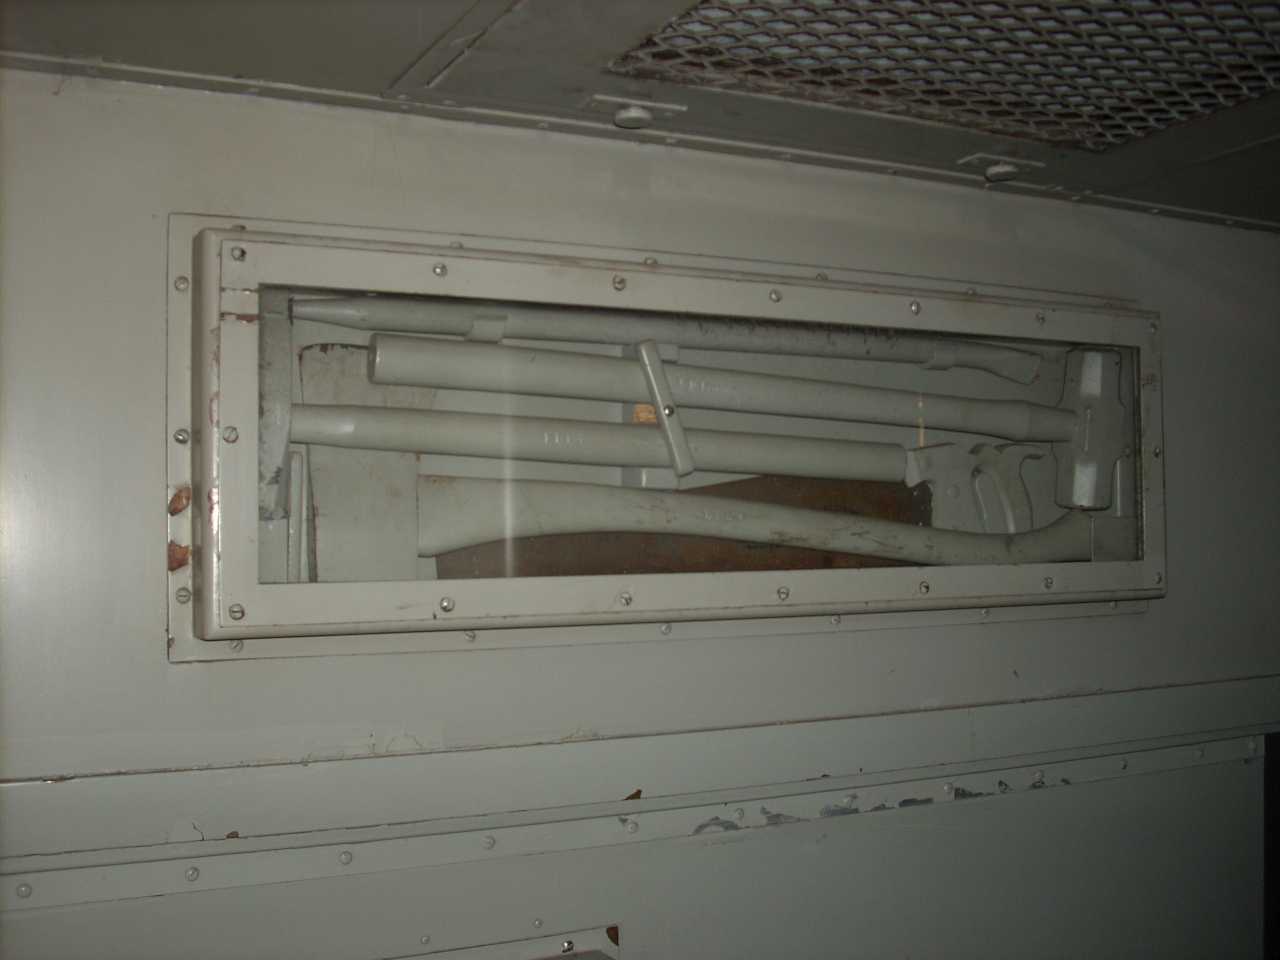
| 1116 still has its original wrecking tools - notice the car number stamped in the handles. |
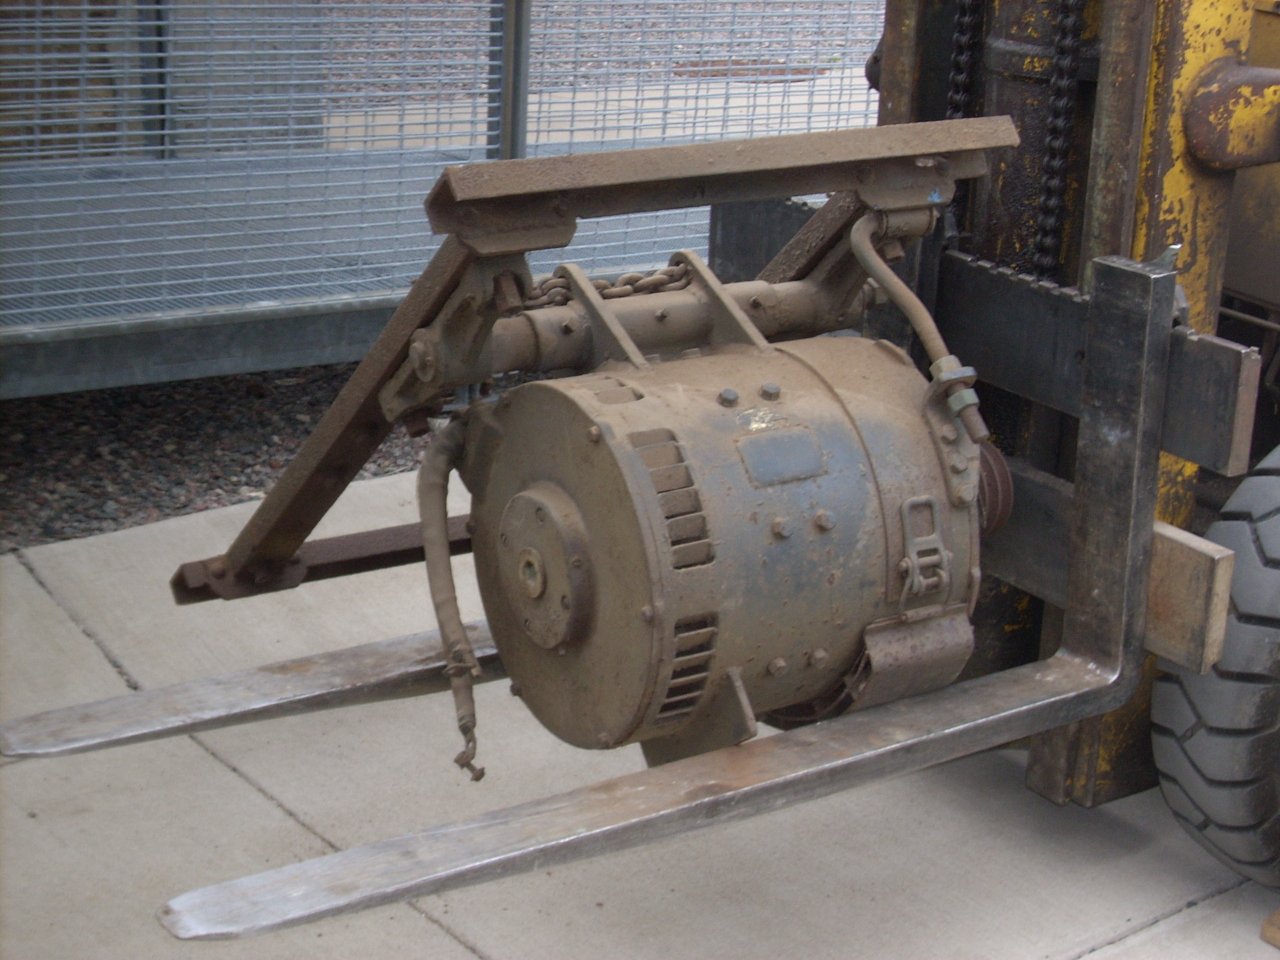
I also enjoyed the vendor room. Several vendors I've done business with before were there, and a couple new ones as well. I got to meet Mr. Stauffer, of Stauffer Diesel Co. (Stadco generators.)
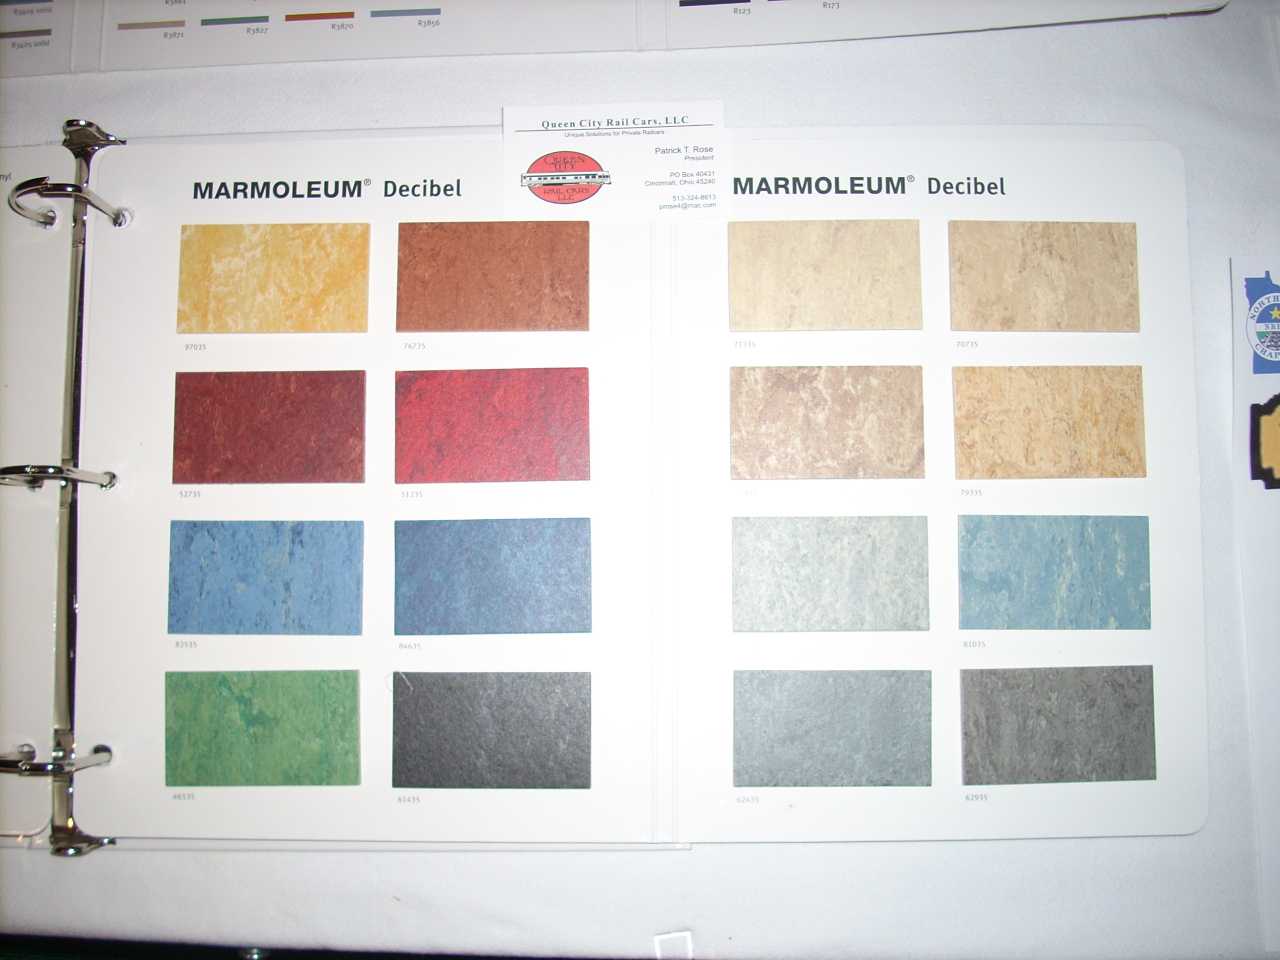 | Queen City Rail Cars, L.L.C. is selling Marmoleum flooring. |
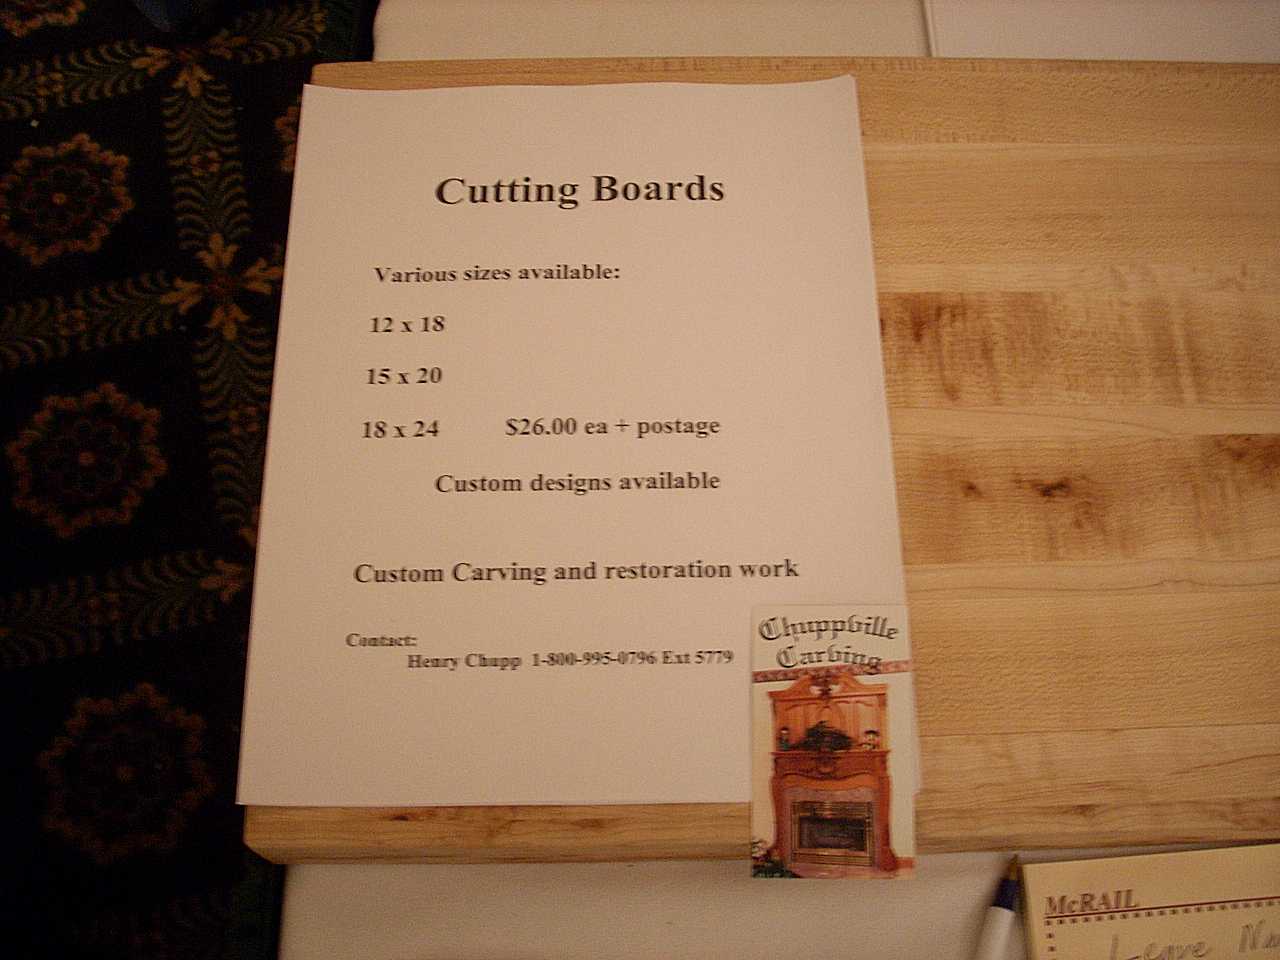 | Henry Chupp, of Chuppville Carving, had cutting boards available. Seeing an opportunity, I engaged him to create a built-in cutting board for 1146's kitchen. (Missing.) |
The last Sunday in January was unbelievably warm. I opened the garage door and spent the afternoon doing parts work.
 | One project was filling all the little dings and dents in the men's room door. (Still stripping the women's.) For sanding, I've found a Porter-Cable profile sander with vacuum attachment which gets into corners nicely. |
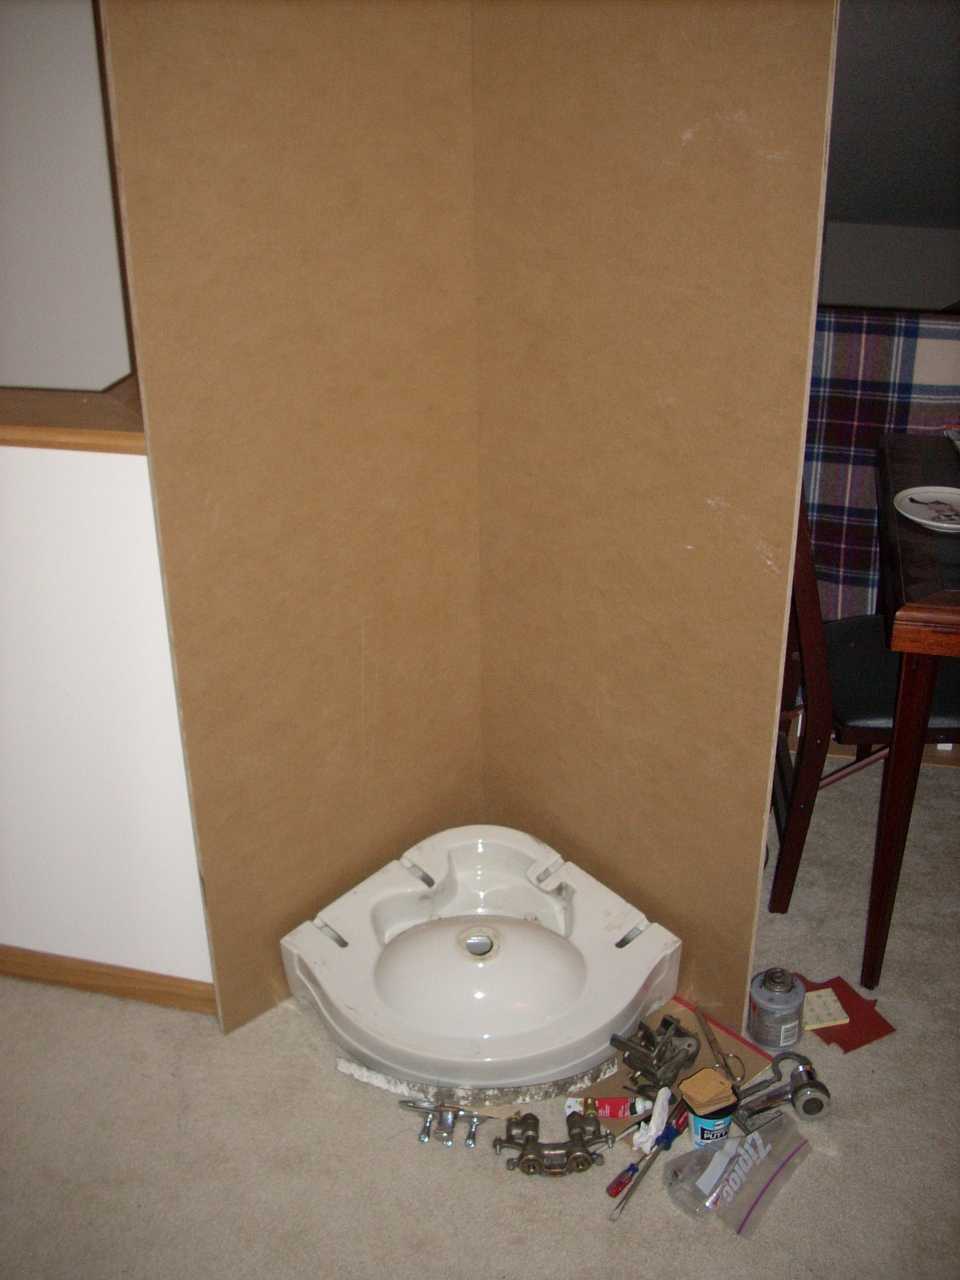 | Another was turning 1/2" sheets of Medium-Density Overlay (MDO) into imitation restroom corners. Admittedly a waste of time, my purpose is three-fold: Experiment with MDO as a wall material (as was done in the restoration of NYC "Hickory Creek"), keep restroom parts together so they don't get lost, and pre-assemble the plumbing. |
 | I also tried a stainless cleaner on a lavatory surround. The product is Stainless Clean, from Walter, which I found at Mississippi Welders Supply. It can be used in food plants, but read the MSDS. |
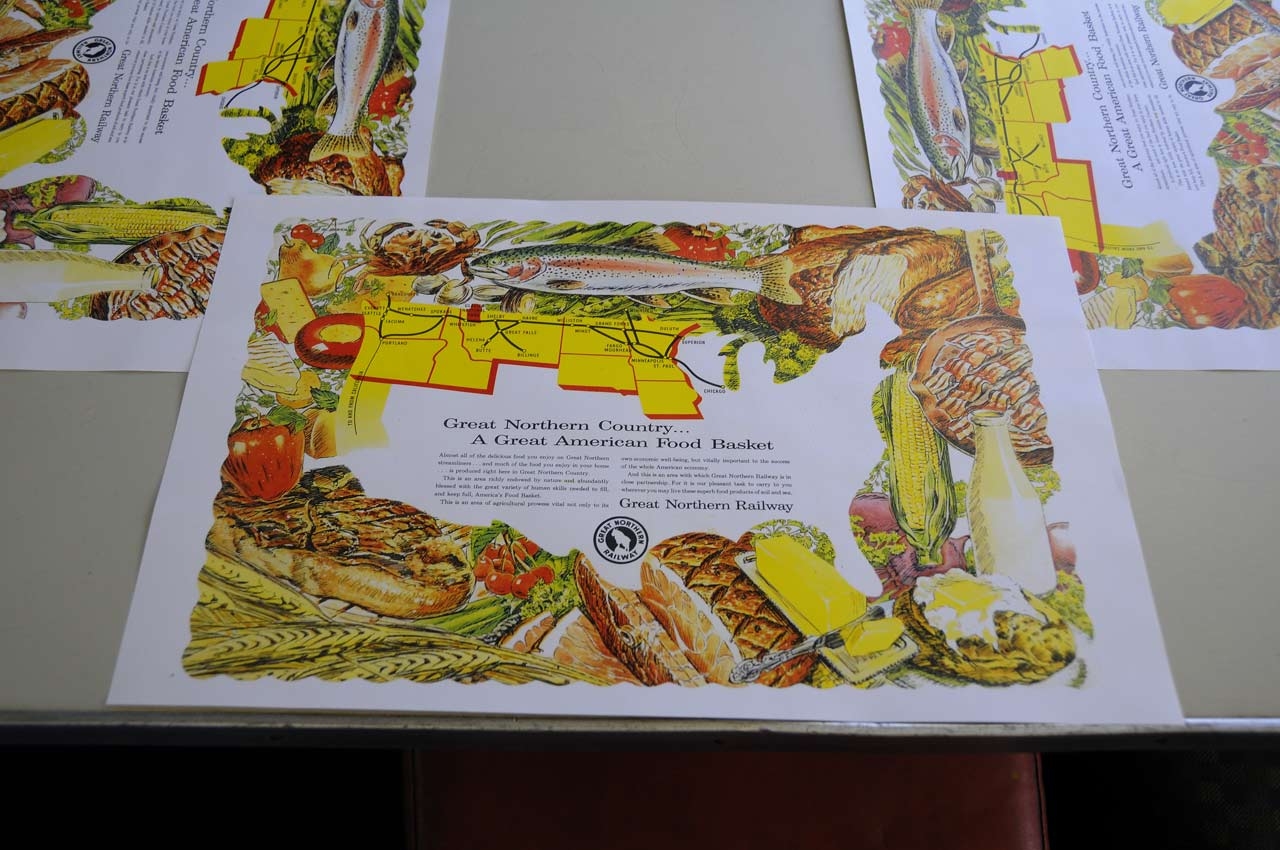
 | This is cool: A Great Northern placemat I found on e-bay. It's colorful enough, I could see getting reproductions made for a dining service. |
I just updated the Parts Wanted page, taking advantage of the 1116 pictures and other recent finds. Please visit and, if you have anything that will help restore 1146, drop me a line!
I've also added a Seminars page, which has the slides from the seminars we presented at the 2008 RPCA conference. It joins the Tech Pubs page, which has the technical publications scans which were on the CD we handed out. All of this information is presented as a service to others who are restoring and maintaining this neat old equipment. I don't profit in any way, and the equipment and publications are no longer available from the manufacturers.
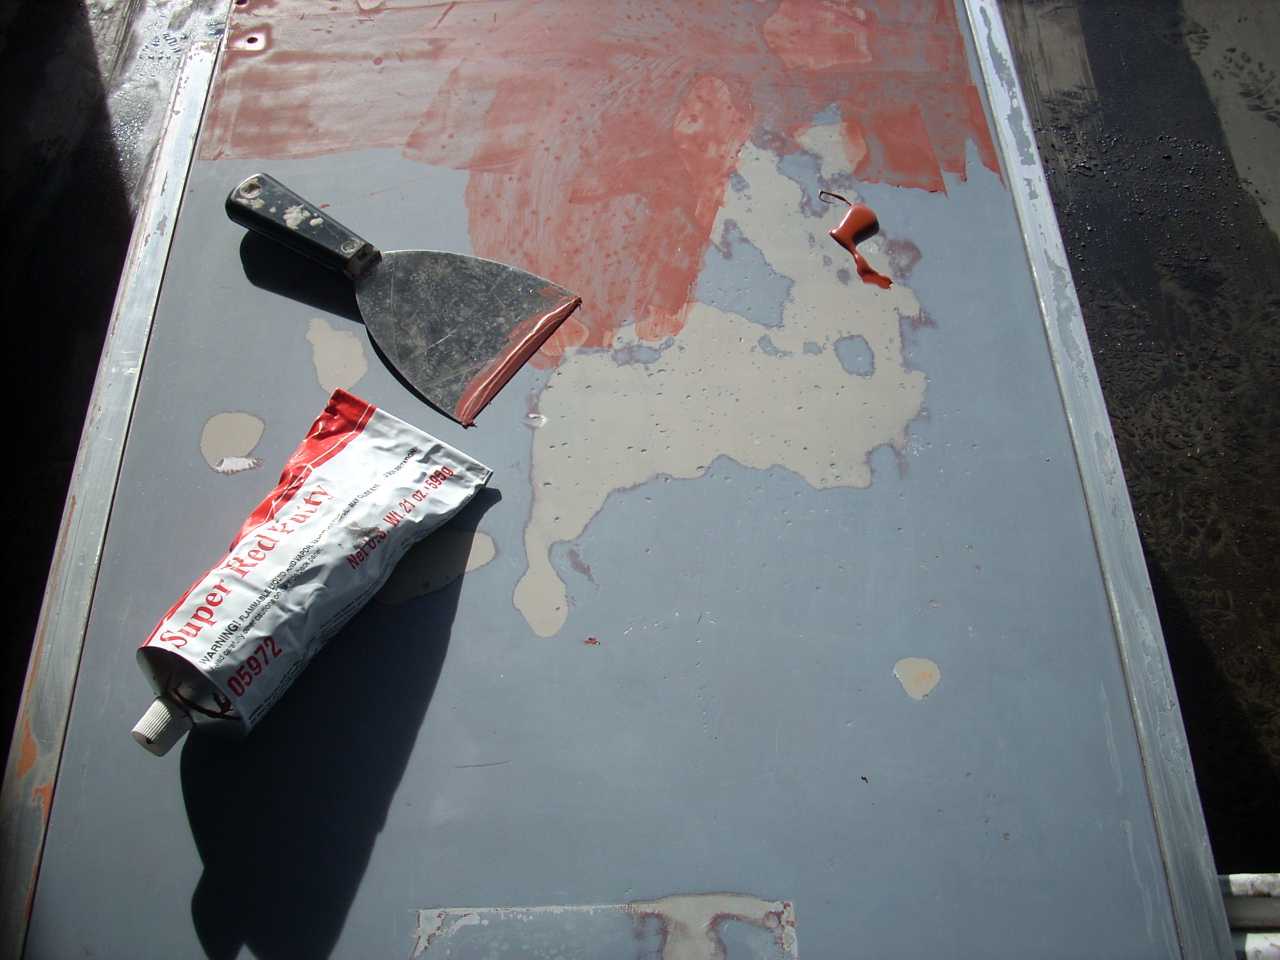
Puttying dents in restroom doors and cleaning lavatory surrounds continues. I've decided the solvent-based putty has two problems: It shrinks as it dries, making numerous coats necessary, and it stinks. I'm told that lightweight polyester putty - a variation on Bondo - doesn't suffer the shrinkage problem so the job is done more quickly.
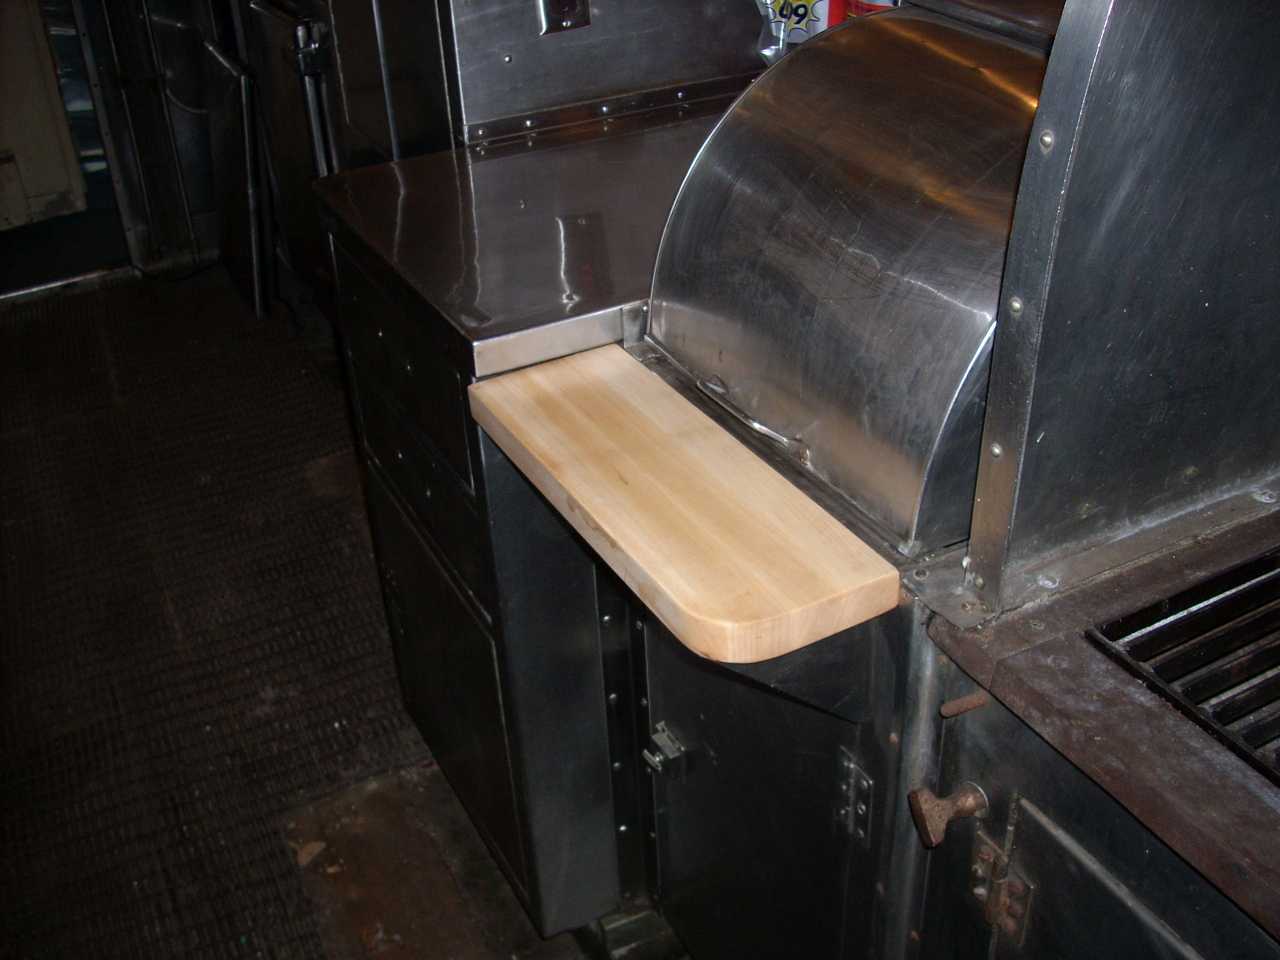 | Henry Chupp came through on the carving board for the kitchen. I sent him copies of the ACF drawings and photos of the mounting brackets - with a tape measure stretched out - and he sent this excellent custom Maple carving board. I installed it with brass wood screws, and here you see the results. Henry is a railfan, so we both enjoyed this project. |
Collision post engineering progresses. From time to time my engineer has a question, which I try to get answered in a timely fashion. (Editorial - he probably doesn't think I'm very quick.)
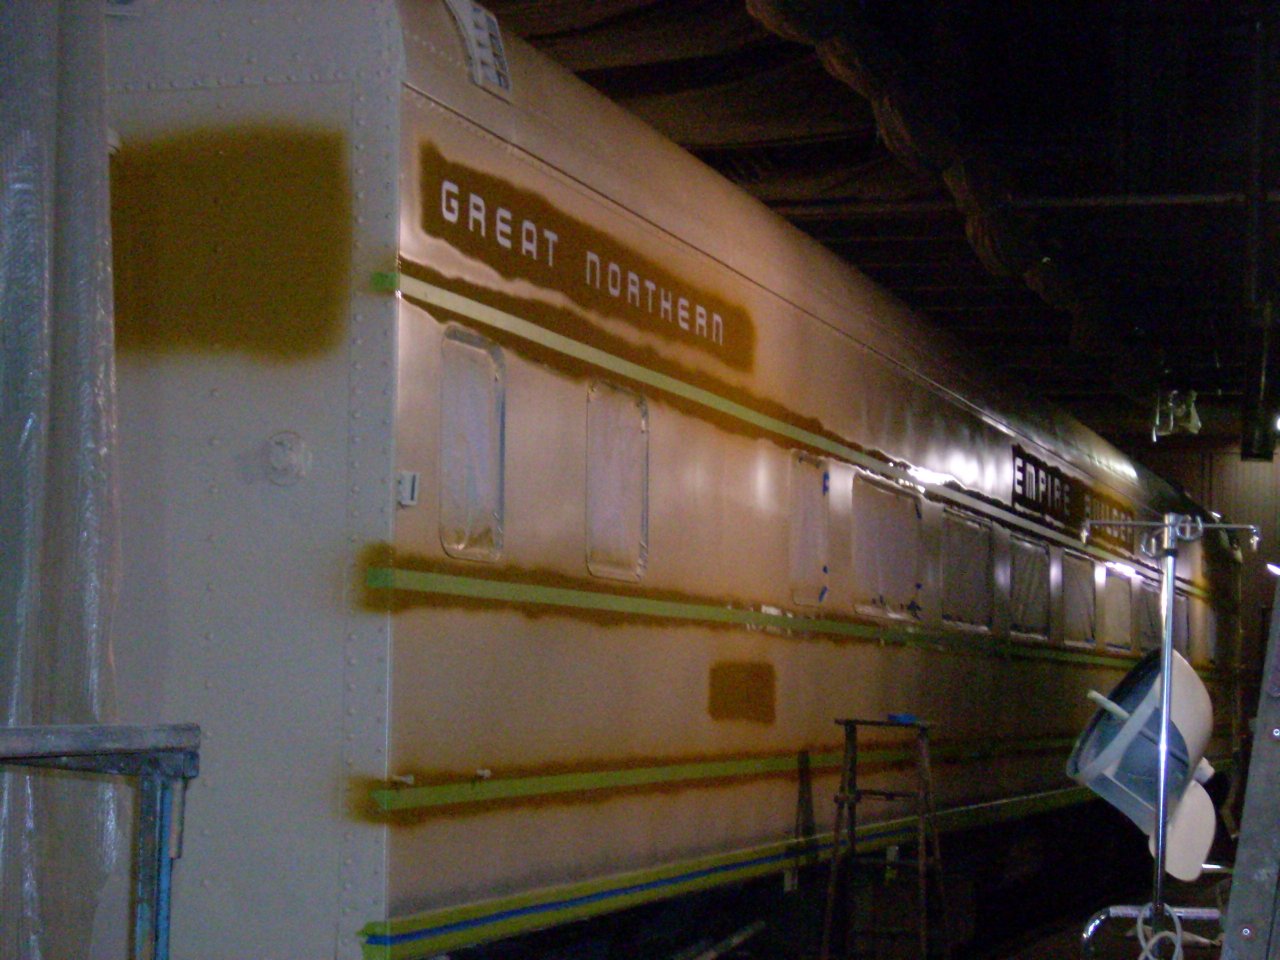
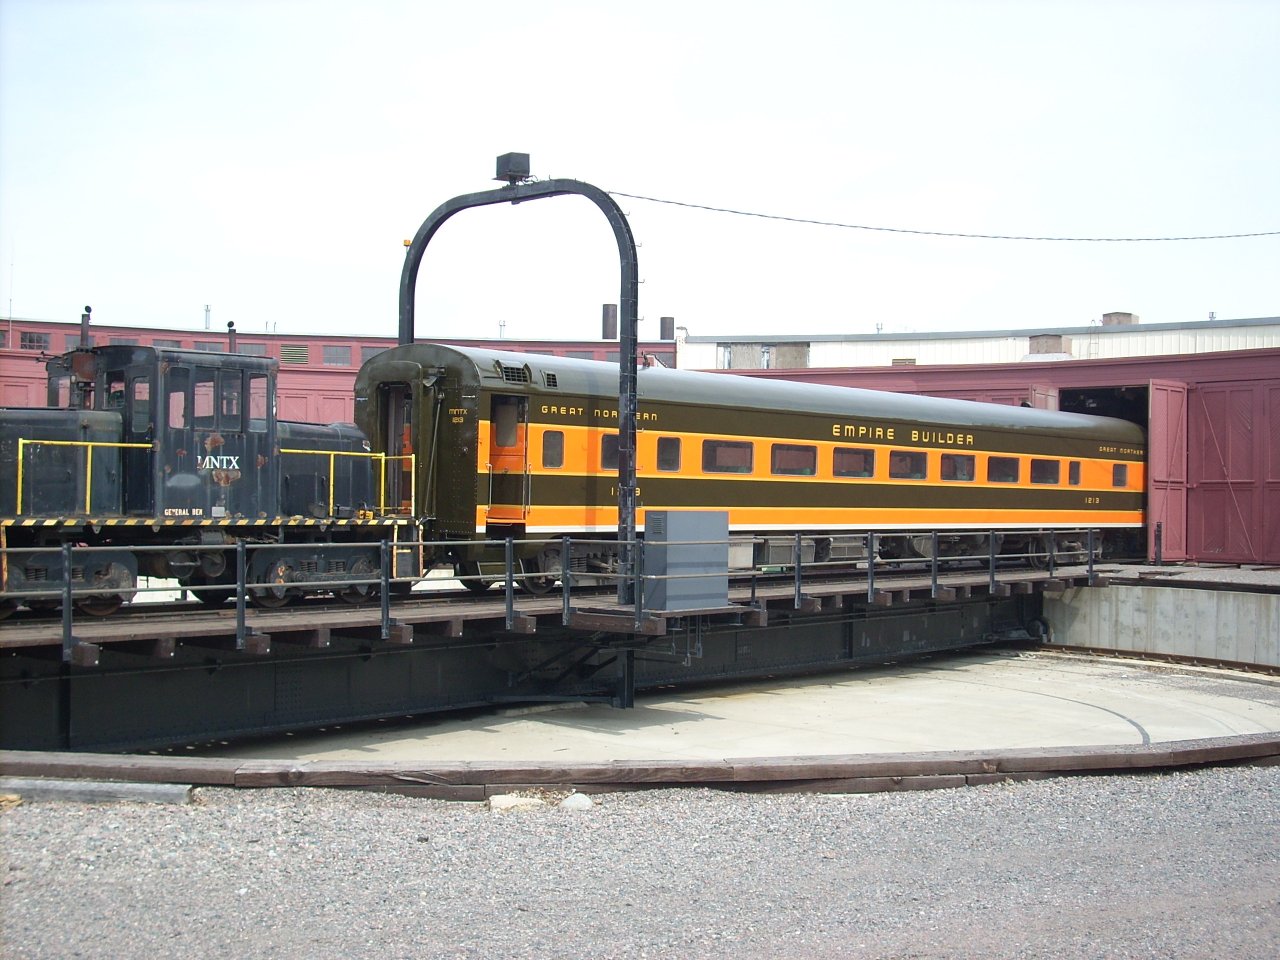
 | If you wonder why I'm not getting much done on 1146, here's the answer. Over 50 hours on MTM's GN 1213 in February alone. We're having to replace much of the sheet metal around the BR vestibule steps. I think I went a little nuts with the simulated rivets... |
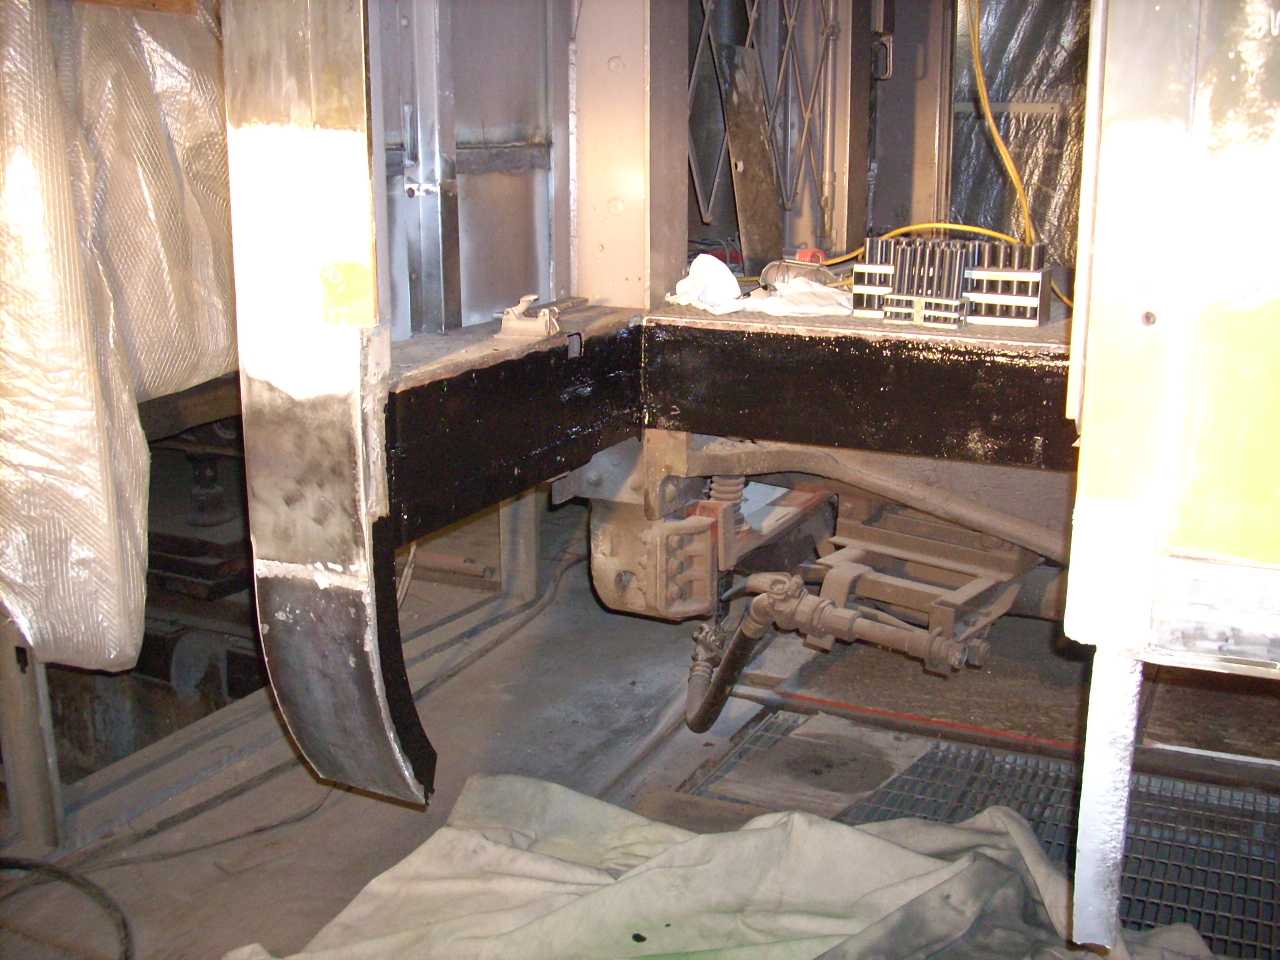 | 1213 and 1146 were both built by ACF for the GN, one year apart. Structurally they are almost identical. That's handy for me, as any problem solved on 1213 applies to 1146 as well. Lucky for MTM that 1213 is in much better shape - there were still large areas of primer in the areas I painted black (POR-15,) and check out that collision post! |
Engineering is complete for the collision post repair, and a copy of the drawings and existing material analysis has been sent to Harold Weisinger at Amtrak. It will take me a little while to digest and understand the next step.
I found another correct Kitchen ceiling light lens on eBay.
GN 1213's imminent paint job has had me studying paints. Many happy hours were spent reading about DuPont's Duco, DuLux, and Imron products. The chemistry is fascinating. (Did you know Duco - the oldest - is a chemical cousin to gun powder?) I compared PPG and DuPont automotive finishes, DuPont's industrial Imron 333M - which I have used to touch up locomotives after repairs, and ultra-low VOC water-borne finishes. I concluded that DuPont's Imron 3.5 HG (formerly 333M) would give a very durable high-gloss finish at a competitive price. Admittedly, my prior experience with 333M and some bad experiences with cheap urethane enamels have created a bias. Happily, DuPont has eliminated lead and chromates from the formula. I opted against a basecoat/clearcoat system, because with the square footage of a passenger car, time constraints, and a naturally dusty environment, the chances of making the clearcoat stick seemed low.
Once the finish paint was chosen, using the recommended primer is natural. I selected DuPont's Corlar 2.1 ST epoxy primer, in stock color "Clay Tan". Epoxy primers work well for sealing bare metal surfaces, and "Clay Tan" was closest to the Gold and Gray pin stripe colors, which will be applied first. On DuPont's recommendation, it will be thinned 10% to 20% to avoid an orange-peel texture.
Google searches:
Tan-colored 3M automotive seam sealant 08300 will be used to caulk all exterior seams (namely around rooftop vents) before spraying the primer.
In the past, MTM has used 3M Scotchlite Gold (580-64) and White (680-10) for the pin stripes and lettering. Shelf life is two years (or it will peel) so any stock on hand is useless. A fellow volunteer and retired 3M employee has tried to locate a source, but apparently it is out of production? Update: A local sign/graphics company can still get it, so I suspect 580 is replaced by 680.
Our upper-midwest DuPont sales rep., Mr. Thomas R. Kluver, has been absolutely wonderful. Armed with only four DuLux paint codes from 1951, he had people at corporate cross the colors to the current Imron 3.5 HG base. Then he had paint chips made, and supplied tech specs and material safety data sheets.
Primer:
| Color | Corlar 2.1 ST | Sq. Ft. | Gallons | $/gal | Ext. |
| Clay Tan | LF63525P | 2500 | 6 | $51.10 | $306.60 |
| Hardener | VF525 | 2500 | 6 | $51.10 | $306.60 |
| Reducer | Y32035 | 2500 | 3 | $20.20 | $60.60 |
| Total | $673.80 |
Finish colors:
| Color | DuLux | Imron 3.5 HG | Sq. Ft. | Gallons (Short) | $/gal | Ext. |
| Pullman Green | 88-4558 | 1547-42P | 2150 | 5 | $97.00 | $485.00 |
| Omaha Orange | 88-35617 | 31U-42P | 290 | 1 | $123.00 | $123.00 |
| Imitation Gold | 95-056 | 3292-42P | 42 | 0.75 | $59.50 | $44.63 |
| Aluminum Grey | 88-8343 | 38N-42P | 21 | .25 | $51.70 | $12.93 |
| Hardener/Activator | VGM6005 | 7 qt. | $27.80 | $194.60 | ||
| Total | $860.15 |
I must point out: Observe all safety precautions - especially using an approved respirator and eye protection with side shields - when applying any railroad finish.
 | This "Empire Builder" painting diagram is from MTM's collection. I took the DuLux paint codes in effect at the time 1213 was built, and asked DuPont for current Imron equivalents. |
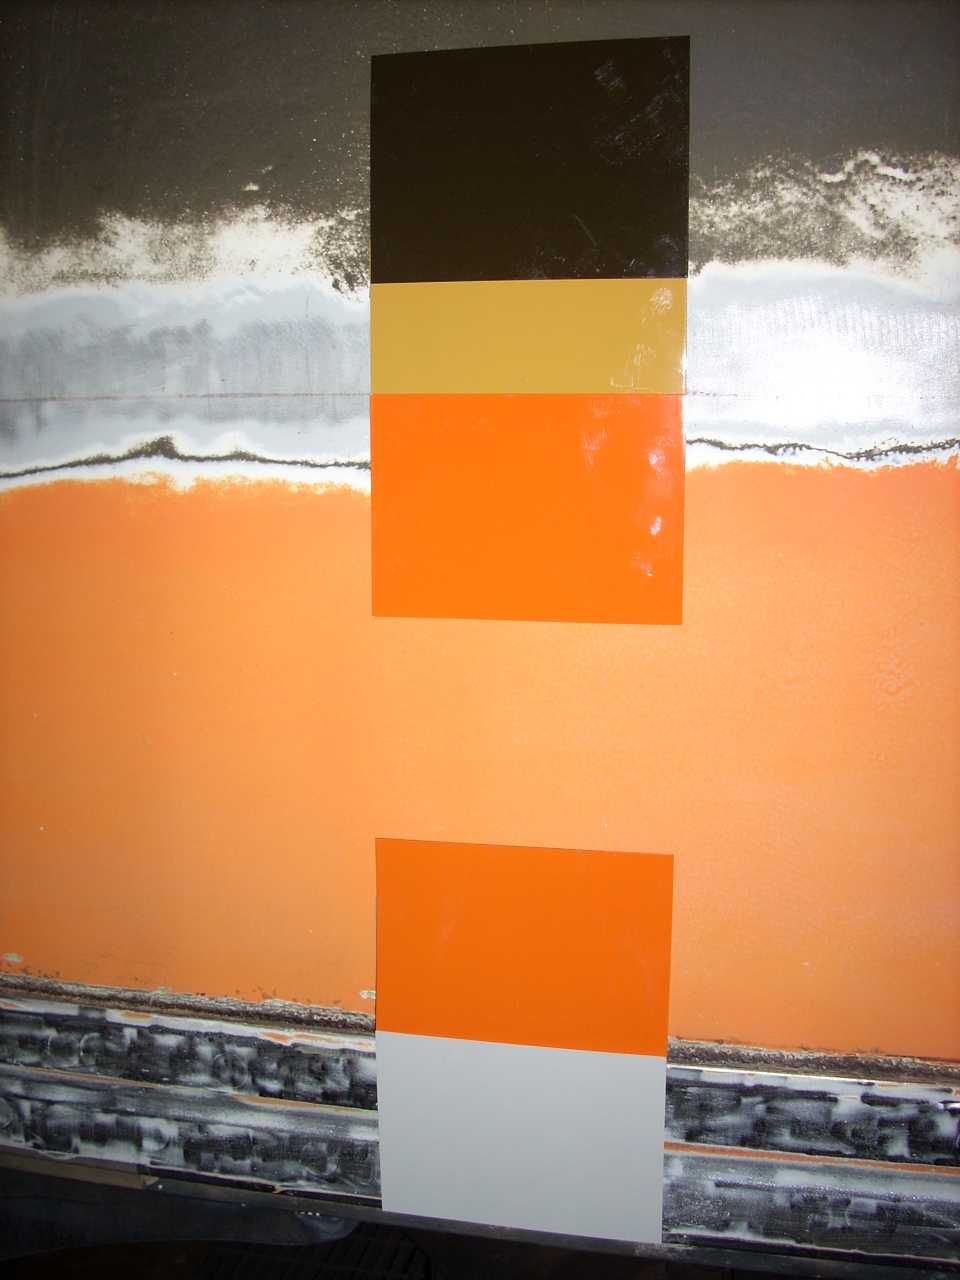 | The DuPont Imron 3.5 HG paint chips, taped to the side of GN 1213 to judge the effect. The grey looked way too dark at first, but a close look at early color photos shows a distinct grey cast to the "white" pinstripe, while later photos are definitely white Scotchlite. |
Lettering GN 1213 was done using removal vinyl stencils, cut by a sign maker and supplied on transfer paper to maintain proper alignment and letter spacing. The font is Ben Coifman's "Empire Builder Font 1.2". The capital letters in the standard font compared best to GN lettering blueprints. Letter spacing is equal to the letter height, although the "P", "T" and "L" have negative space which requires a closer spacing to look right. This kerning (tweaking the letter spacing) was done by hand with GN "In Color" books for reference. Word spacing is three times letter height. I was startled to notice the GN changed the letter spacing at some point. There were wide- and narrow-spaced versions applied. I used the wide spacing on 1213. The "L" had to be changed - in car names it has a rounded corner, but in "EMPIRE BUILDER" it has a square corner.
It is also interesting that there is no standard height for the pin stripes. The best rule of thumb I've found is to put gold stripes two inches above and below the window cutouts. Adjust everything above and below to fit. Lettering is always centered vertically between stripes. In the 1951 Empire Builder, the ACF and Pullman cars have different window heights! The Pullman car's windows are installed about 3/4" higher on the car.
For my own future reference, here's what worked, and mistakes to avoid:
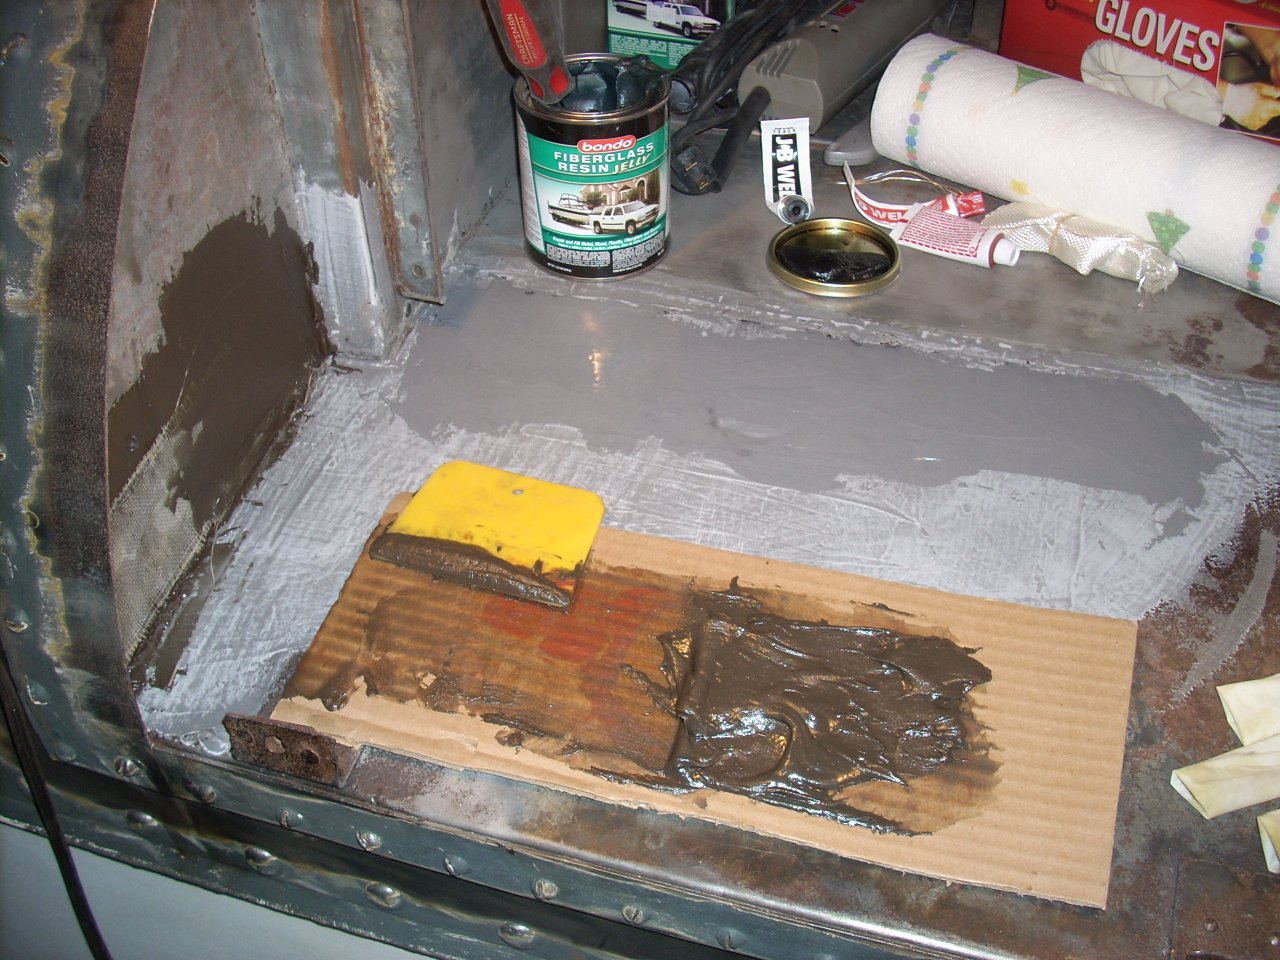
 | Make necessary repairs first. If not sandblasting, wash old paint job then scuff with 2nn- to 3nn-grit in a dual-action sander. A DA sander with a vacume attachment and a HEPA filter in a shop vac work great. Bondo for a smooth surface. MTM's body man prefers to start with waterproof fiberglass-reinforced over welds and holes, lightweight bondo, and lightweight polyester putty. |
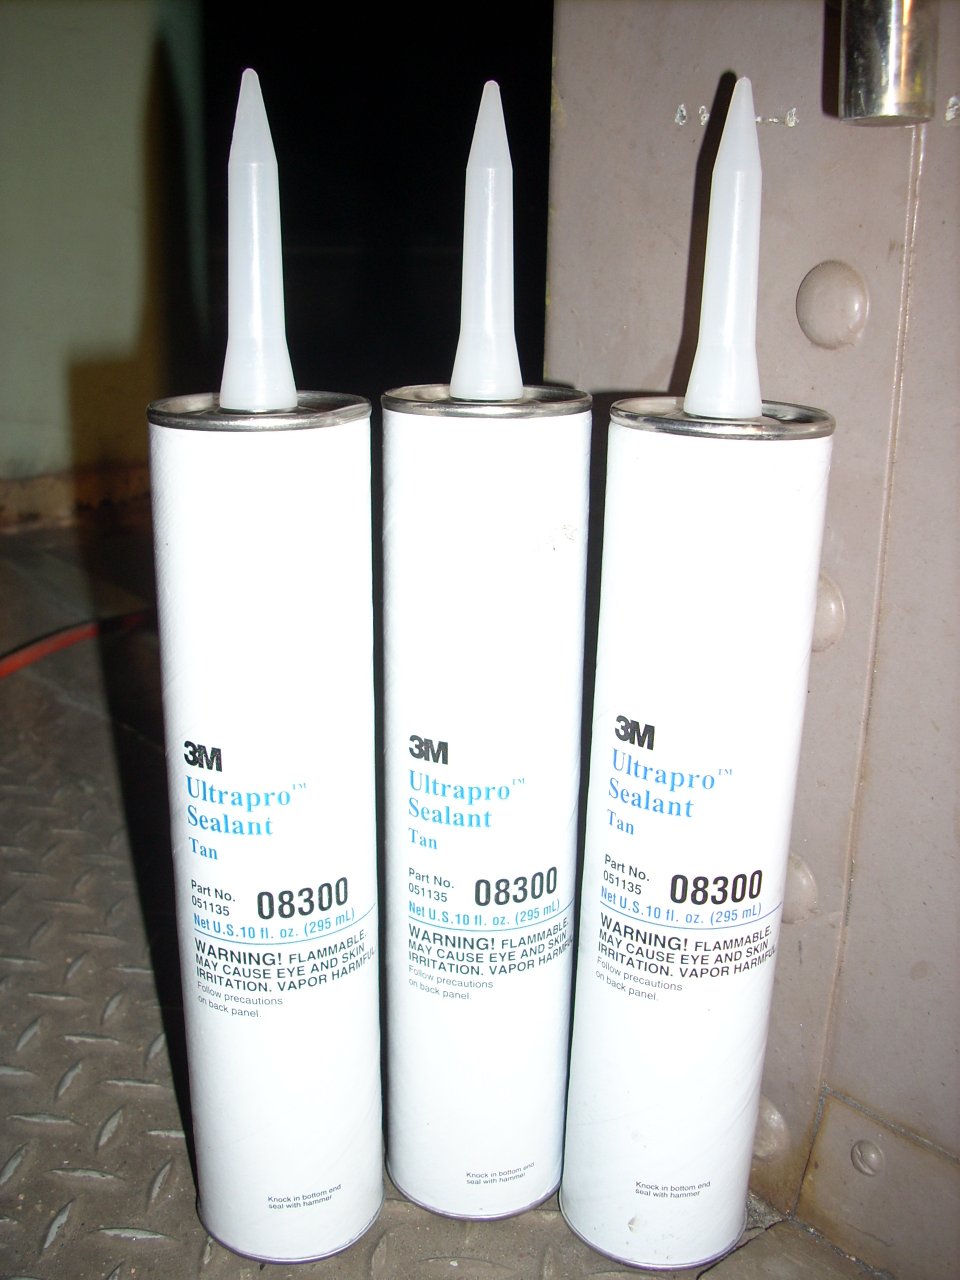 | Use an automotive seam sealant to caulk around all rooftop vents, burn-throughs from other people's welds, and generally any place water might enter. Do not use any Silicone-containing products prior to painting! |
 | Sandblasting dust sticks to the metal - especially horizontal surfaces. Compressed air will remove some, but it really needs to be hand-wiped. Also clean crevices thoroughly with compressed air, or the paint sprayer will do it. 3M blue and green painter's tape both work well. Green is better where paint must not leak under the tape edge, while less-tacky blue is better if it will be there for a while, or there are concerns about the prior paint job lifting off with the tape. Any kind of paper makes good masking. If window gaskets are bad, or there are rust problems underneath, loosen the window and pull the gasket. Remember to tape around the window on the inside to prevent spray-through! My HVLP gun came with a 1.3 tip - too small for the rather viscous Corlar primer. Next time I'll try at least a 1.6. Don't dry after washing with a household mop. Use a tack cloth (non-woven rags) to remove lint instead of painting over it. When painting a large vertical range, a step ladder works great. Good lighting and high-contrast paint colors help one achieve proper coverage. Hide wet-to-dry paint "joins" along natural body lines or in narrow areas whenever possible. |
 | Regulations prohibit paint on couplers. Use old bolts to keep paint out of safety-appliance bolt hole threads. To avoid paint runs in complicated areas, first spray into the corners and crevices, wait a few minutes, then spray the surrounding flat surfaces. I like the 3M PPS system, which replaces the gun's open-top paint tank with a bladder, allowing it to be used in any position. |
 | I applied colors from lightest to darkest for best coverage. Striping and lettering locations were marked with a "story stick" - which assumes either the top or bottom edge is straight - and a pencil. 2" green tape is actually metric and closer to 1 7/8". I've found the best way to get straight tape stripes is (1) tension!, (2) sight along the tape edge, (3) use the story-stick, and (4) always peel up a third to a half of what was just laid down. Green tape will accept and remember a curve. The lettering was computer cut vinyl 3M Scotchcal Marking Film, with a release adhesive. Work edges with a squeegee to seal. |
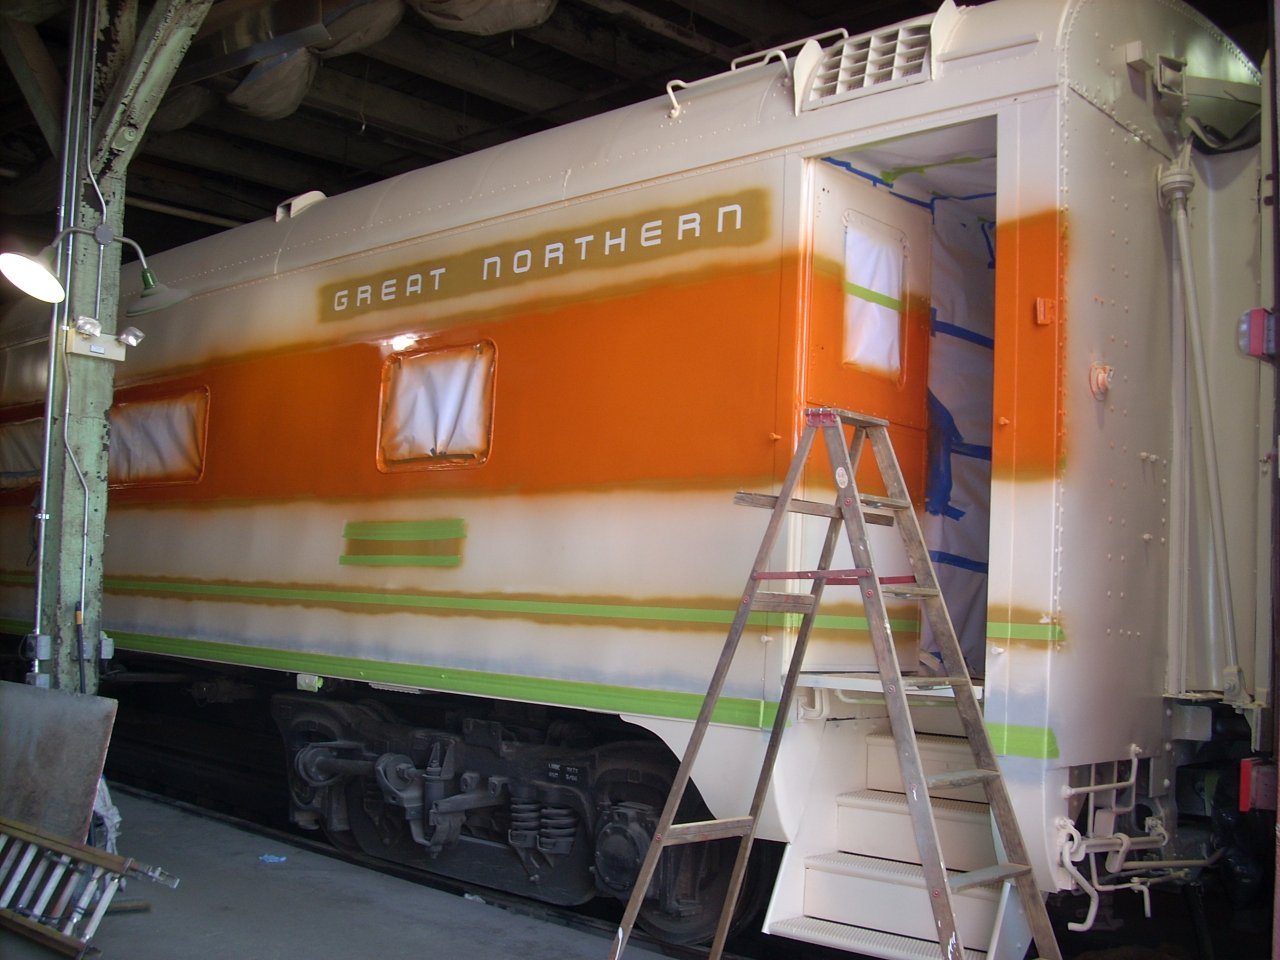 | Allow Imron to dry for two nights before masking over the top of it. If masking paper adheres to tacky Imron, let it dry a night or two then wash with water. Allow 80 to 160 working hours to paint a car. Welding, caulking, bondo and old paint prep add more. Wear a respirator good for organic vapors. Consider the respirator "used up" after 40 hours in free, moving air. Isocyanates have no taste or smell. Any high-gloss paint should be scuffed with 2nn- to 3nn-grit before painting over the top. MTM's body man recommends 3M 37447 red Scotch-Brite and 37448 grey for scuffing - will not tear tape or stencil edges. I should have use a primer closer in color to the gold, because I saw the gold through the orange unless I really laid it on thick. To get a thick coat without runs, lay down a thin coat, wait a few minutes, then lay down a thicker coat. Overlap each gun stroke by 50% to avoid tiger striping. If the gun cost a lot, always clean thoroughly after use. Cover hair and all clothing. I went through five "bunny suits", and badly stained one pair of canvas sneakers and several pairs of socks. |
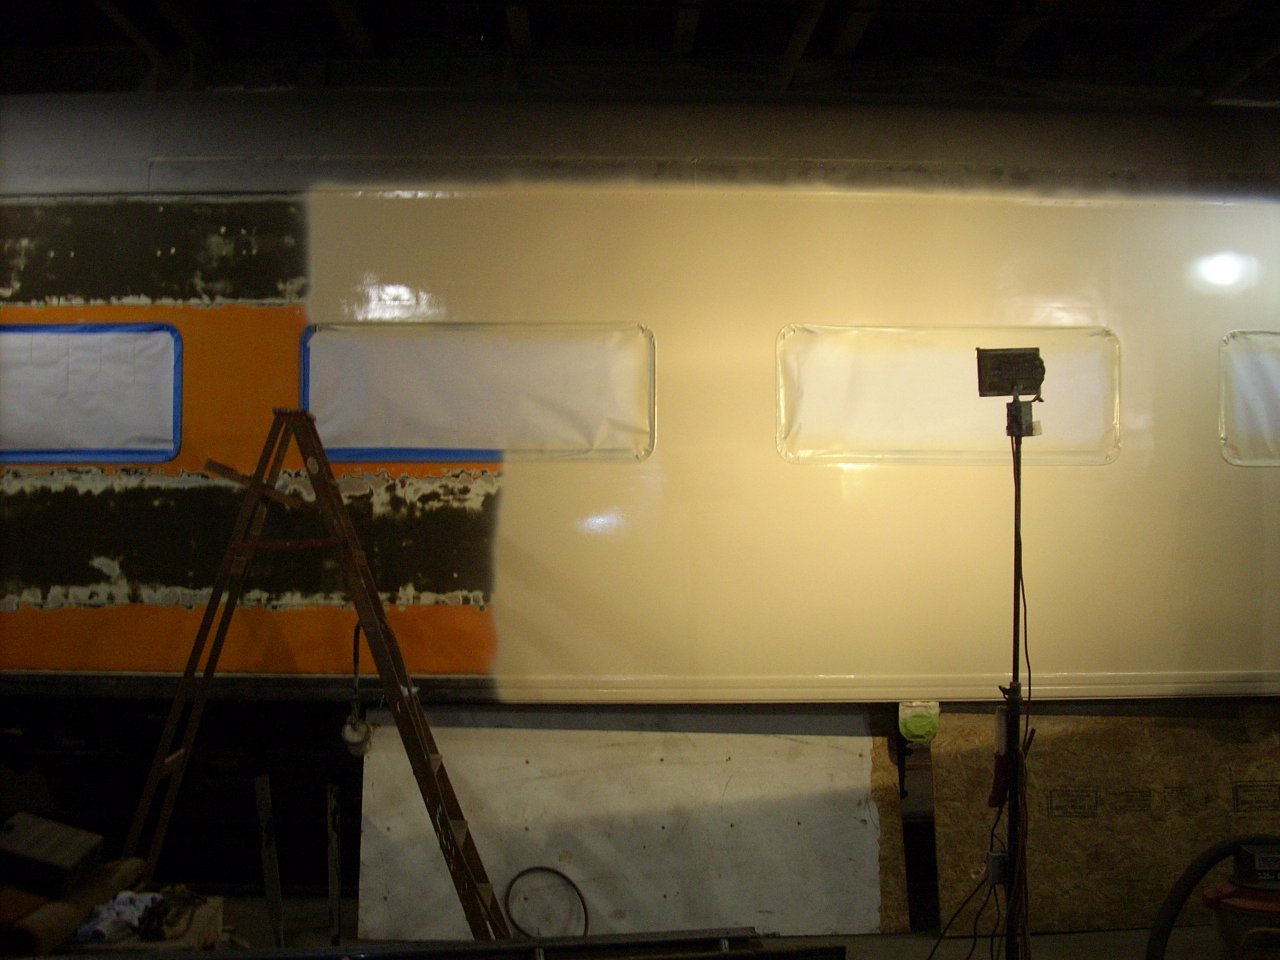
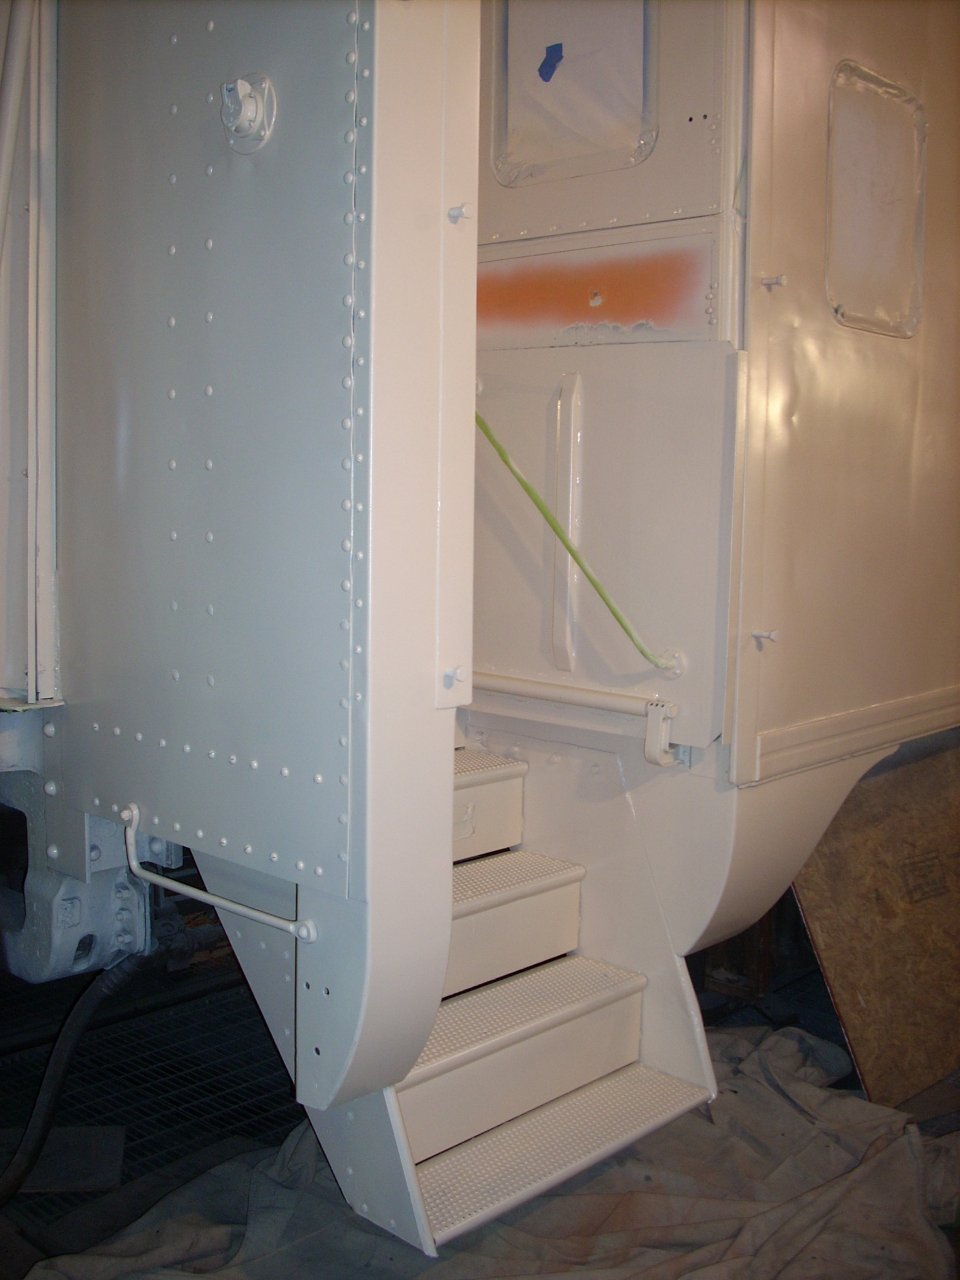
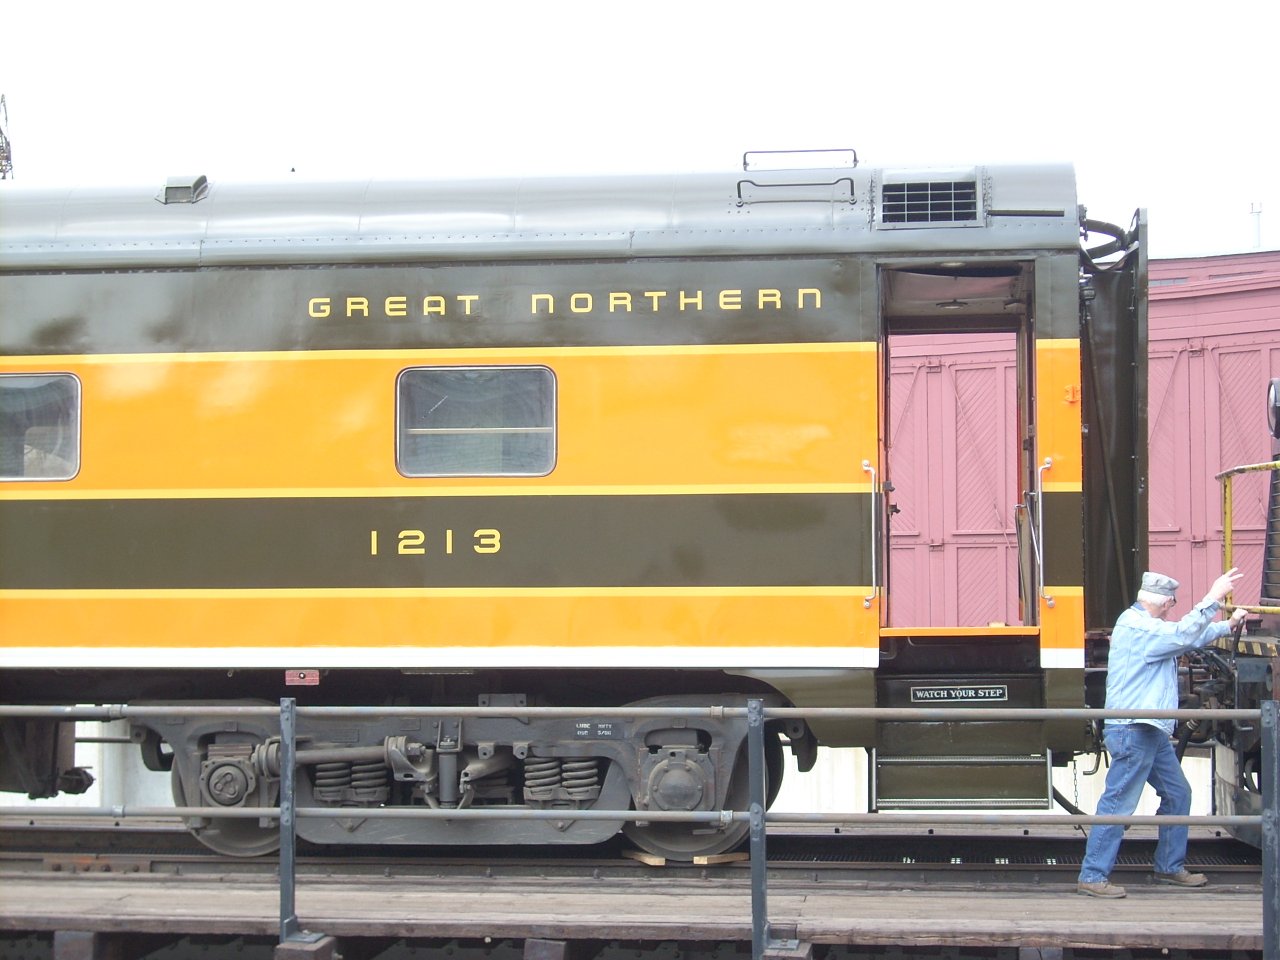
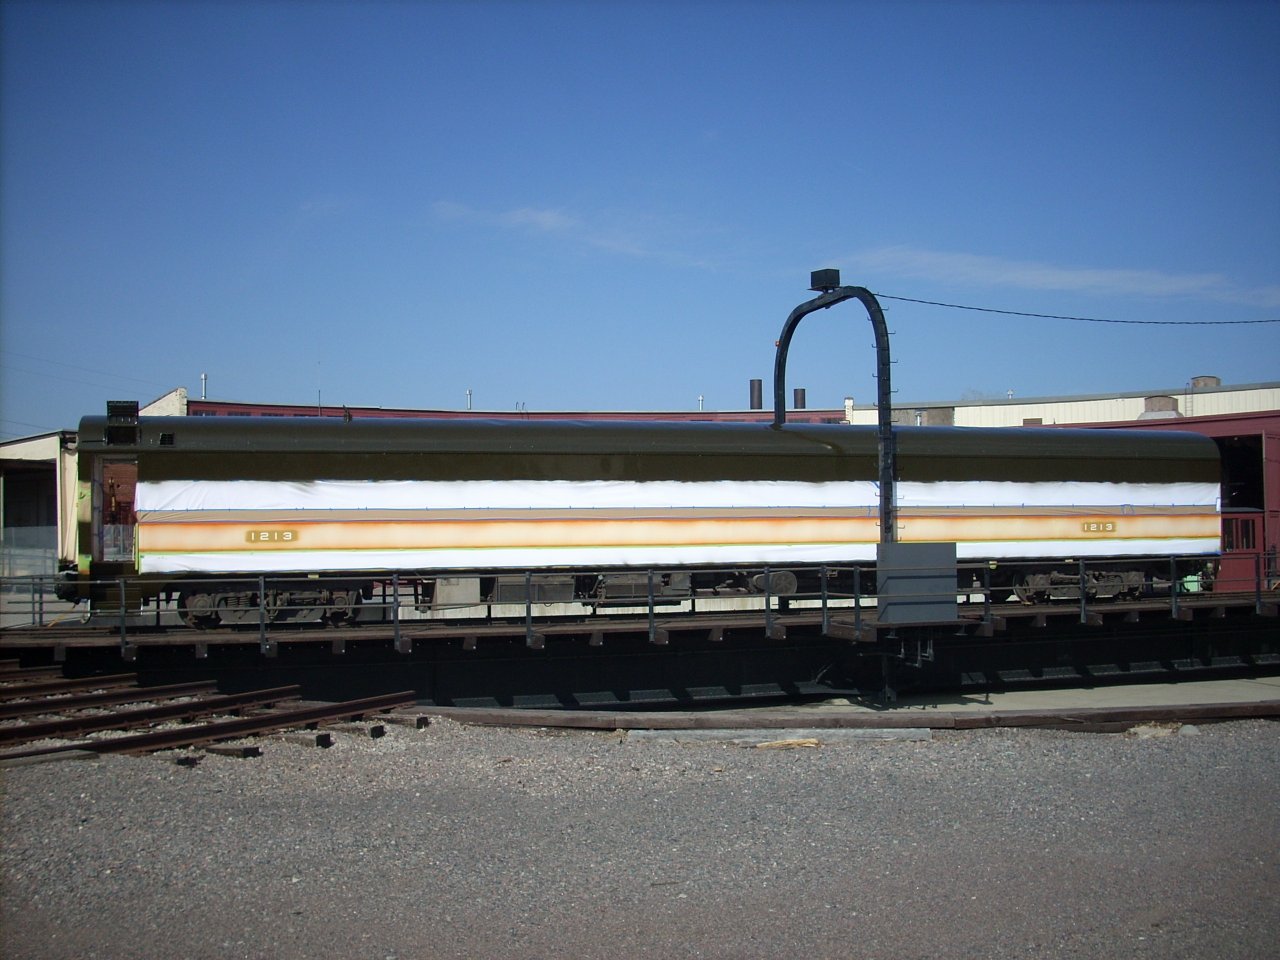 | With an assistant mixing paint and feeding me a steady supply of cups, and an old scissors lift, I was able to paint the roof and letterboards in one 12-hour day. There is a "wet" to "sorta dry" line down the middle of the roof, where few will see it. Always work from top to bottom, to keep the air hose out of the wet paint. I did three roof panels at a time, taking care to reach over to do a couple vertical strokes on the letterboard every so often. That kept a fresh "wet" line on the letterboard, with no unsightly dry joints. The "full wet" and "overspray" textures of the gold paint underneath are visible, suggesting I went to fast and did not put the green on thick enough. This picture was taken on a Wednesday, and the car had to travel the following Monday, so I was really hustling! There was not room for my lift of both sides of 1213, hence this spin on the turntable. |
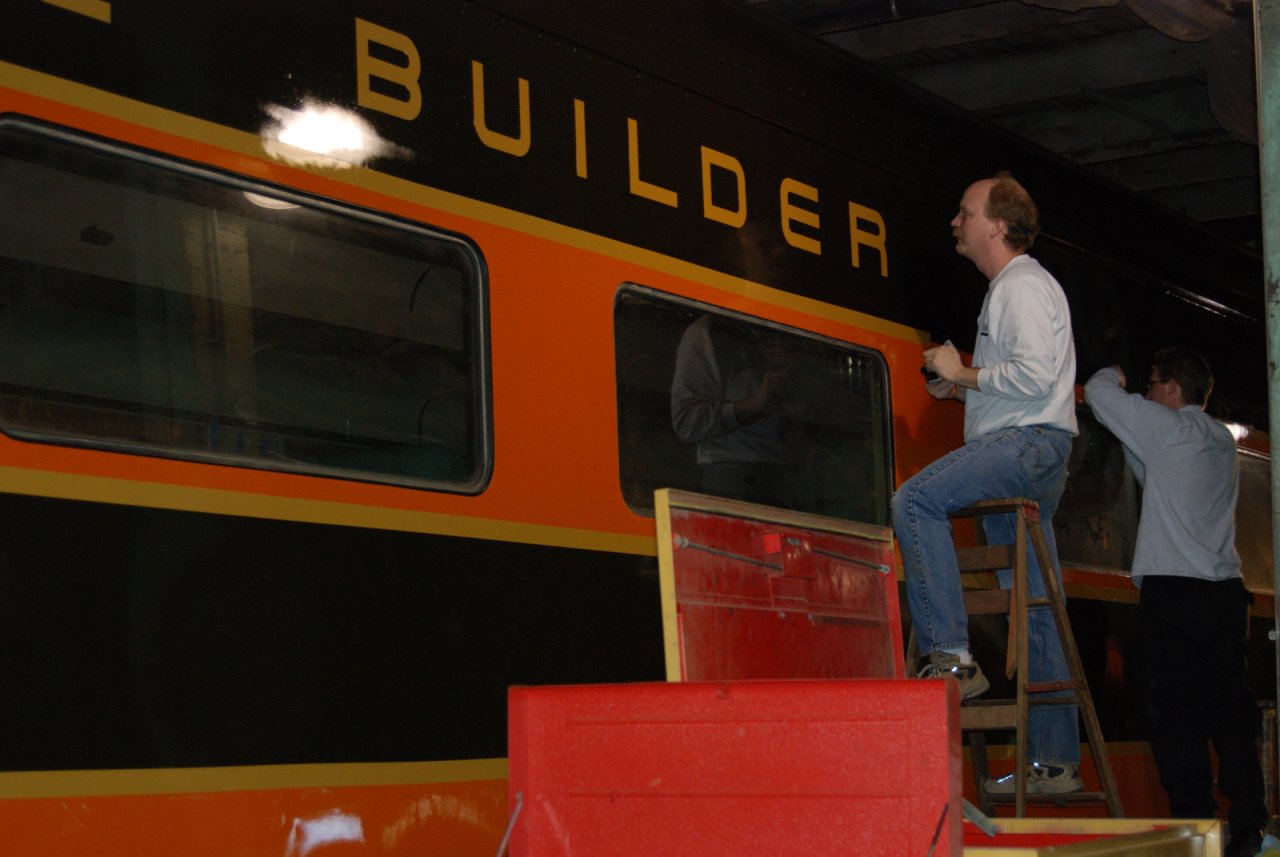 | The masking and stencils were removed (carefully) after the last Imron had set up over night. Then it was allowed to harden for another night. Fingernails work best when tape edges tear - and I'll use some WD40 later to remove stray tape adhesive. There were a couple heart-stopping moments at the ends when lifting the tape revealed twelve-year-old primer. Be able to mix small cups of Imron to fix mistakes with an artist's paintbrush. That's me on the ladder - photo by Ralph Back. |
 | Sunday the head honcho indulged my request to pose 1213 for pictures. I invited friends, and a reader of this journal was also there. (My apologies if I was a bit distracted.) Here 1213's new paint job rolls into the light of day for the first time. |
 | I like this detail shot. |
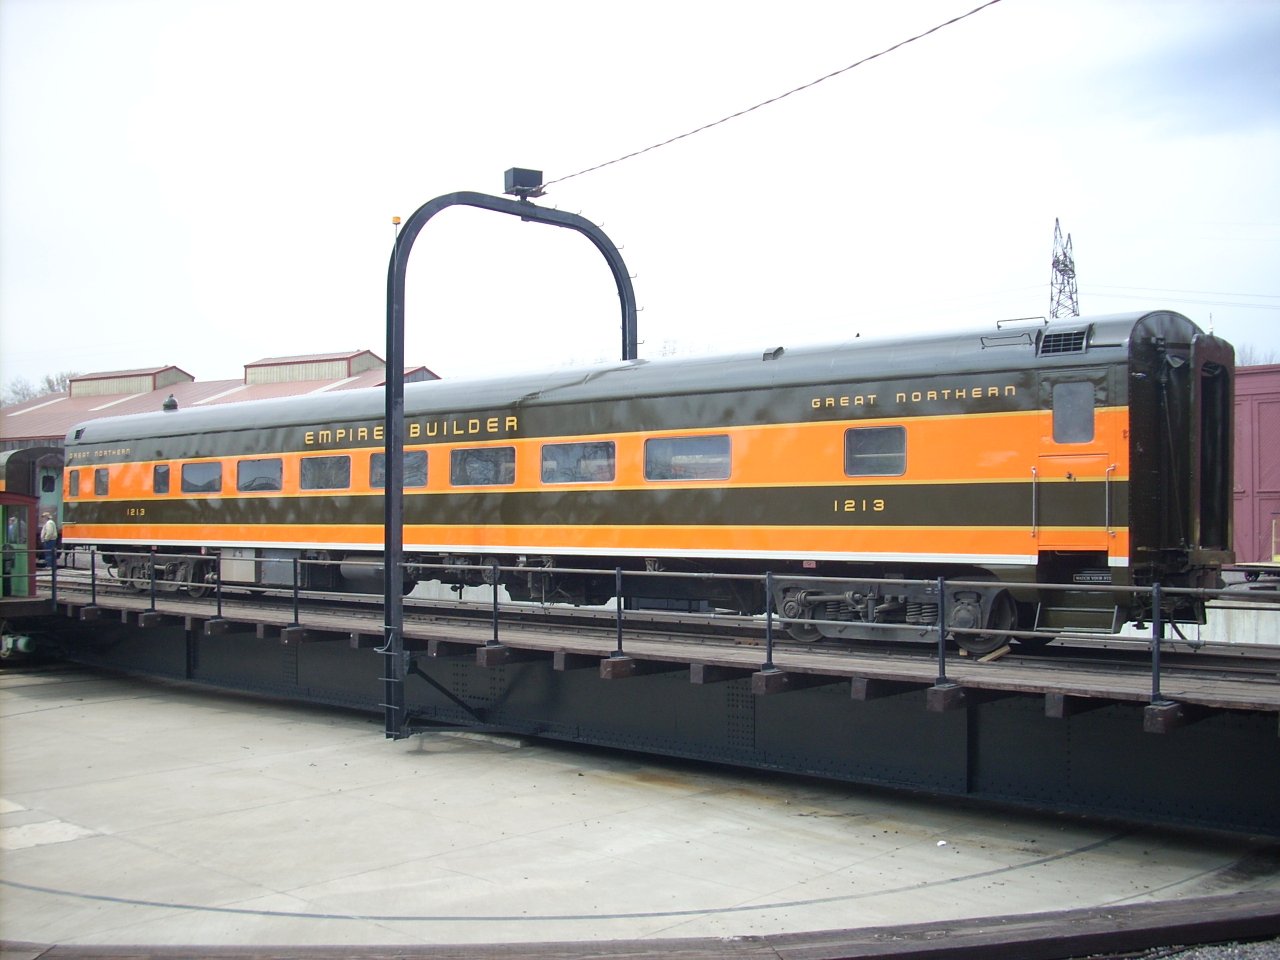 | This is the best "builder's photo" I got. The sharp-eyed may notice the generator is our for repairs. |
I had a little time for "token" work on 1146:
 | The kitchen now has a matched set of ceiling light lenses - I even have spares! Thanks to Ben Ringnalda. |
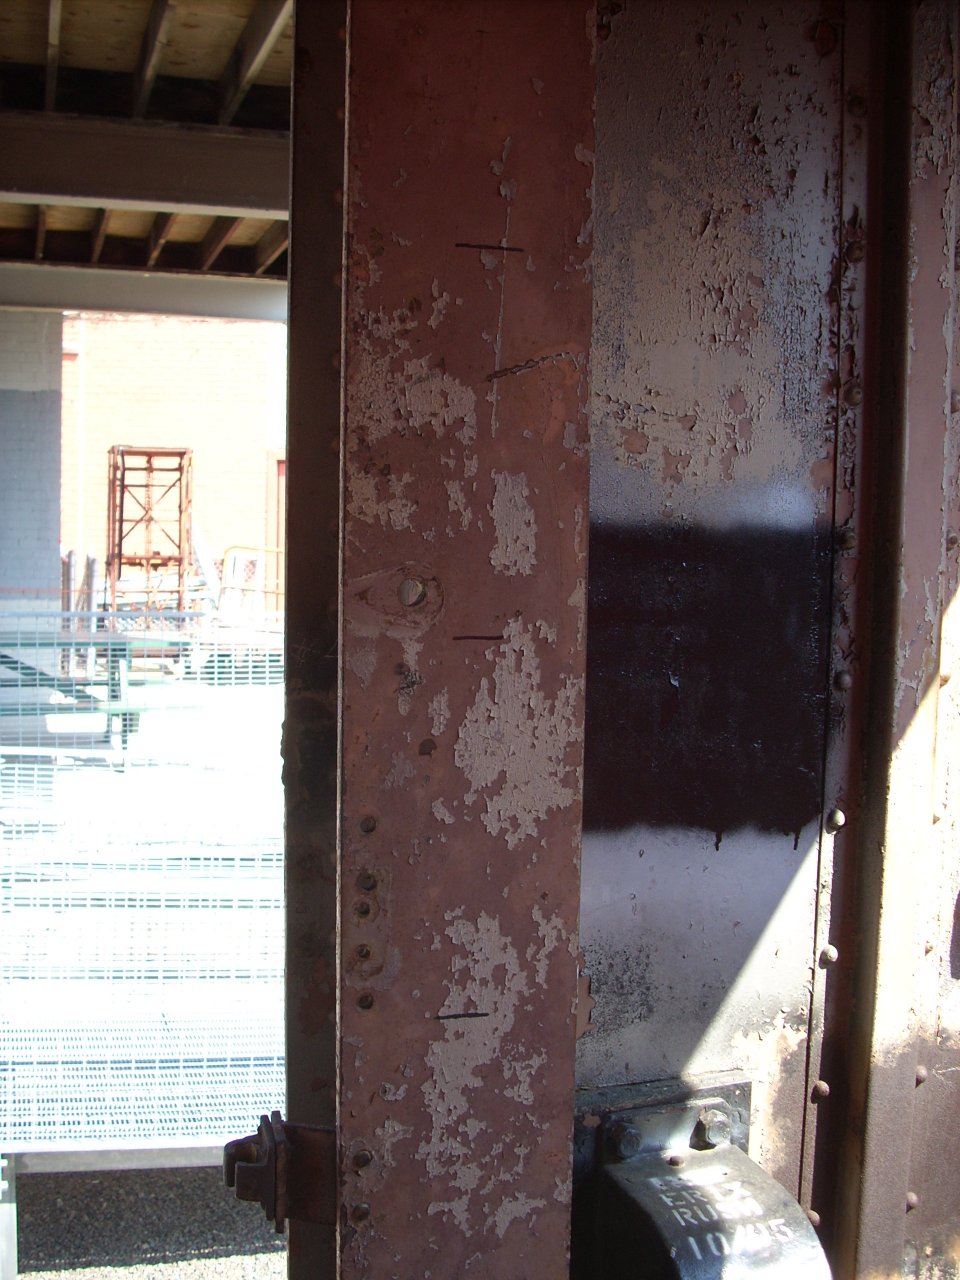 | I used a magic marker to visualize the collision post repair specified by my engineer. The center mark is where the old and new post sections join. The outer marks are the extent of the splice plates, which will cover both sides of the web and the insides of the flanges. The location is entirely above the shear plate and handbrake, but there will be some bolt holes drilled. |
 | A friend alerted me to an ACF sleeper that was being scrapped. (ACL "Manatee River", at the National Railroad Museum in Green Bay.) Hoping to find restoration hardware, we loaded tools and paid a visit. I found a few parts worth salvaging:
|
 | Memorial Day I continued removing air conditioning components. (Something I had started last October, after hashing out mechanical plans with Bob Jackson.) MTM has no spare A/C motors for 1213, so I'm trying to donate this to them. |
A reader asked about the finacial aspect of this project. He thought that would be great information for others who are considering a similar restoration effort. I prefer not to talk about my income, (if I were married and had kids, this project wouldn't be happening,) but don't mind mentioning major expenses:
Editorial comment: I've reached a very dangerous phase in this project (as far as the artifact is concerned.) Demolition to make way for the new is relatively easy. Putting things back together takes a lot more work, time, and money. Many people loose interest when they reach this point. To pull this off, I think one has to be crazy-in-love with trains, or able to pay someone else to do the work.
 | Every spring there is a real musty smell inside 1146. I've long suspected roof leaks, but haven't been able to find them. So after 1213 left, I requested the shop space to do roof work. I feel I should be doing collision post work instead, but roof work is cheaper - still paying off car loans - and necessary to stop the deterioration. |
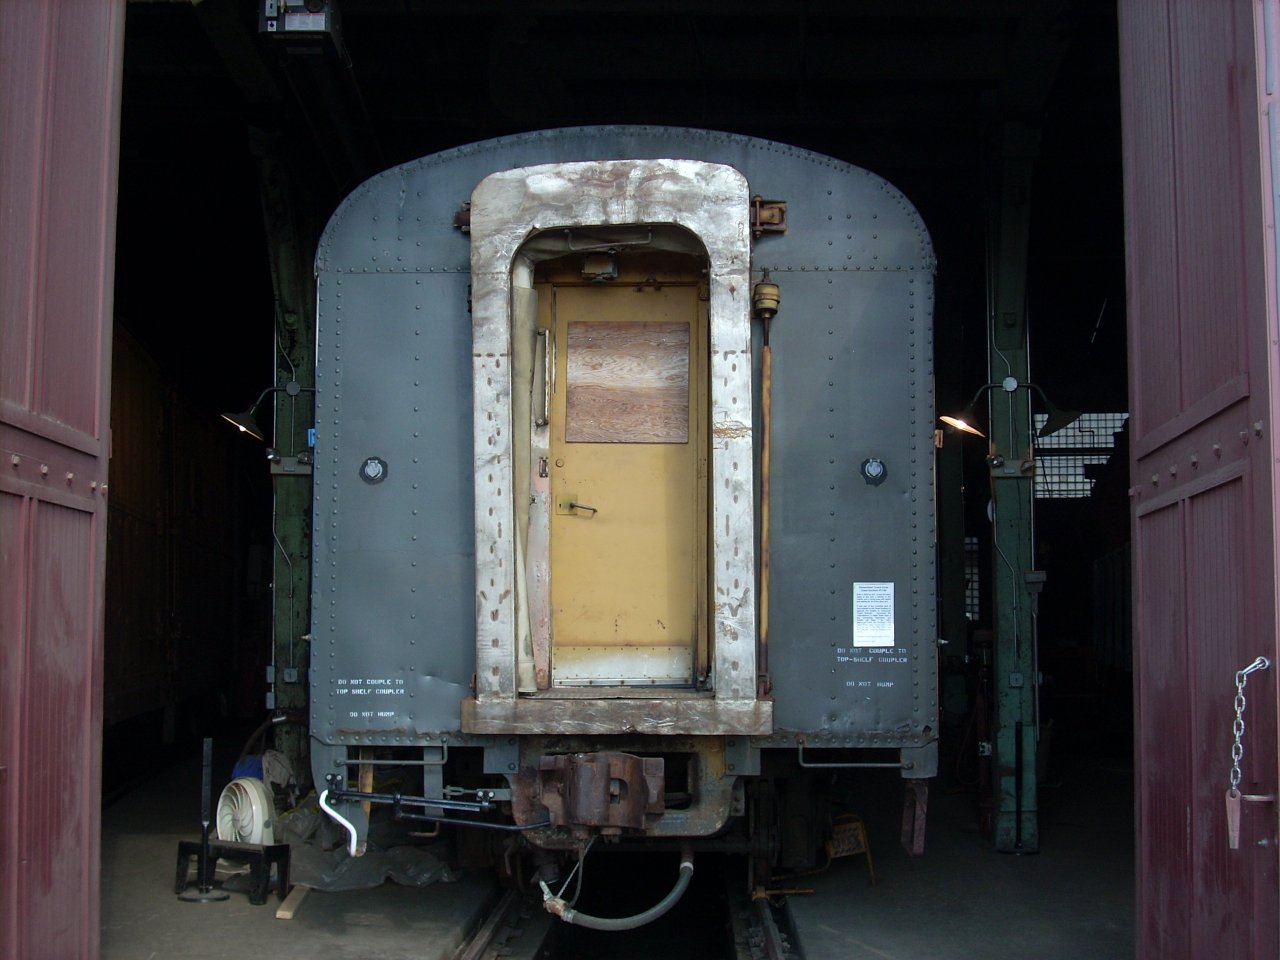
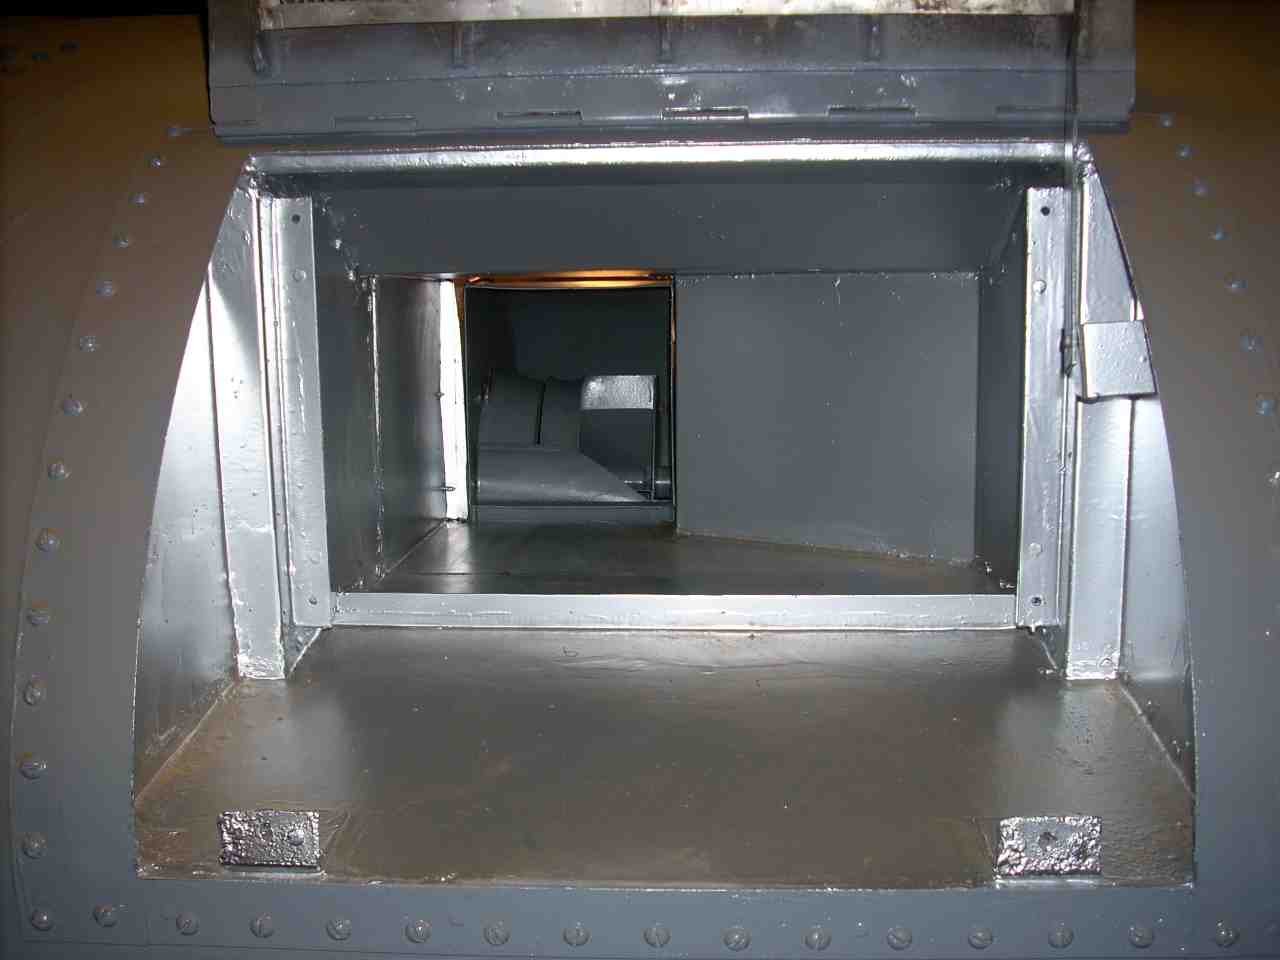
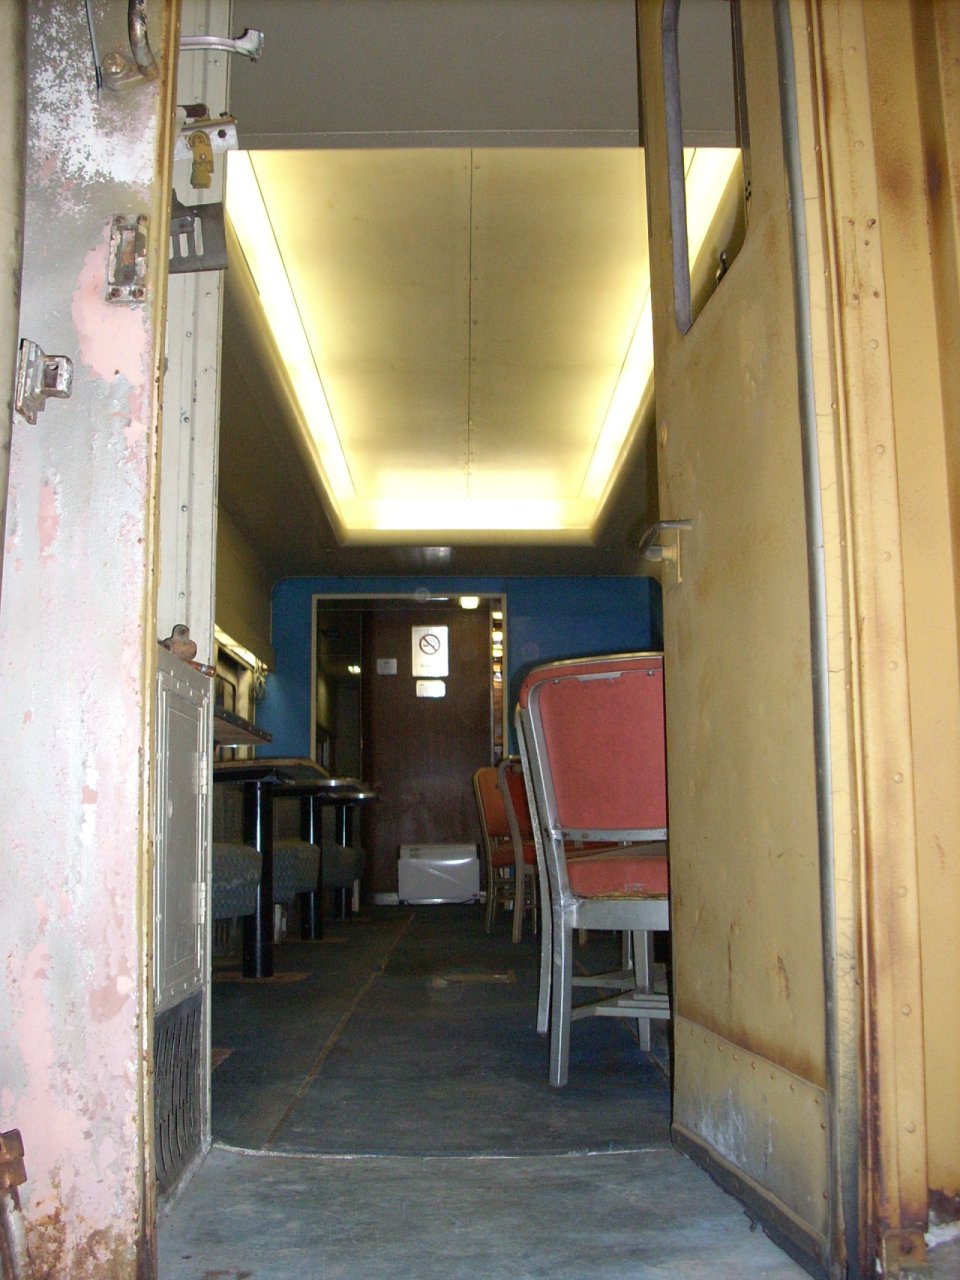 | Due to the floor I can't allow the public in the car, but for museum guests touring the shop I've opened the blind-end door. That way they can see the dining room in all its glory. On Saturdays when I'm there, I also turn the lights on. |
 | One potential problem is these patches. Water sitting on top the wall top plate rusted through the roof sheet, so the previous owner applied these patches with silicone sealant to buy time. A decade later some are separating and, I think, funneling rain water into the roof. |
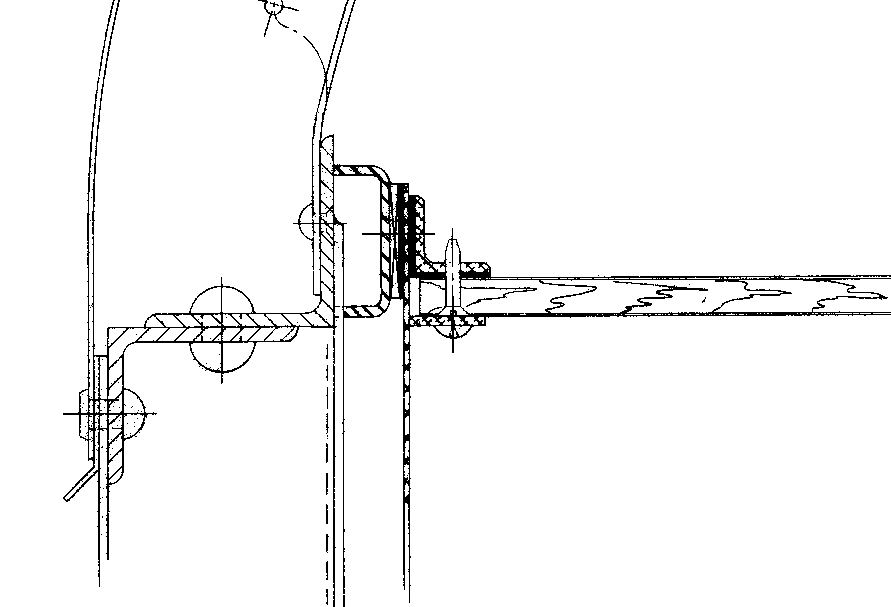
 | Eave rot detail: On an ACF cor-ten car, the roof and sides are separate sub-assemblies. Each has a horizontal L-channel at the edge where they join. The roof sheet extends past the roof's L-channel, and is riveted to the wall's L-channel. In this view, water sitting on top the roof L-channel has rusted through the roof sheet. Because rust build-up between the roof sheet and the wall's L-channel pushes the roof sheet out between the rivets, the opening is like a protruding lower lip, catching rain water and funneling it into the roof structure. At this location the vent is a possible water source, but several eave perforations have no such explanation. I'm still puzzling where the water comes from - perhaps it is condensate forming on the inside, when the interior air is hot and humid, and cool night air rapidly cools the roof. |
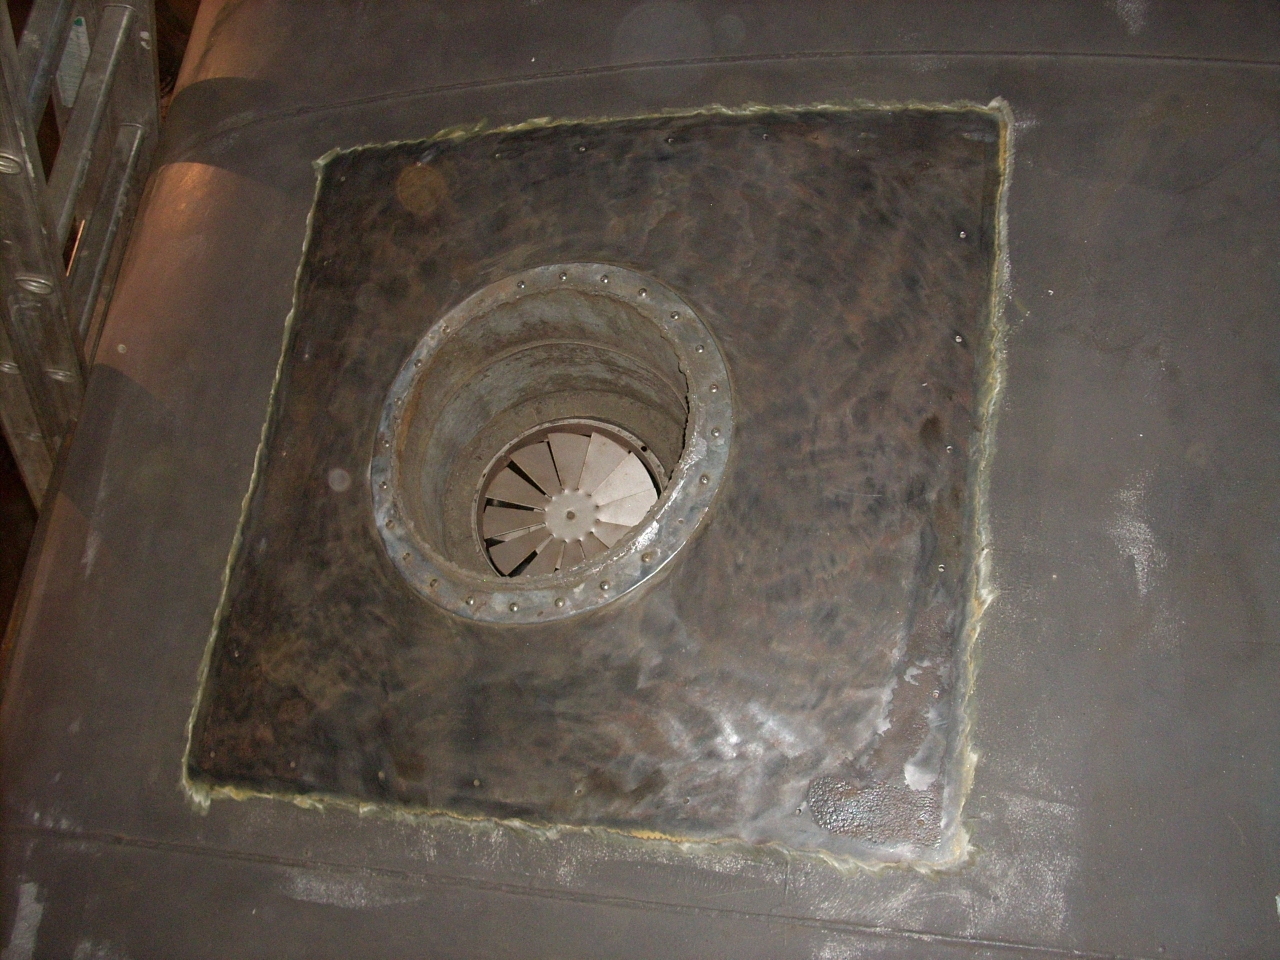
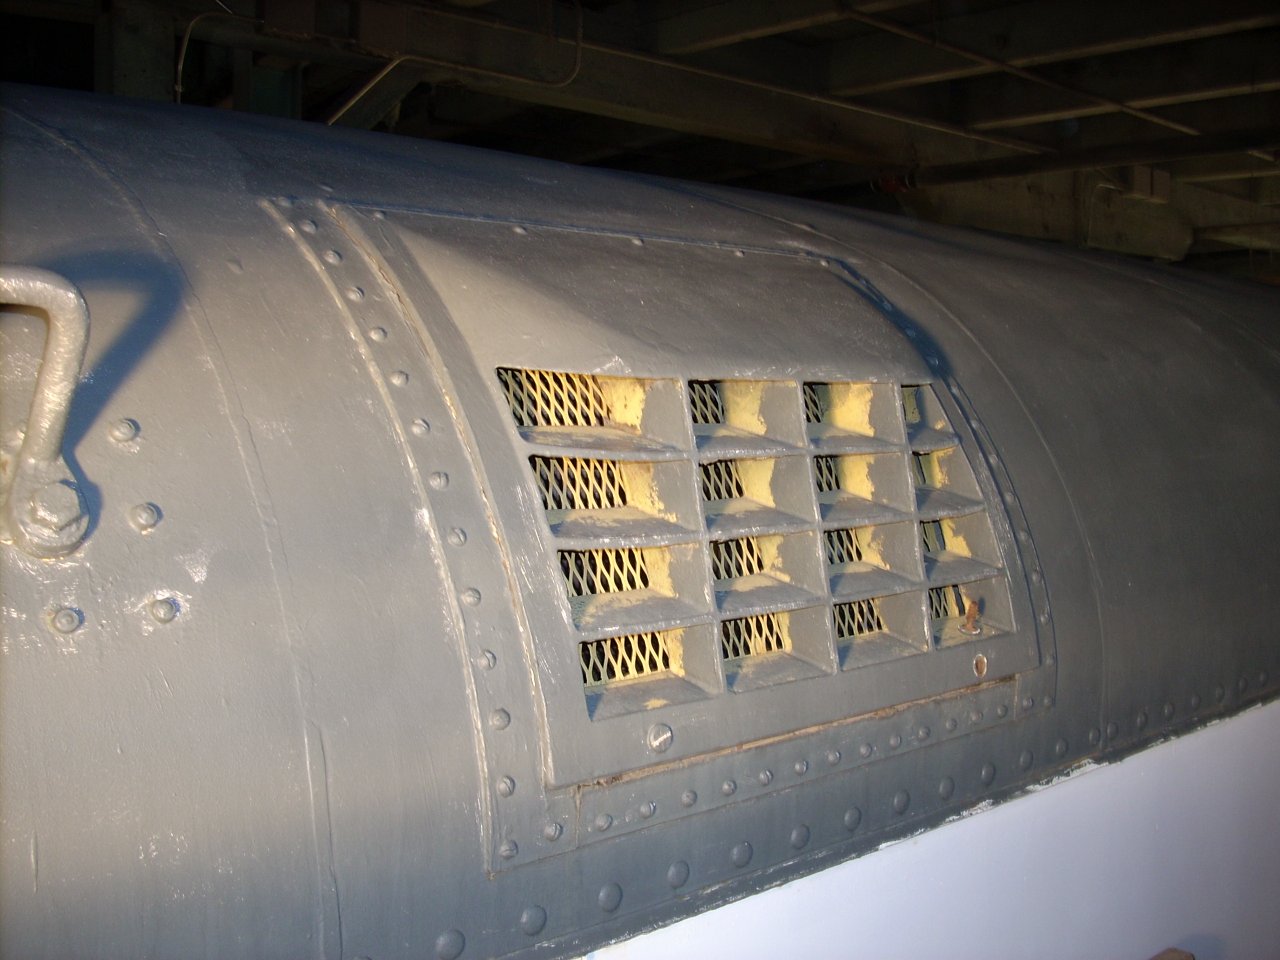 | This is the vent for the kitchen range's exhaust hood. It's right about where the musty smell was always strongest. (There are three rooftop openings in the kitchen area, so it may not be the only explanation.) Notice that the vent assembly was inserted into a hole cut in the roof sheet, and its flange was caulked and screwed to the roof sheet. After 58 years, I expect the caulk may not be keeping rain water out anymore. |
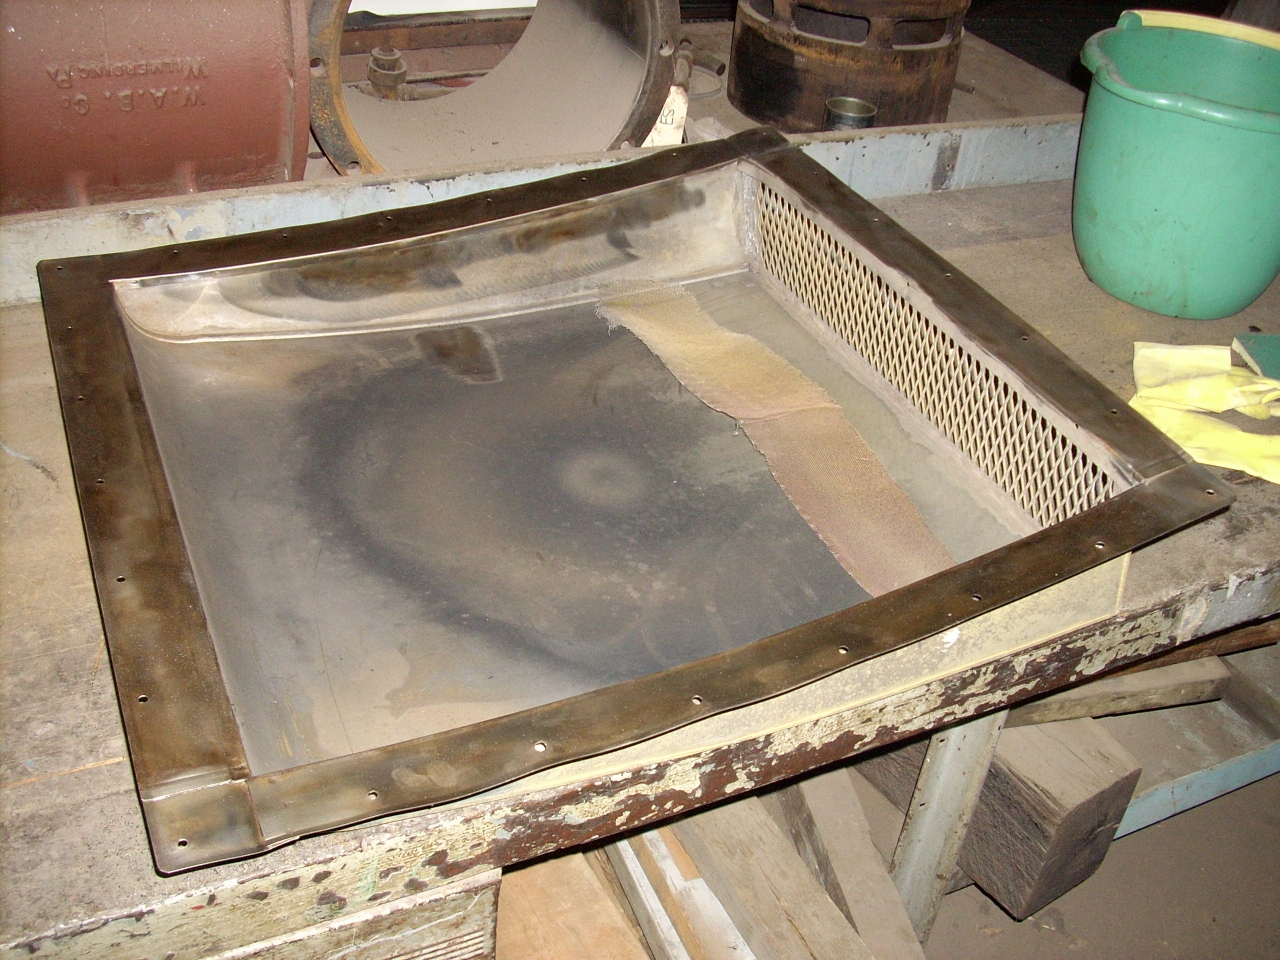
 | You're looking at a full inch of mud - road dust and rain water. The mud in the baffle panel ("Eliminator") held water and it completely rusted away. There is literally nothing left of it "underground". |
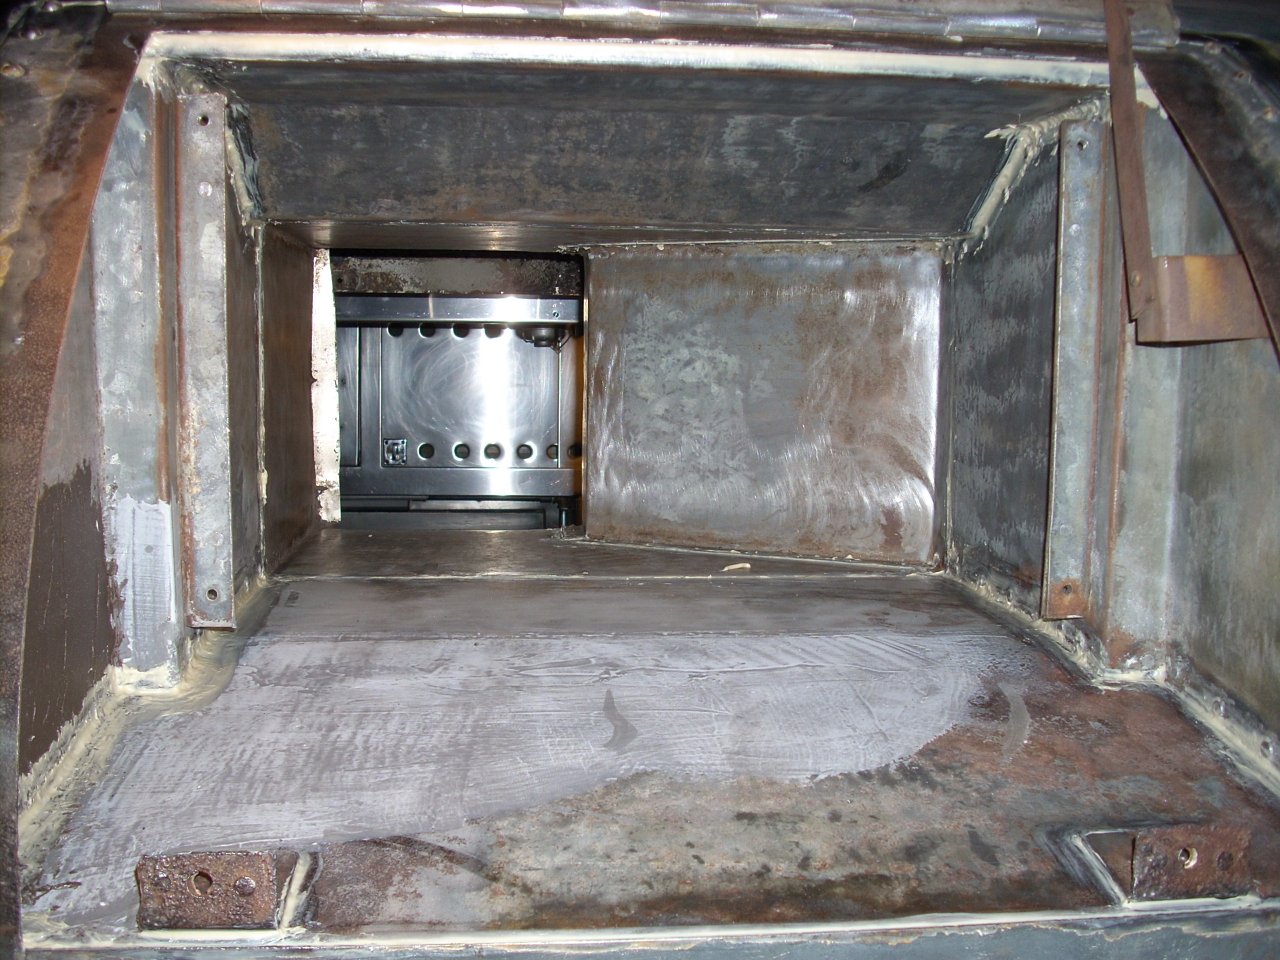
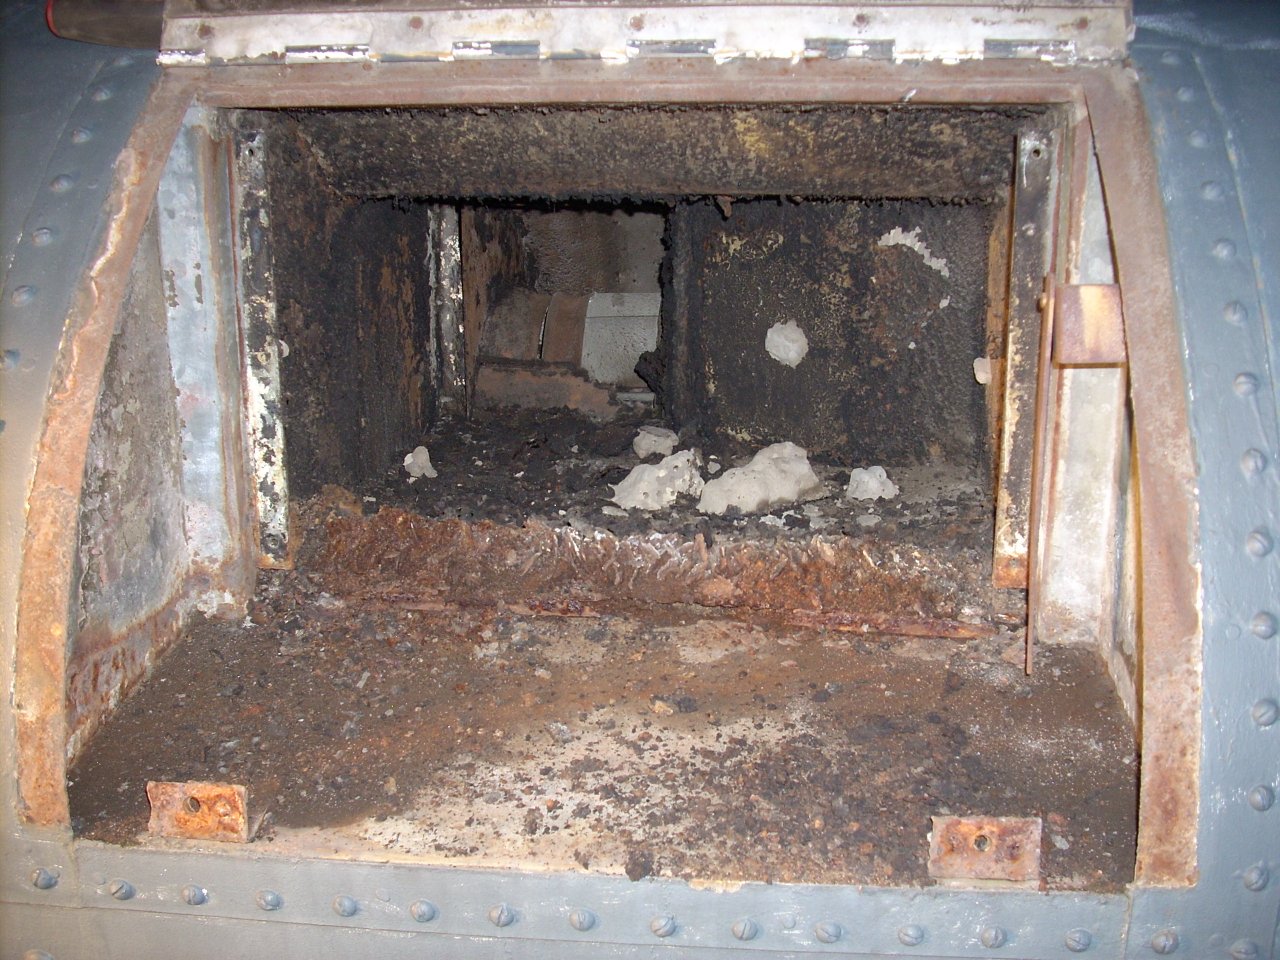 | The mud and Eliminator are removed. We're looking at the rusted remains of the Eliminator bottom, and fifty years of stove grease. (Yum! Smells like steak!) That's the squirrel-cage blower in the rear. |
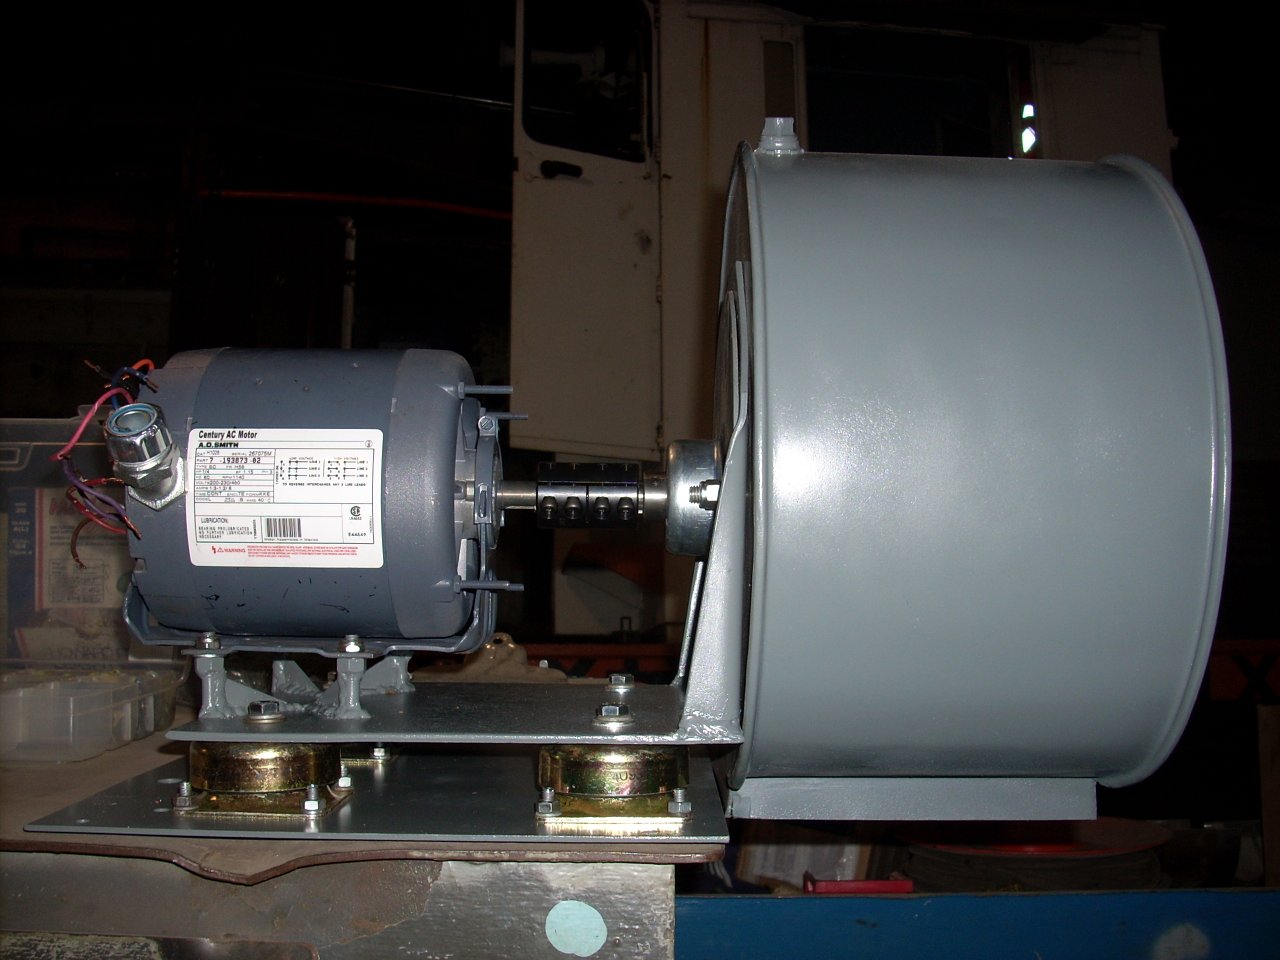
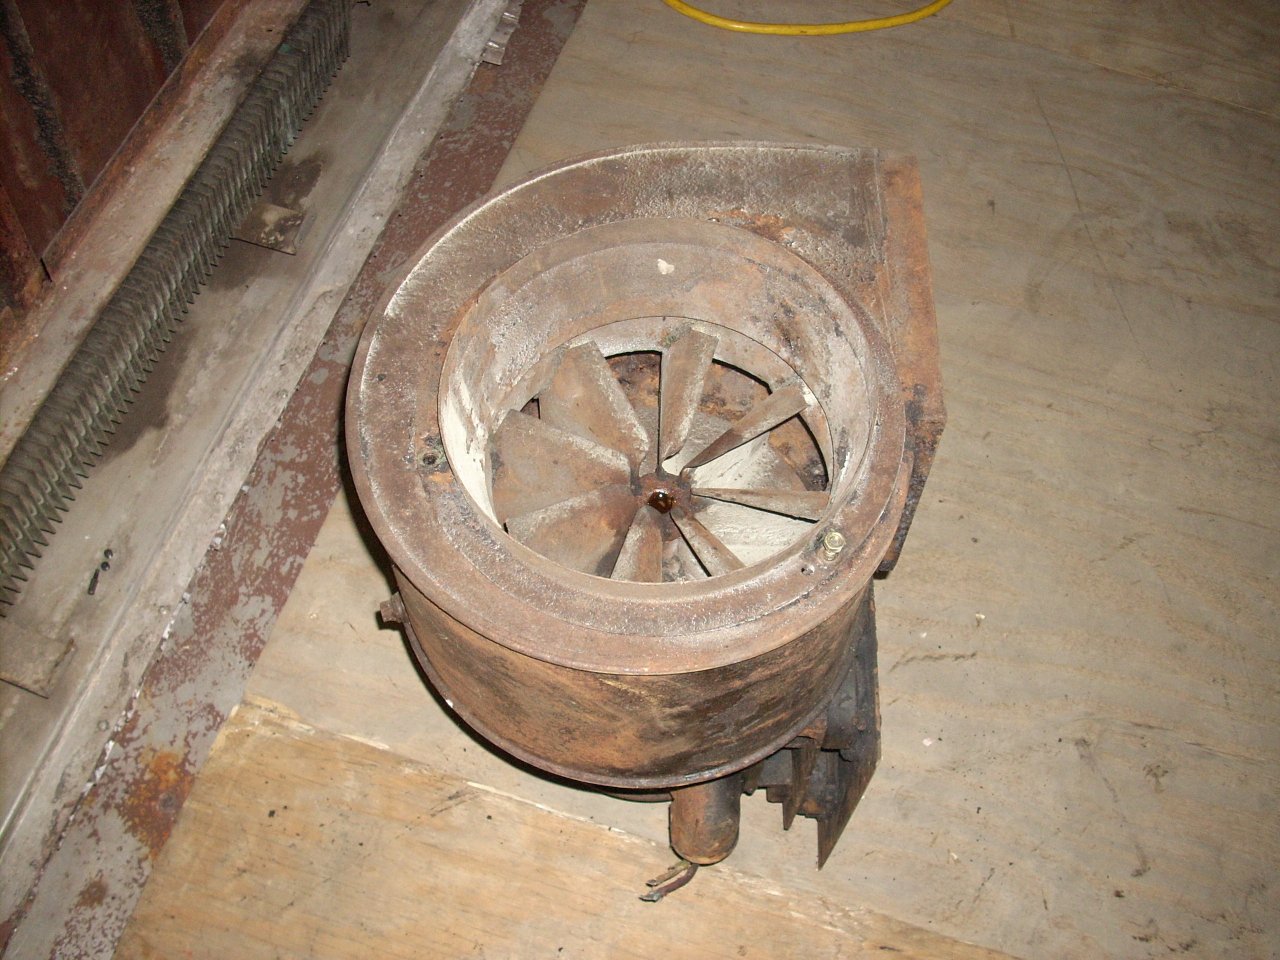 | I removed the blower for cleaning, repainting, and hopefully conversion to 3-phase. It was very unbalanced, I discovered, by a large hunk of grease. The motor is big and heavy, but only 1/8 hp. It is totally enclosed - explosion proof - because it lives in the exhaust stream. |
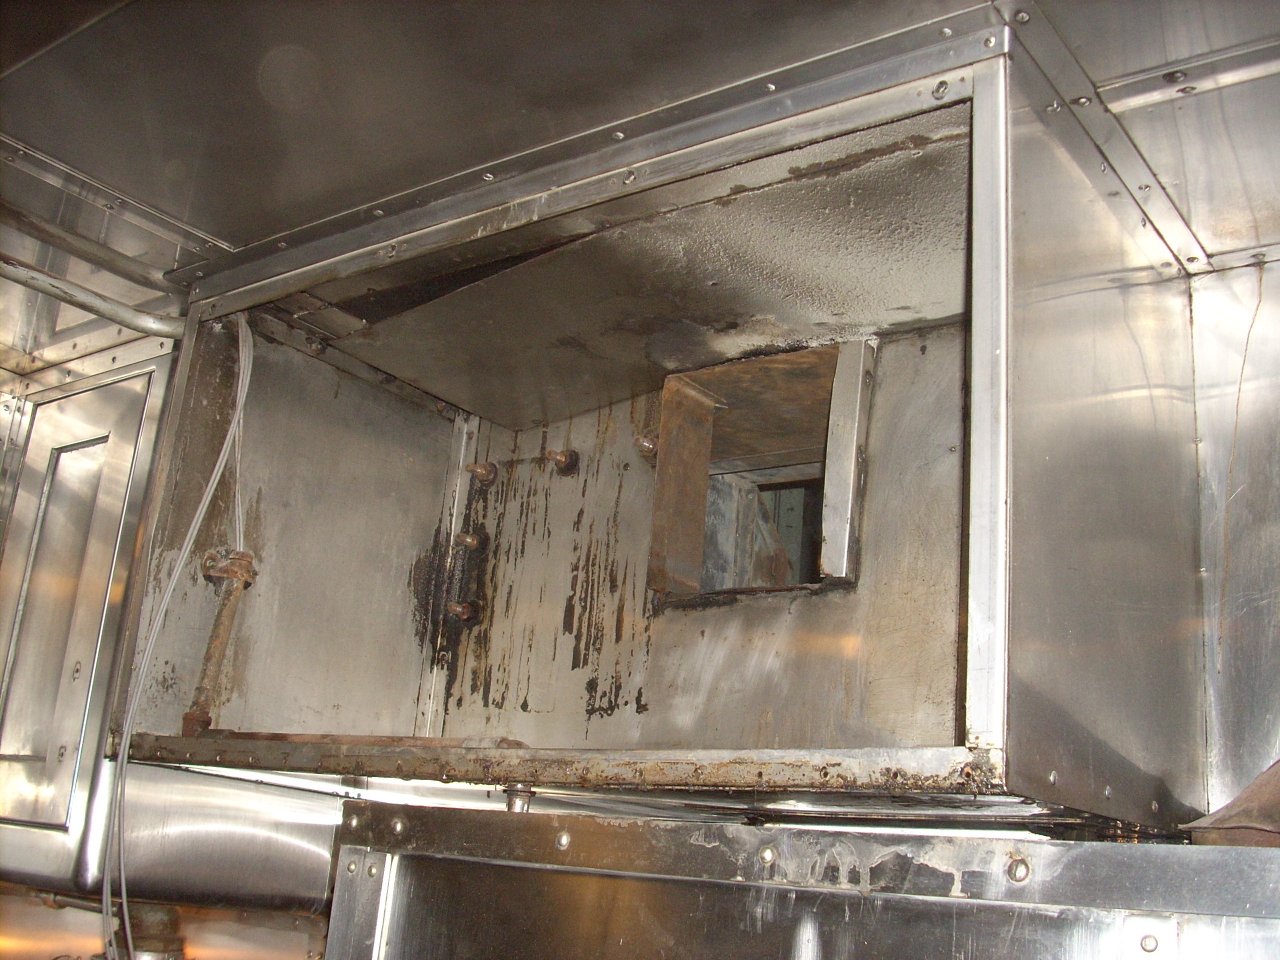 | This is the blower cabinet atop the stove, front removed and after much cleaning. If I use an AC or 3-phase motor, I may put the wiring in liquid-tight flexible conduit. If I reuse the DC motor, I'll put a weather tight electrical box in the conduit gap, and install a transformer/rectifier there. |
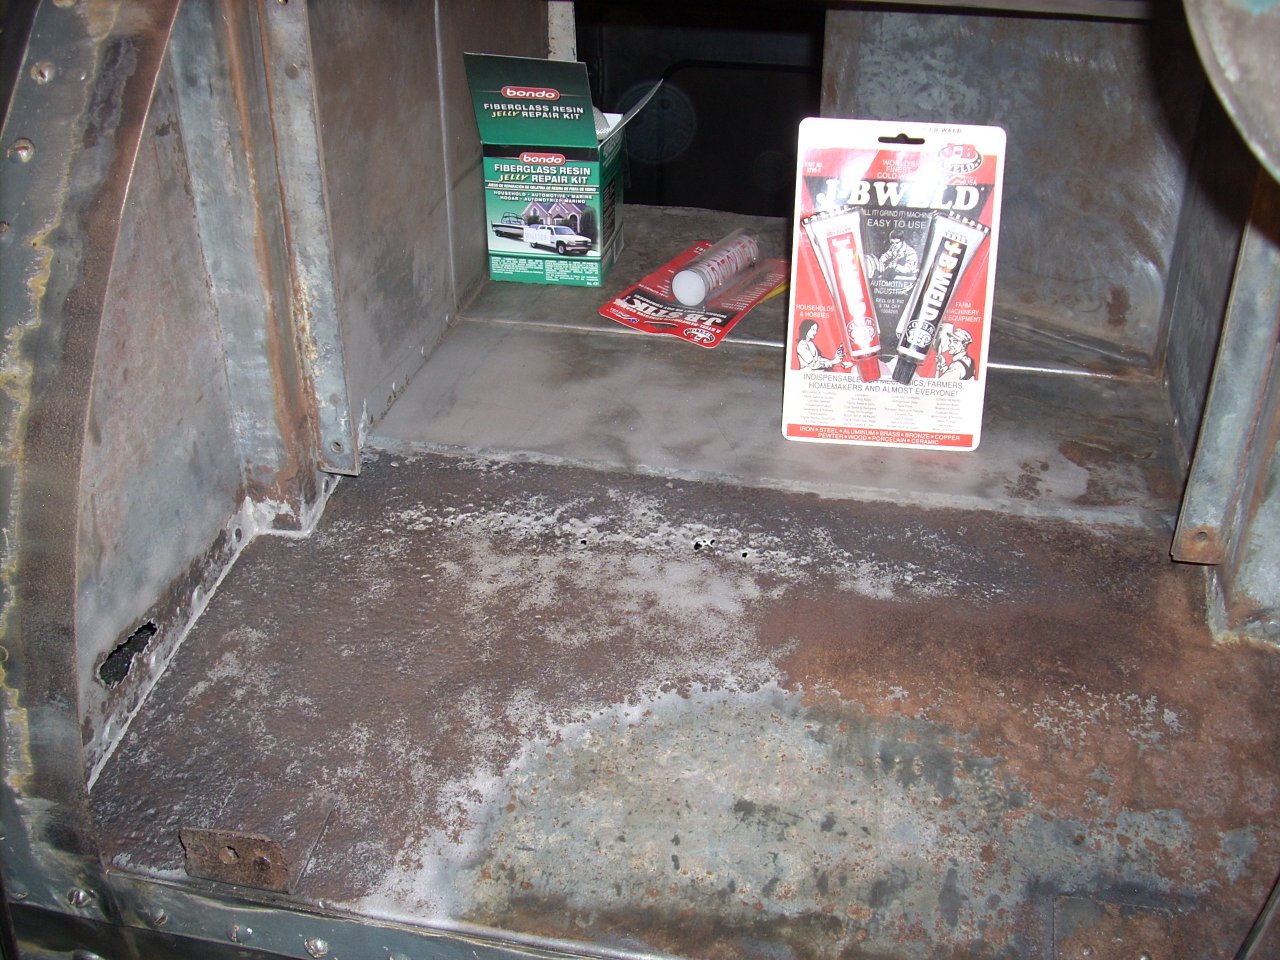 | This photo shows several important details. After scraping the gunk off, unsoldering and unriveting a bottom gap filler, and wire-wheeling, I found remnants of galvanizing on the steel, deep rust pits, several pinhole perforations, and one big rust hole in the left side. Note I've also wire-wheeled around the flange-roof joint so that I can caulk it. Making it up as I went along, I sandblasted the worst rust, and spread J-B Weld in the bottom pitting and pinholes as if it were Bondo. The fiberglass auto body repair stuff is for the big hole on the left side. |
 | Department of mysteries: This car is the only one I've ever met whose roof makes loud POPs as it heats and cools. Notice the wrinkles in the roof sheets. There are no cracks in the welds, but in places there appears to be rust build-up between the roof sheets and roof joists. I don't have a good hypothesis yet... |
Railway Age magazine, mid-century, was great about reviewing each new streamlined passenger train introduced by the railroads. They consistently included floor plans, exterior and interior decoration, and vendors & equipment used. I had the good fortune of finding their review of the "International" and "Red River". It will be a great resource when deciding on interior materials and colors.
To my dismay, the Railway Age review suggests I made a mistake while repainting Great Northern 1213 for the museum. I thought it was entirely painted when new - no Scotchlite. The Railway Age article disagrees. It says the stripes were painted, but the lettering was always 3M ScotchLite. I thought I had done my homework!
Two friends wrote to say mine isn't the only car whose roof makes popping noises. It's nice to know I don't have a unique problem!
A three-phase replacement motor for the kitchen exhaust hood took a lot of finding. (Odd grammar? I'm quoting "Stardust" by Neil Gaiman.) The smallest I can find is 1/4 hp - double the existing - A.O. Smith model H1026 from Grainger. Given the motor's position in the charcoal stove's exhaust stream, having a sealed motor is important. All motors I've looked at have a different shaft diameter, so some adaptation will be necessary. I'll probably buy the necessary control/protection equipment from Automation Direct, who has good prices.
 | I have just a small bit of actual work to report. In the range hood duct, the bottom is sealed and I'm working on the side. Ten years from now, I'll know whether this was a good idea or not! The alternative would have been busting every rusted screw, removing the assembly, and welding in a new side and bottom. |
 | Joints have been caulked with 3M seam sealant. Next: Sand the patch on the left flat, install a new baffle strip on the bottom, and paint with POR-15. That will probably happen in August. |
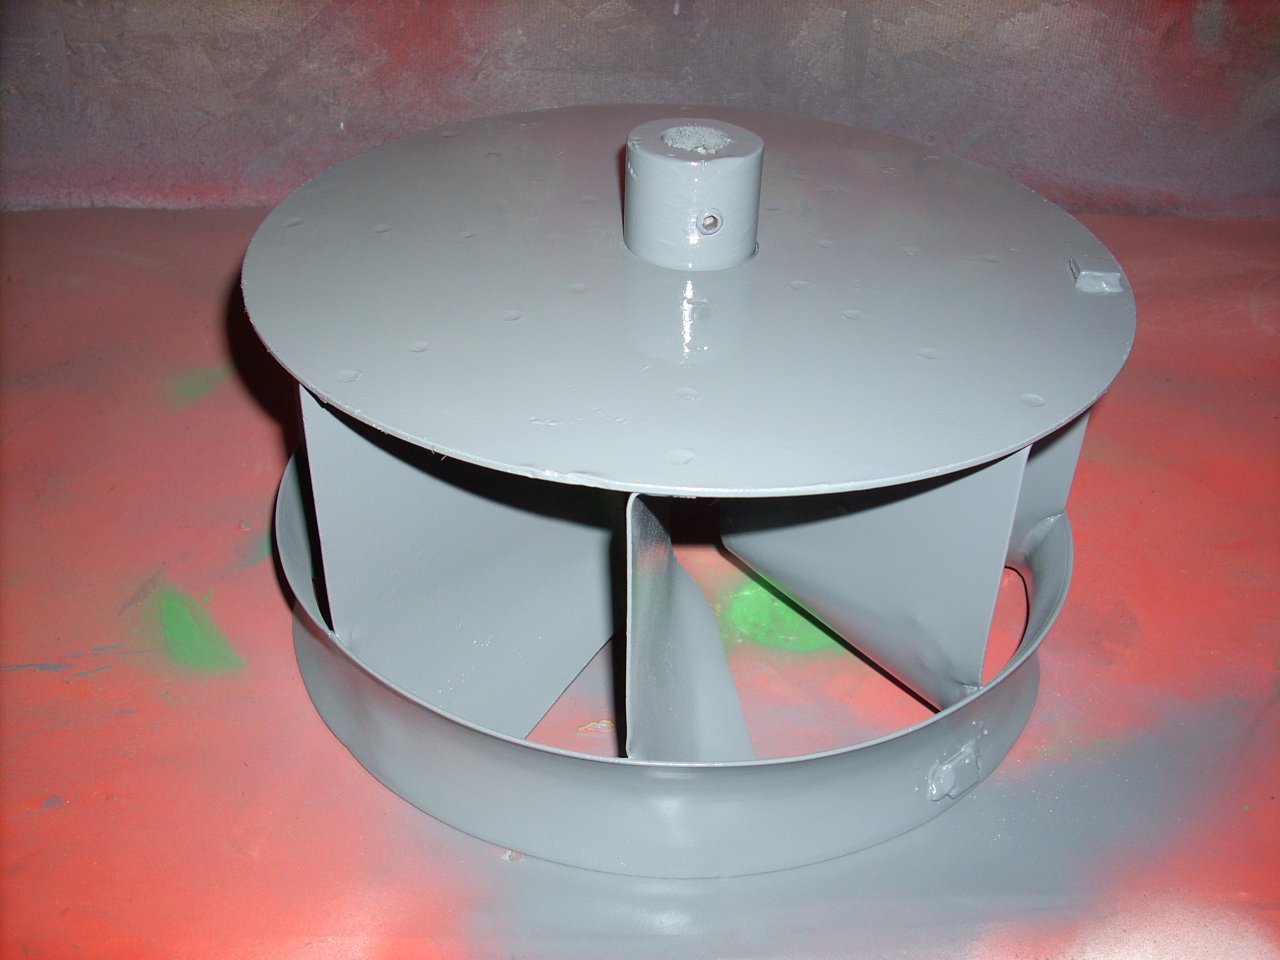 | A friend and I got some blower parts sandblasted, and painted with Duplicolor high-temp engine enamel from NAPA. Before, the blower was badly unbalanced. Large chunks of grease and dirt had accumulated, so I retested after sandblasting. Happily it is still very well balanced. |
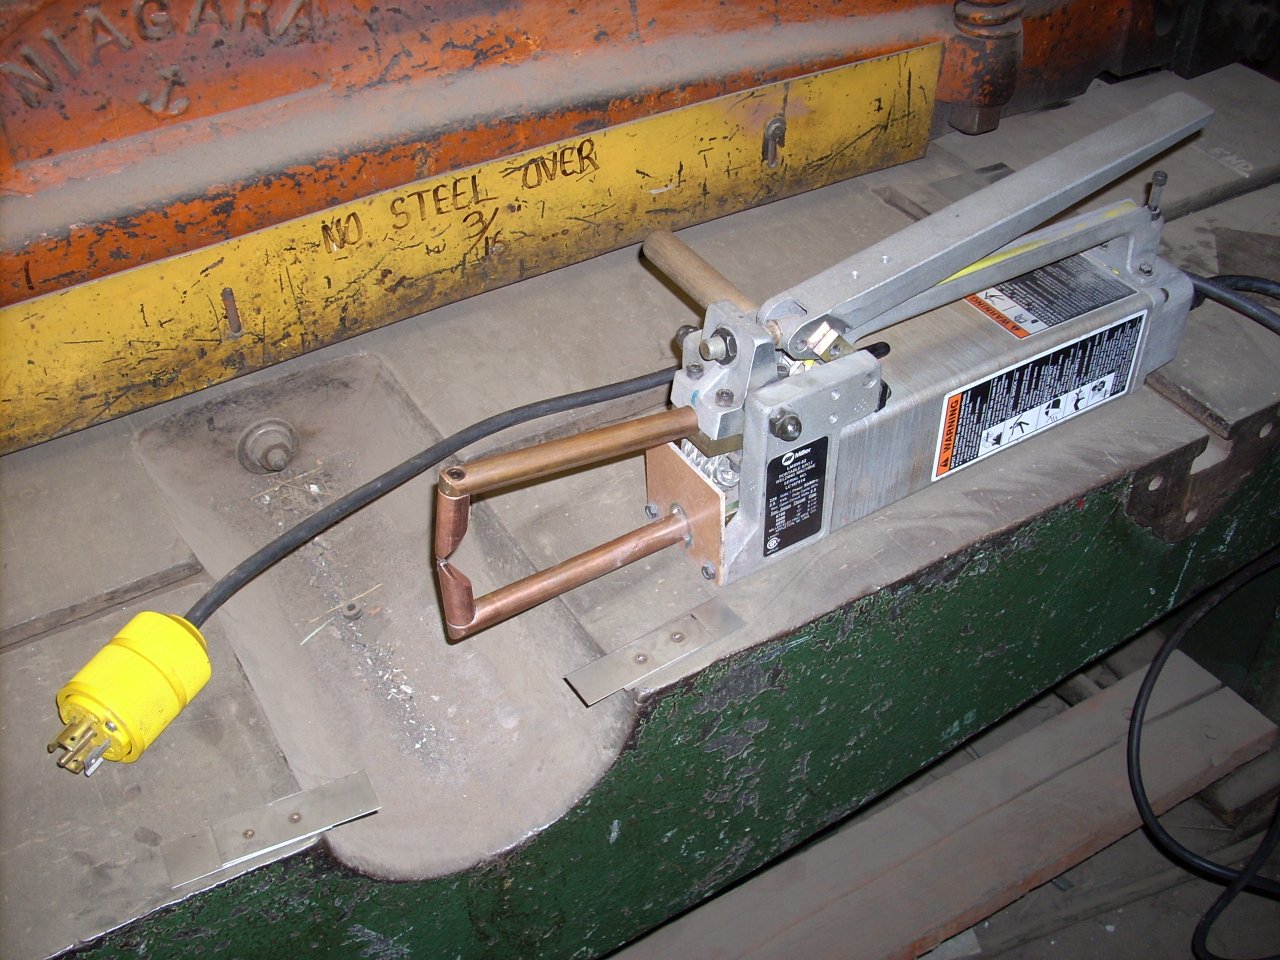 | To fabricate a new Eliminator, I decided on spot-welded stainless, rather than slot-and-tab mild steel. Therefore, I bought this Miller LMSW-52 used and equipped it with short offset-tip tongs. I also changed the plug to match the museum shop outlets. This is a trial balloon: I live in a townhouse and don't have room at home for the shop tools that I'll need to procure. So, my idea is to buy and donate to the museum. Pros: I get 30% back on my income tax. Cons: If I ever part ways with the museum... |
While looking for blind rivets (below), I stumbled upon Southco's web site. Southco is the original equipment manufacturer for the screw-like fasteners on the rooftop vents, as well as the ceiling air diffusion grating inside the car. They're still in business and still selling those fasteners - cool!
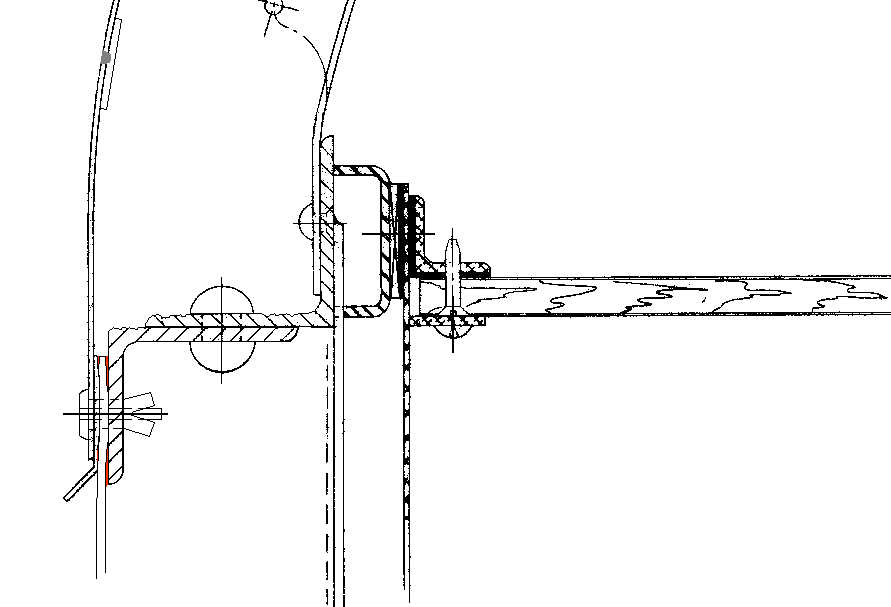
How to repair the eave rot problem? I've given it some thought, and think I will have Cor-Ten sheet rolled to the right radius. These flush patches will extend from one rafter to the next, to avoid welding sheet whose thickness is reduced, though not yet rusted through. I'll spot-weld or plug weld a horizontal backing strip to existing material at the top. At the bottom rivet line, I'll replace the hot rivets with drive rivets for appearance. A couple potential rivet vendors are Hanson Rivet and Jay-Cee Sales & Rivet, Inc. The following drawings illustrate what I think happened inside, and my planned repair:
 | As built: Wall and roof sub-assemblies terminate in an L-channel, and the roof sheet extends to overlap the wall by a couple inches. The L-channels are hot-riveted together, and the roof sheet and drip strip are hot-riveted to the wall. After insulating, the interior is installed. |
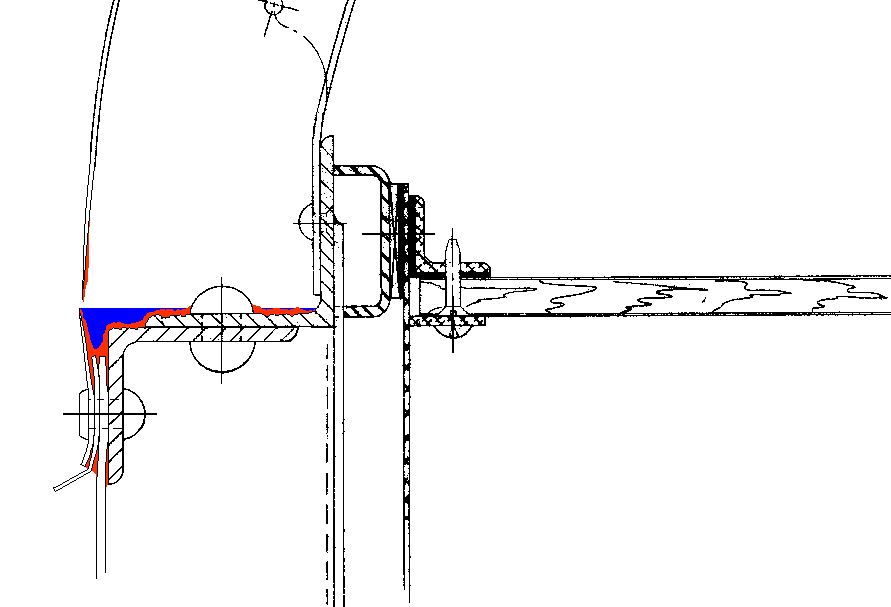 | Water has sat on top of the wall for years, keeping the insulation damp. The L-channels are less damaged, simply because they are thicker. The roof sheet rusted through from the inside, and there is significant rust bulging along the visible rivet line. From observation, when the roof sheet perforates the bottom edge springs outward, creating a trap which directs rain water into the roof, accelerating the decay. In places there is visible rust between the drip strip and the wall sheet, and when in the rain I've seen water droplets inside between the wall and roof angles. |
 | My proposed repair is a rafter-to-rafter flush patch, with a backing strip for the weld at top, and replacement blind drive rivets (steel not aluminum) along the bottom. While its open, I'll needle-scale and rustproof with POR-15. |
A friend who is an Amtrak inspector, and owns a few cars himself, agrees with the idea that condensate was probably the initial water source. The inside of the roof sheet was originally sprayed with "Ded-nox" - a tar and cork composite rust proofing, but that separated from the steel over time, leaving a hairline gap which will suck in water by capillary action.
I probably won't get the eaves patched this year (time & money), so to buy time I'll replace the existing temporary patches with self-adhesive roofing membrane.
I think I've found a water raising system air reservoir, to replace the one missing from my car. I'll be picking it up in mid-September.
 | I bought the 1/4 hp three-phase motor. It's smaller in every way - except twice as powerful - so I got the difference in shaft centerline height using this granite surface. |
 | Not wanting to modify either the motor or existing blower parts, I had to couple a 3/4" stub shaft to the motor's 5/8" shaft. To minimize any "whipping" of the longer shaft, I added a support bearing. Mounting studs were welded on, with bracing, to jack the motor up to the correct height. With shaft extensions, the motor will be 1/2" from enclosure, so it has to be pre-wired. Finally, the old vibration dampeners were shot, so they were replaced. The replacements are a physical fit, but are designed for about three times the assembly's weight - we'll see how well that works. |
| Purchased Materials for Blower | Vendor | Vendor's Part # |
|---|---|---|
| Motor 1/4 HP 60hz 3-phase Belt | Grainger | 4LY49 |
| Two-Piece Clamp-on Shaft Coupling, Steel, with Keyway, 3/4" X 5/8" Bore | McMaster-Carr | 60845K57 |
| Fully Keyed 1045 Steel Drive Shaft, 3/4" OD, 3/16" Keyway, 9" Length | McMaster-Carr | 1497K116 |
| Mounted Ball Bearing | Grainger | 1A402 |
| 3/16" Square Oversize Zinc Plated Keystock | Fastenal | ??? |
| Versa-Mount Bold-Down Vibration-Damping Mount, 3/8"-16 Thread, 50 lb Load Per Mount | McMaster-Carr | 6188K512 |
| Manual Motor Starter 1.6amp 45mm Rotary | Automation Direct | BM3RHB-1P6 |
This October I'm going to host the slide show again. If possible, I'd like to have this exhaust hood blower installed, so that we can grill in the kitchen.
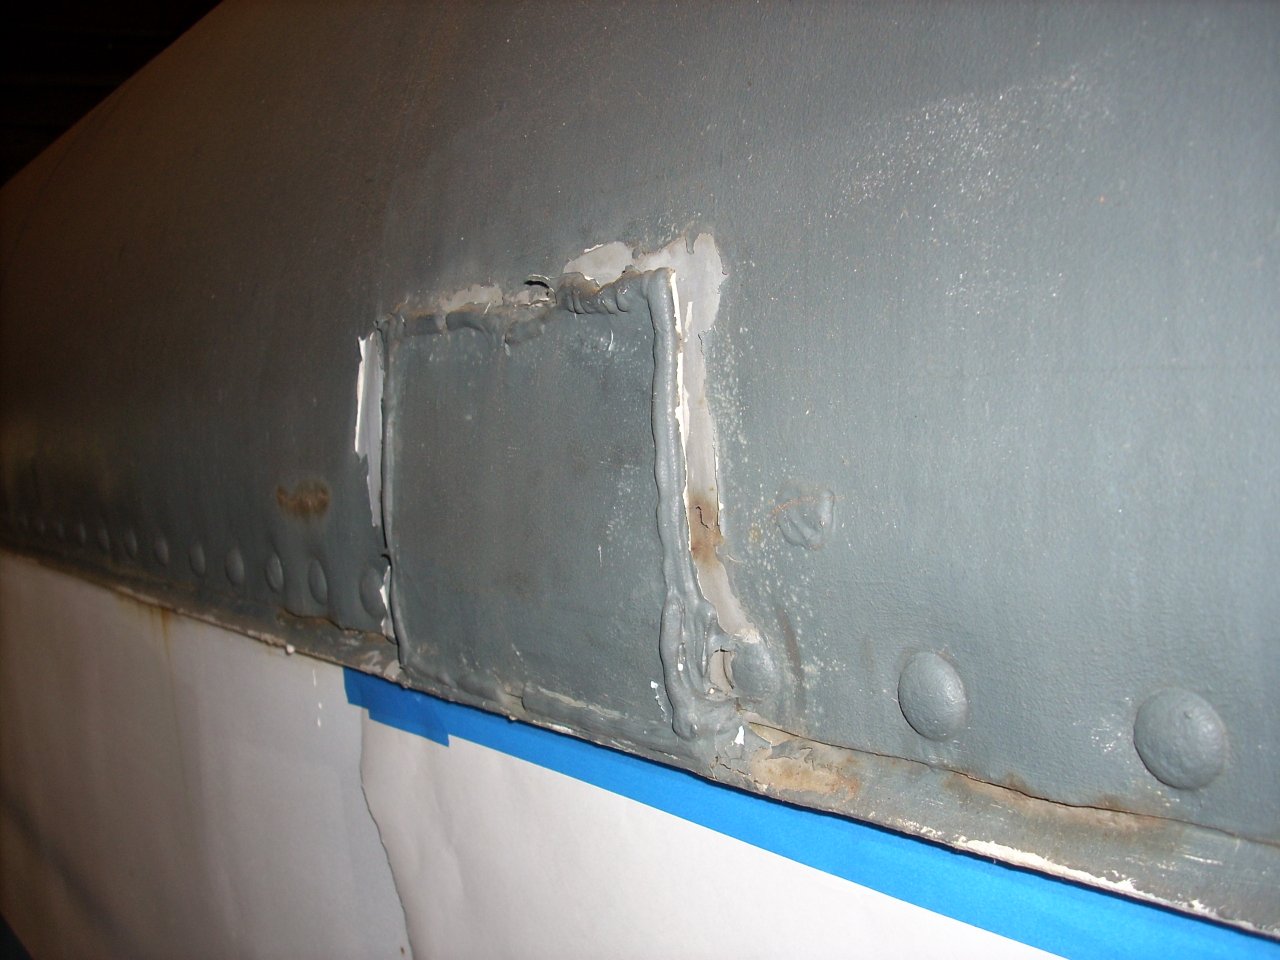 | The previous owner put patches over eave rot areas about ten years ago. This example is galvanized sheet, glued on with silicone caulk. Many of these have begun to pull away, and show evidence of water running down behind them. Notice also the rot continues to grow, both to the left and right of the patch. |
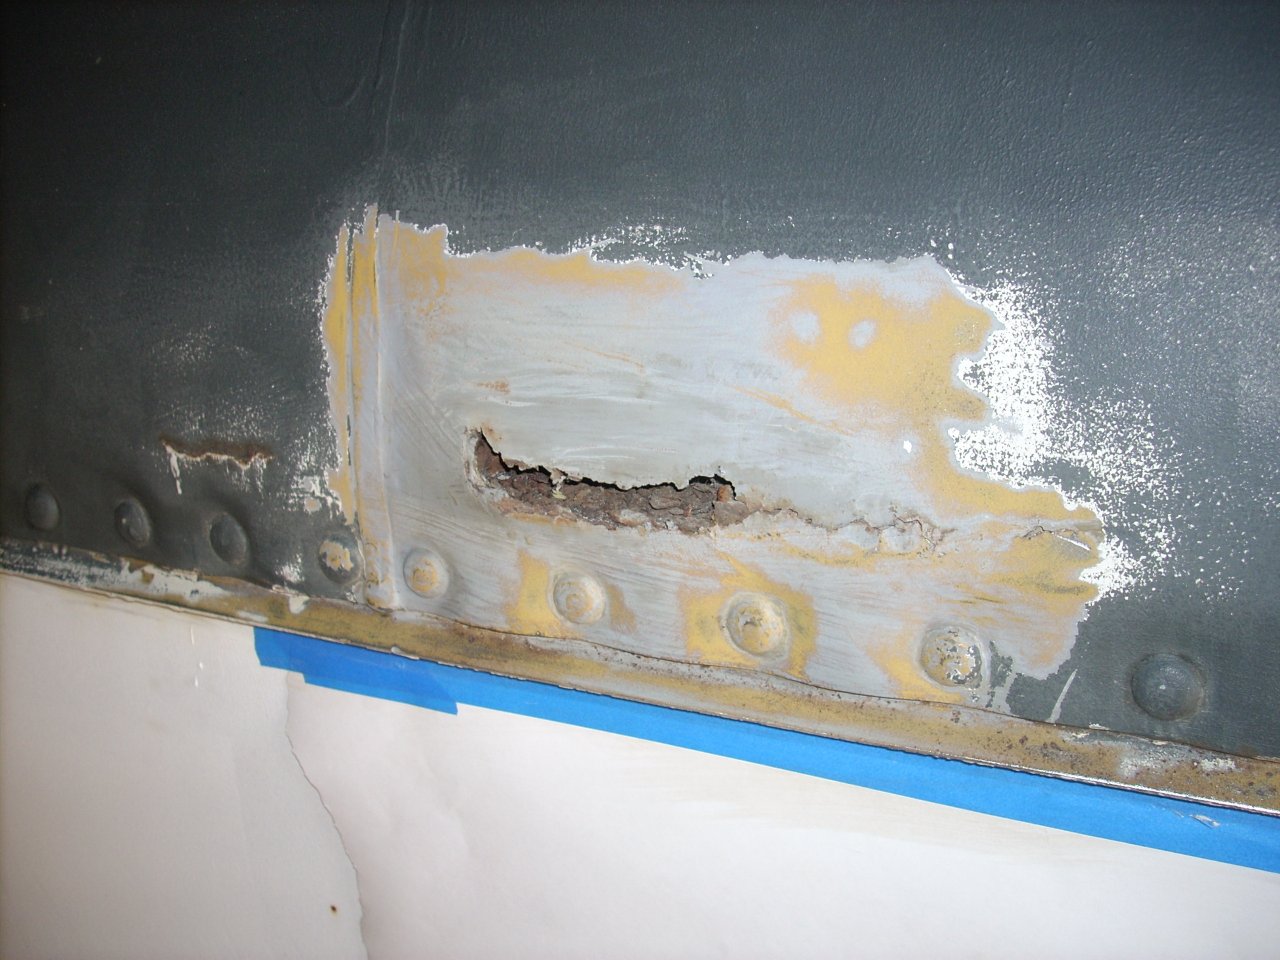 | Same location, cleaned up. Notice the chunks of rust lying on top of the L-channel, and how rust has pushed out the roof sheet between the rivets. |
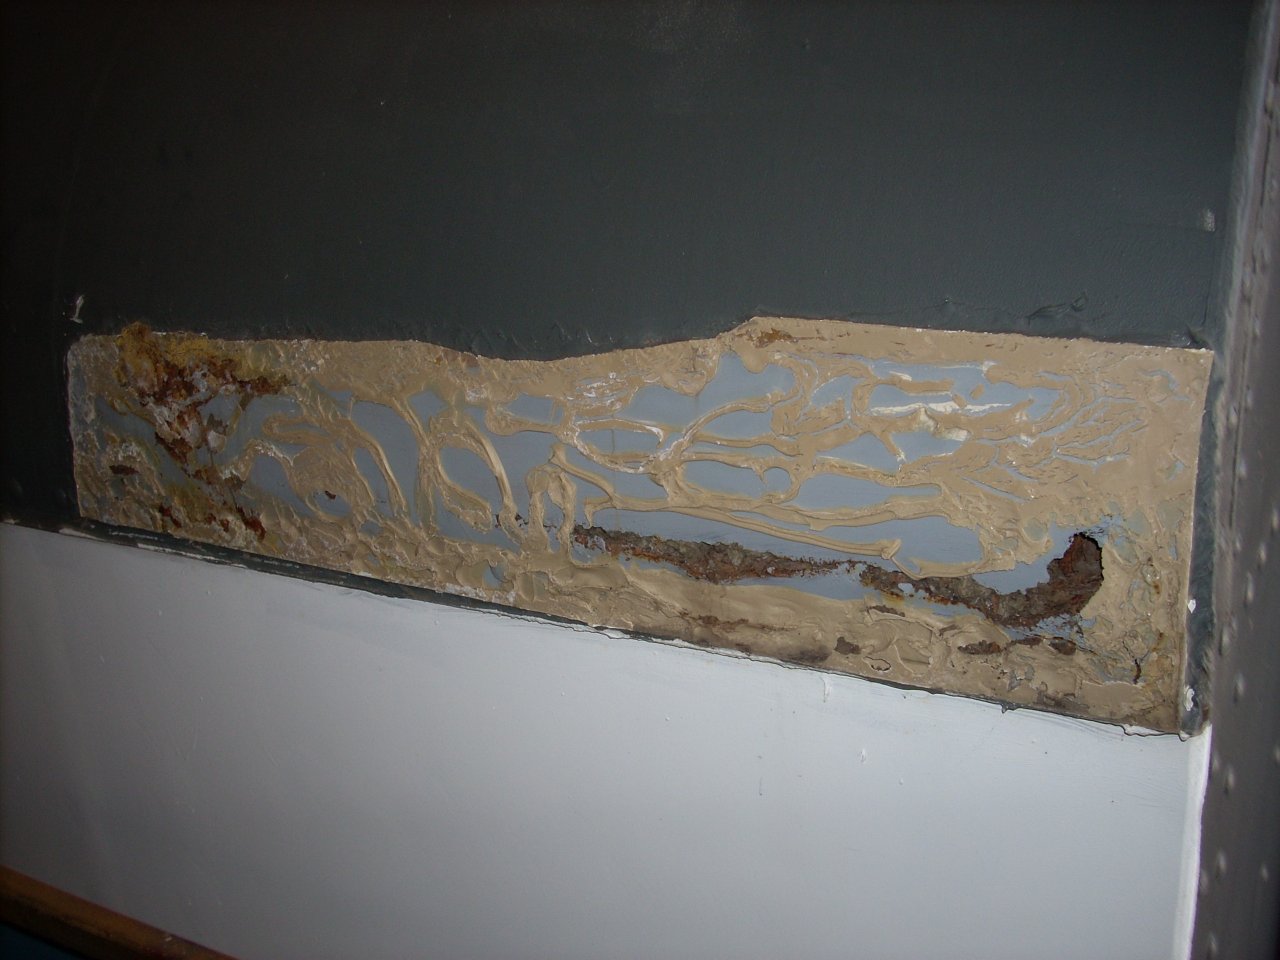 | There's a particularly bad patch at the AR corner of the car (Dining room end, opposite the refrigerator.) This patch was galvanized sheet glued down with construction adhesive - which proved very durable. |
 | To buy more time, I'm using the same self-adhesive roof patching material that I used to cover the kitchen door. First the roof was cleaned with TSP, and then the membrane was pounded down with a rubber mallet. I took advantage of the drip lip, as a smooth surface for sealing the bottom edge. |
 | Finally, gray spray paint made my patches a little less obvious. I got about 1/3 of the patches replaced in August. |
I may have stumbled upon a proper dining roof chair for 1146. A friend was in Bellevue, Ohio, and found it in the Bill Fuering collection. I haven't seen it yet, but have my hopes up.
 | The range hood exhaust duct had a filler strip to close the gap underneath the Eliminator. The new one is Cor-Ten left over from 1213, rust-proofed with POR-15, laid in a bed of 3M Seam Sealant, secured with 3/16" stainless pop rivets, and sealed all around. |
 | The exhaust duct was rust-proofed with POR-15, then painted silver to simulate the original galvanized finish. The hard, glossy POR-15 I use is difficult for the finish coat to bond to, so I have a habit of letting it dry four to six hours. I spray the finish coat while it�s still a bit tacky. |
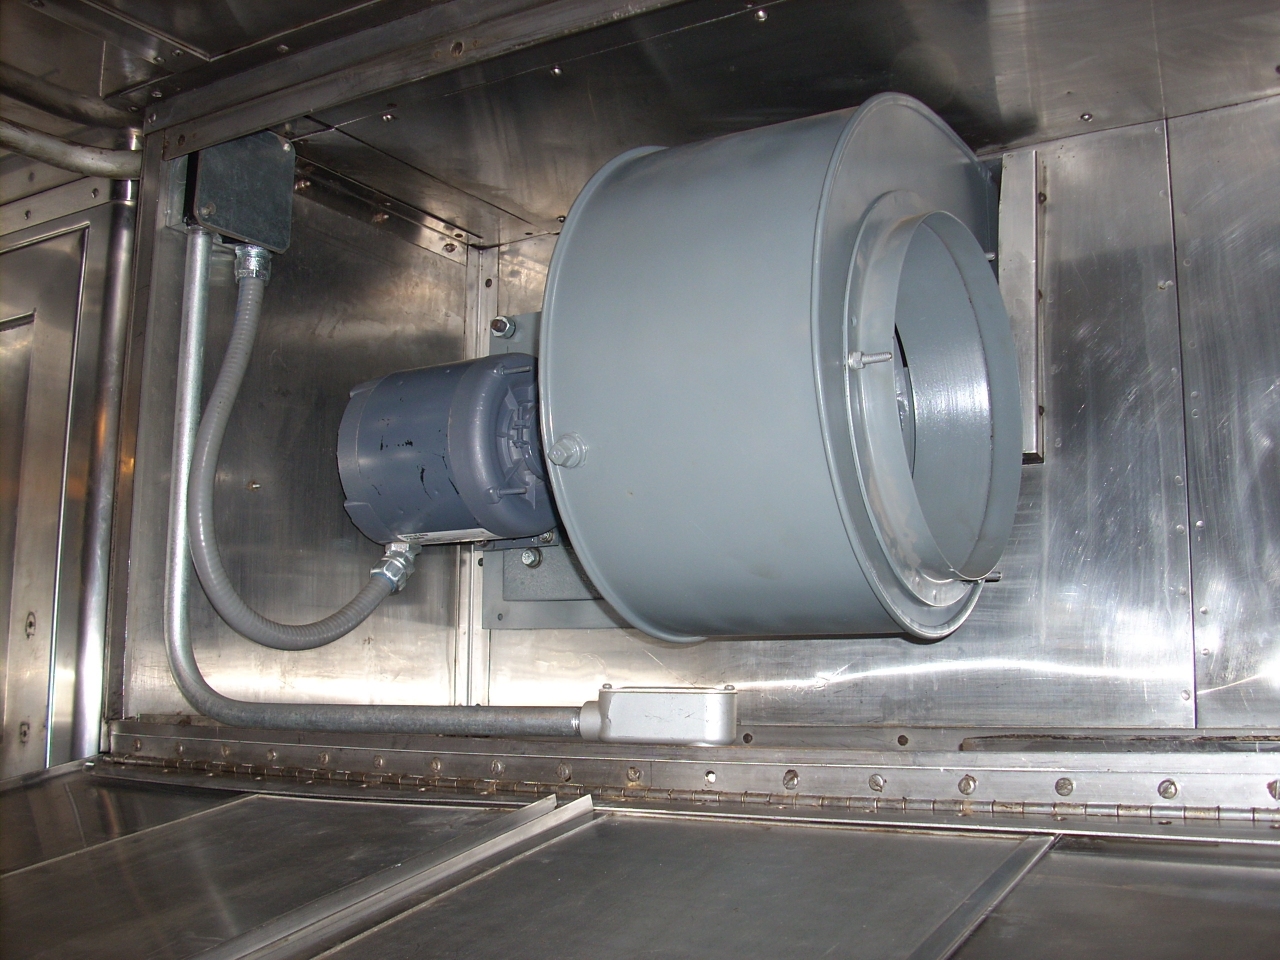
 | Exterior view of the installed blower, during a test run. To finish, I still have to fabricate a new Eliminator and replace the Southco screws on the louvered cover. |
 | Testing the blower, interior view. While everything was out, I thoroughly cleaned the enclosure, and re-attached the stainless ceiling sheet to the plywood sub-ceiling. Next: Fabricate a junction box, install conduit to the range light, and wire. |
 | The drip strips above doors are merely riveted to the roof sheet. I�m caulking top & sides with Seam Sealant. Patching eave rot is at about 75%. |
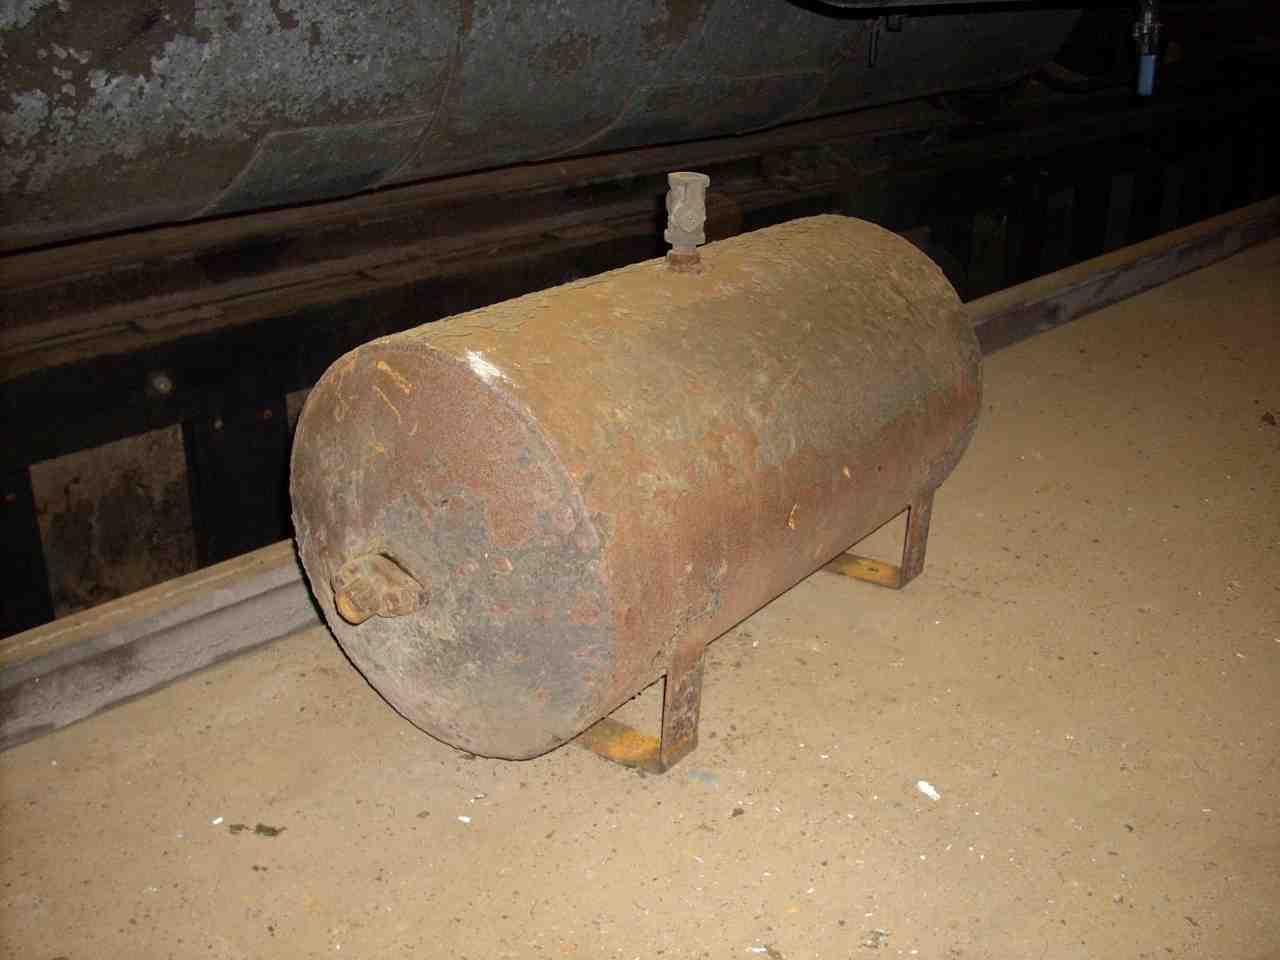 | Here�s the air reservoir I acquired from an old GM&O coach. This is tee�d off the air supply to the water reservoir. I�ll hydro test it at 125% brake pipe pressure, clean & paint it, and replace the missing plumbing before installing it. |
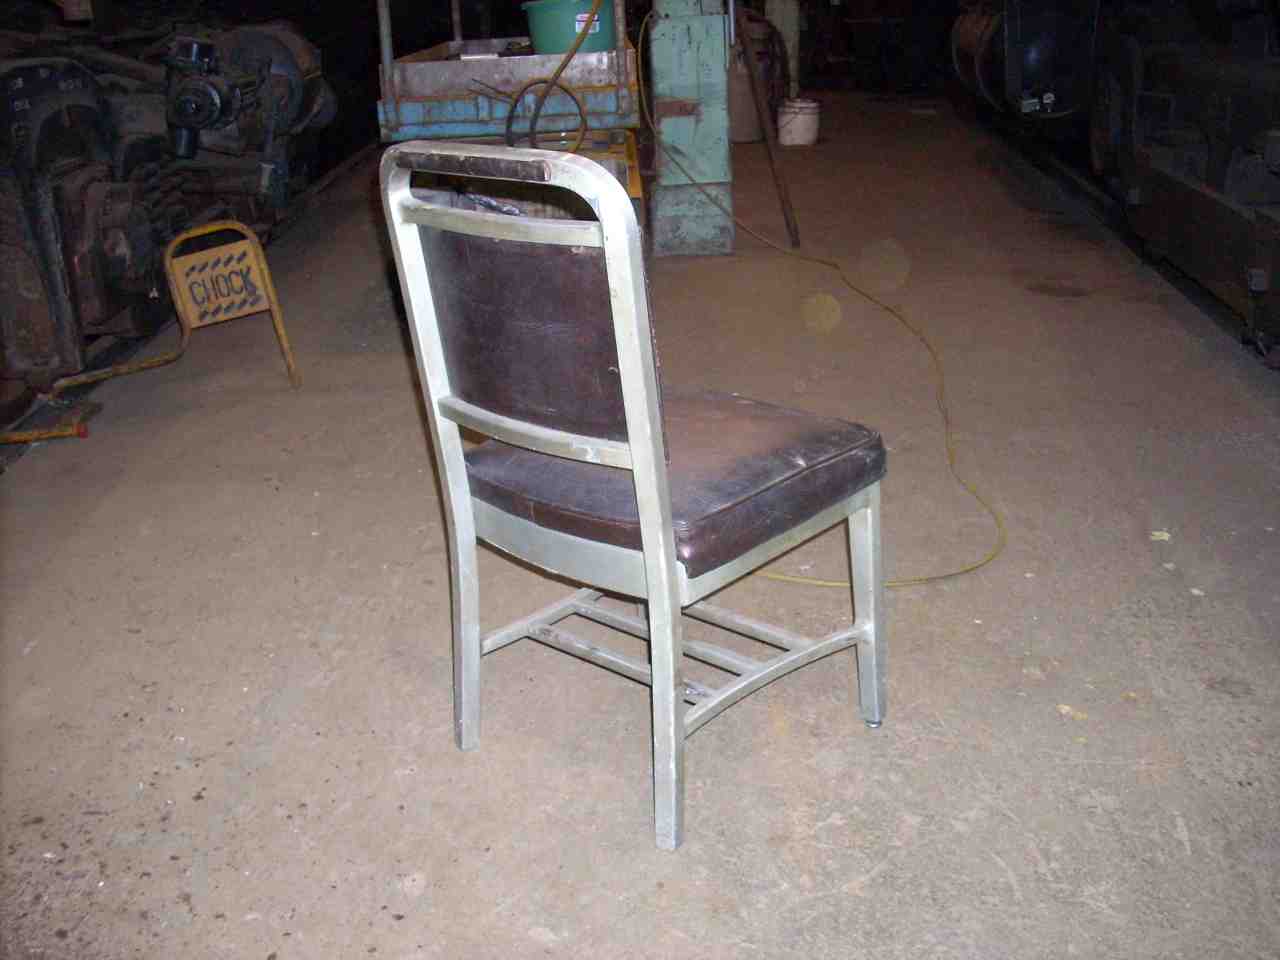 | This is the dining room chair from the Fuering estate. It was made by General Fireproofing in April 1946 for the Norfolk & Western, but is the correct style for 1146. |
 | I�ve mentioned that, when MTM acquired GN 1224, we found the dining-room end door from 1146�s twin on it. It occurred to me that people might like to see it. The back side is badly burned. |
In the last month, three readers have written with some excellent history of 1146�s Amtrak and Burlington Northern service. I highly recommend it to any history buffs. The Amtrak section also gained pictures of Amtrak articles which were still in 1146 when I bought it.
 | Here's the completed range hood blower. Note the wiring is now all in conduit, the enclosure has been scrubbed clean, and doors on the enclosure front now slide easily. |
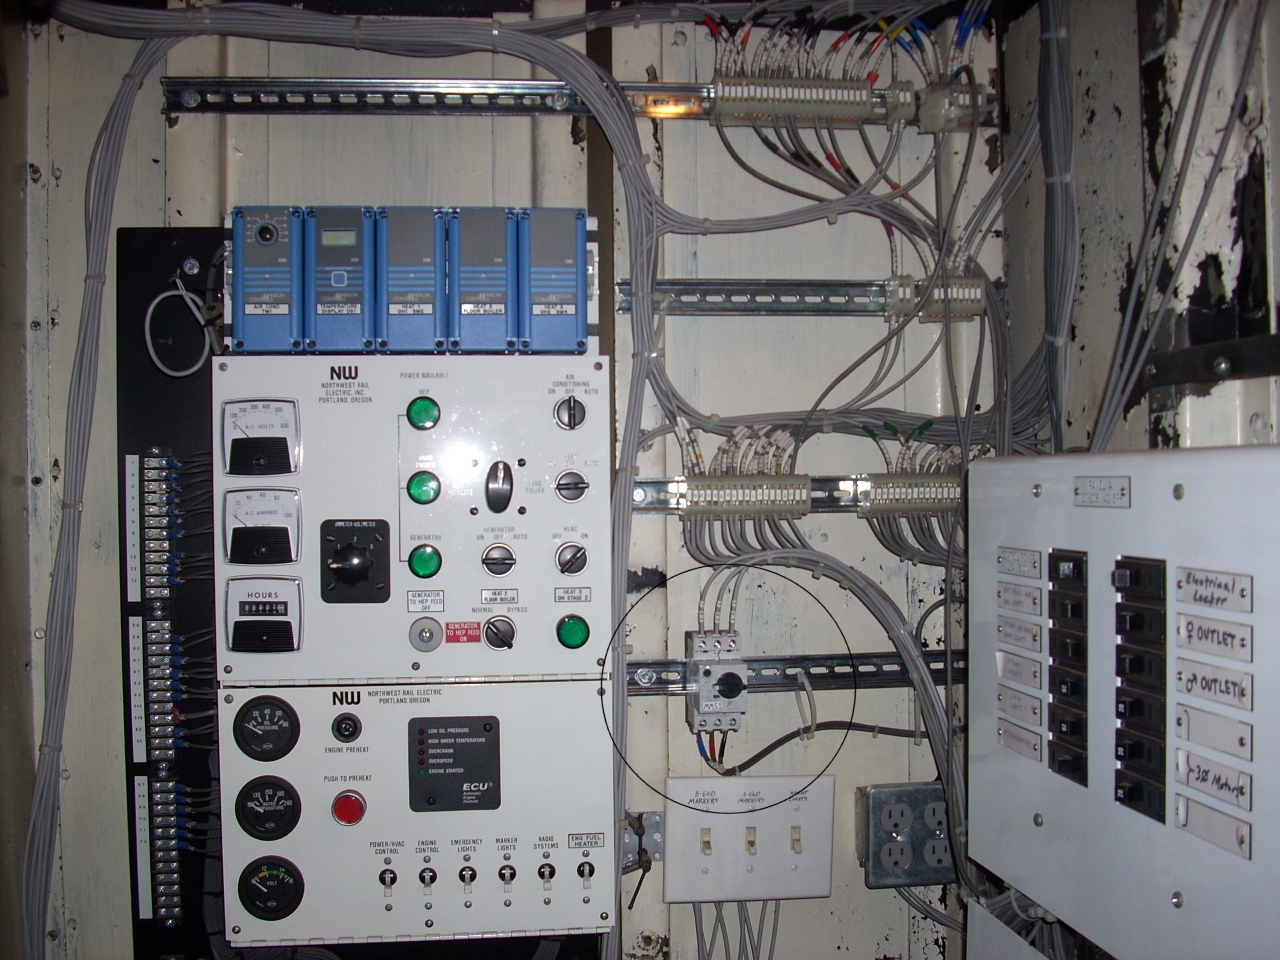 | The blower's manual motor starter (circled) in the electrical cabinet. Note the aluminum DIN rail has been replaced with steel, per Bob Jackson's recommendation. |
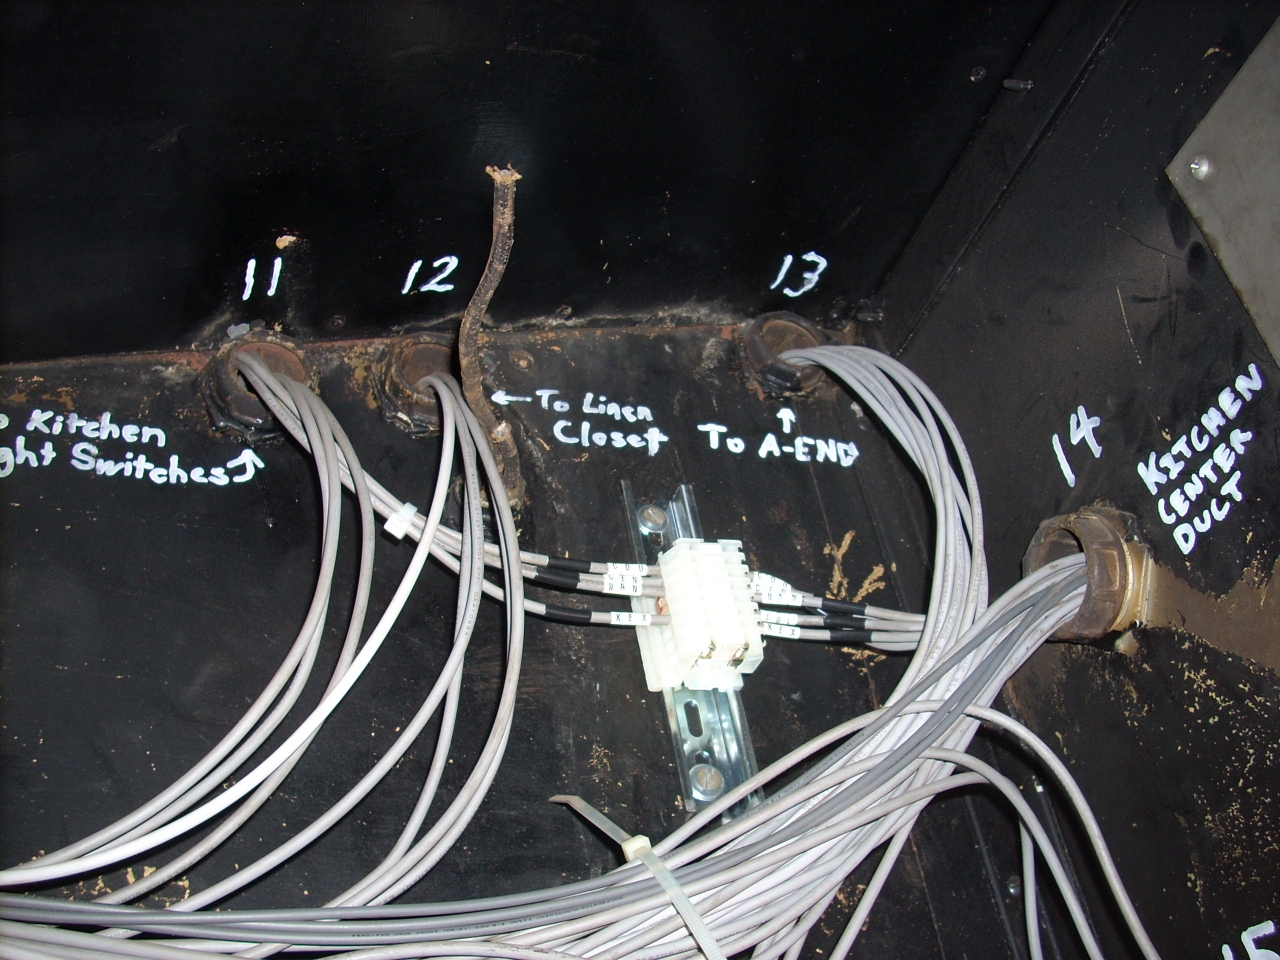 | The range hood light's wires had to be pulled back during blower installation. In doing so, I discovered we'd put a splice in the kitchen ceiling conduit! To correct that, and to troubleshoot another circuit that stopped working, this terminal block was installed where the kitchen wiring loops through the electrical cabinet. Each conduit is labelled for easy troubleshooting, and numbered for a spreadsheet I use for calculations. |
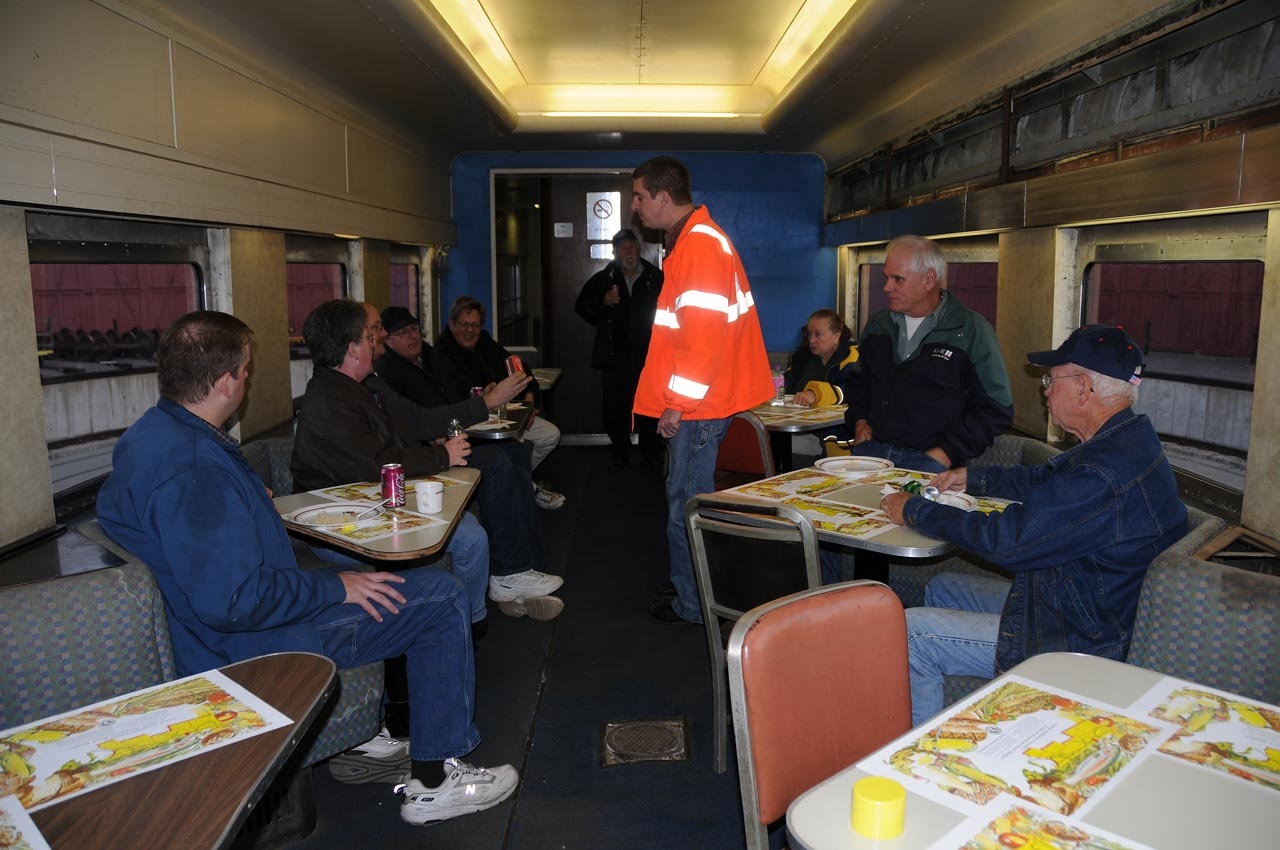
The slideshow was on October 21st. Once a year I take a turn hosting, and with the range once again usable, a bit of fun was in order! In addition to the slide show group, I invited friends from work, the museum, a couple modelling circles I'm connected with. Afterwords, I counted 28 dirty plates. Not bad!
 | For fun, I used authentic GN placemats. (Well, 11x17 color photocopies of one.) One car owner in the group, who worked for the GN as a third chef in 1962, remembered that "They used these for all foodservice in the 1960's. The only exception was the diners had white linen tablecloths." Two retired Amtrak station agents got to discussing linens ("expensive to launder") vs. the paper tablet table covers Amtrak uses today. Dawn Holmberg Photo |
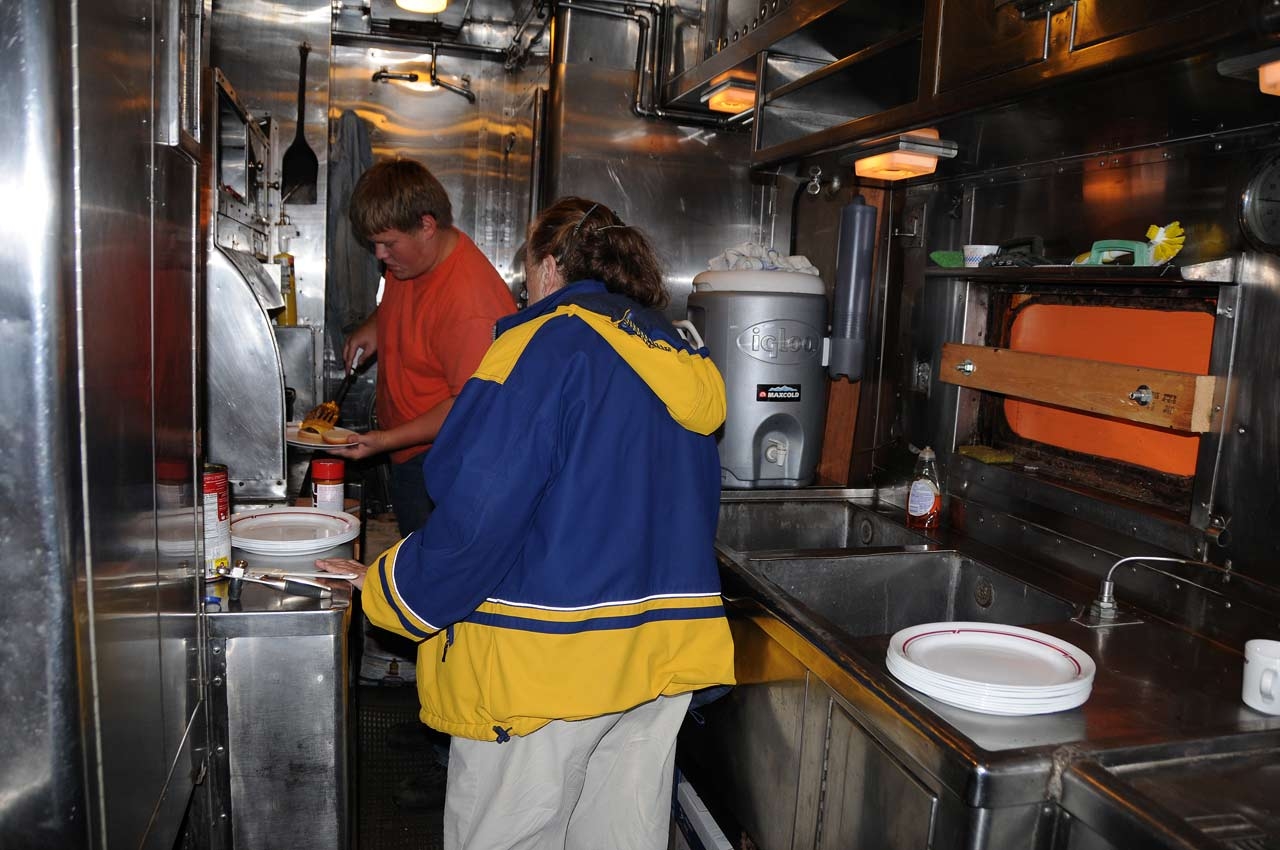 | Stuart grew up around live steam, so he really understands the charcole stove. It's got a firebox, grates, ashpan... He's also good at grilling meat. Dawn Holmberg Photo |
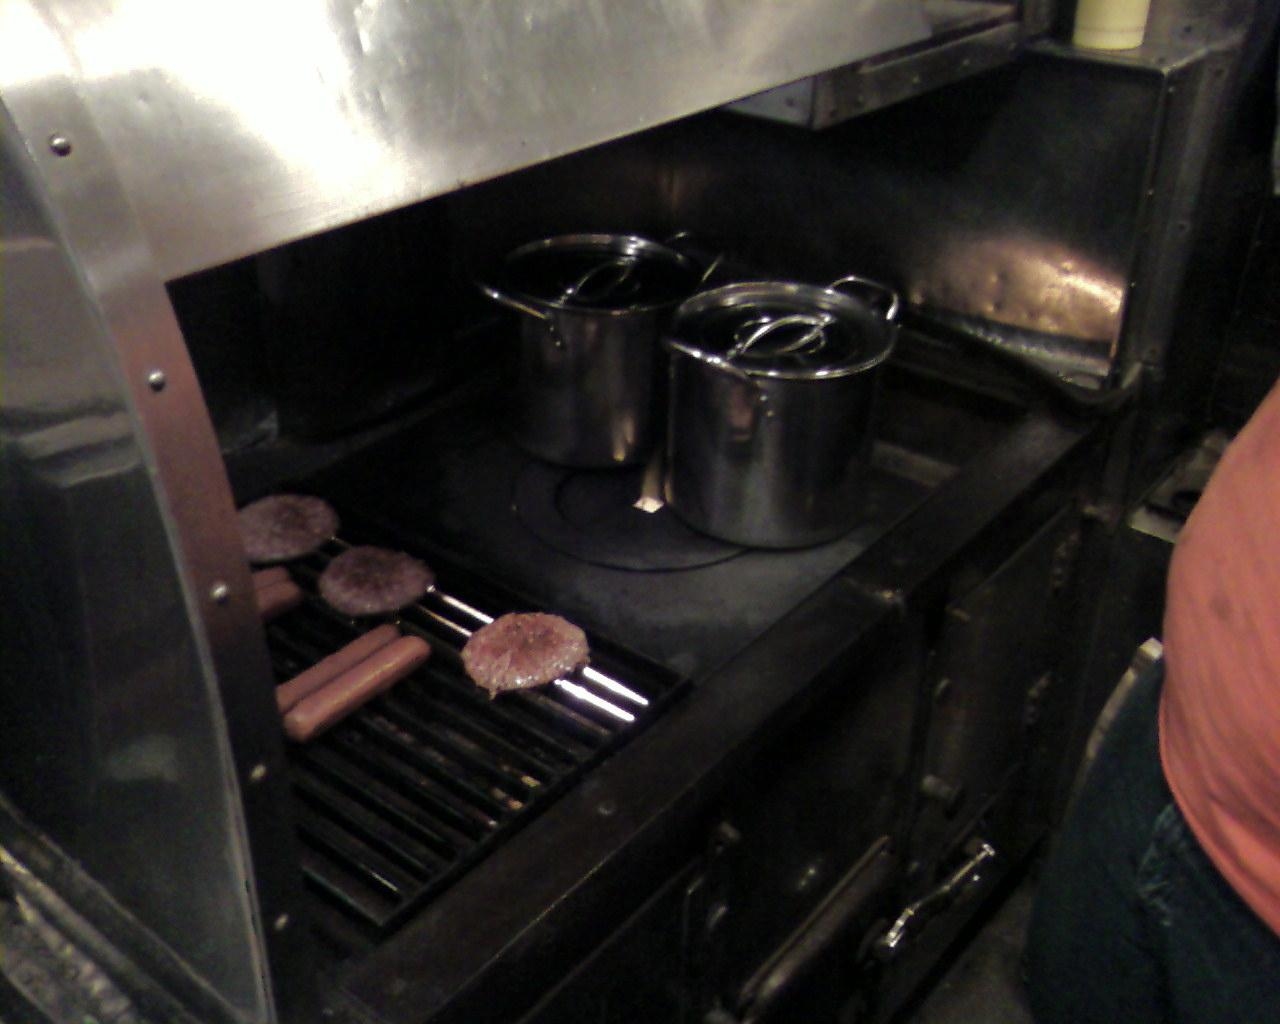 | I like this photo Phil captured with his cell phone. It really hints at what's going on in the firebrick-lined firebox of a charcole stove. Over the course of three hours, it consumed two large bags of Kingsford and got the ovens over 200 degrees. The firebox is centered between the ovens. Note the Vise-grip grate shaker. Phil Wellman Photo |
 | I'm showing a Coke can which I found in the leg of the far-right table. Its soldered steel with aluminum ends, and has an offer which expires in "November 30, 1972." Dawn Holmberg Photo |
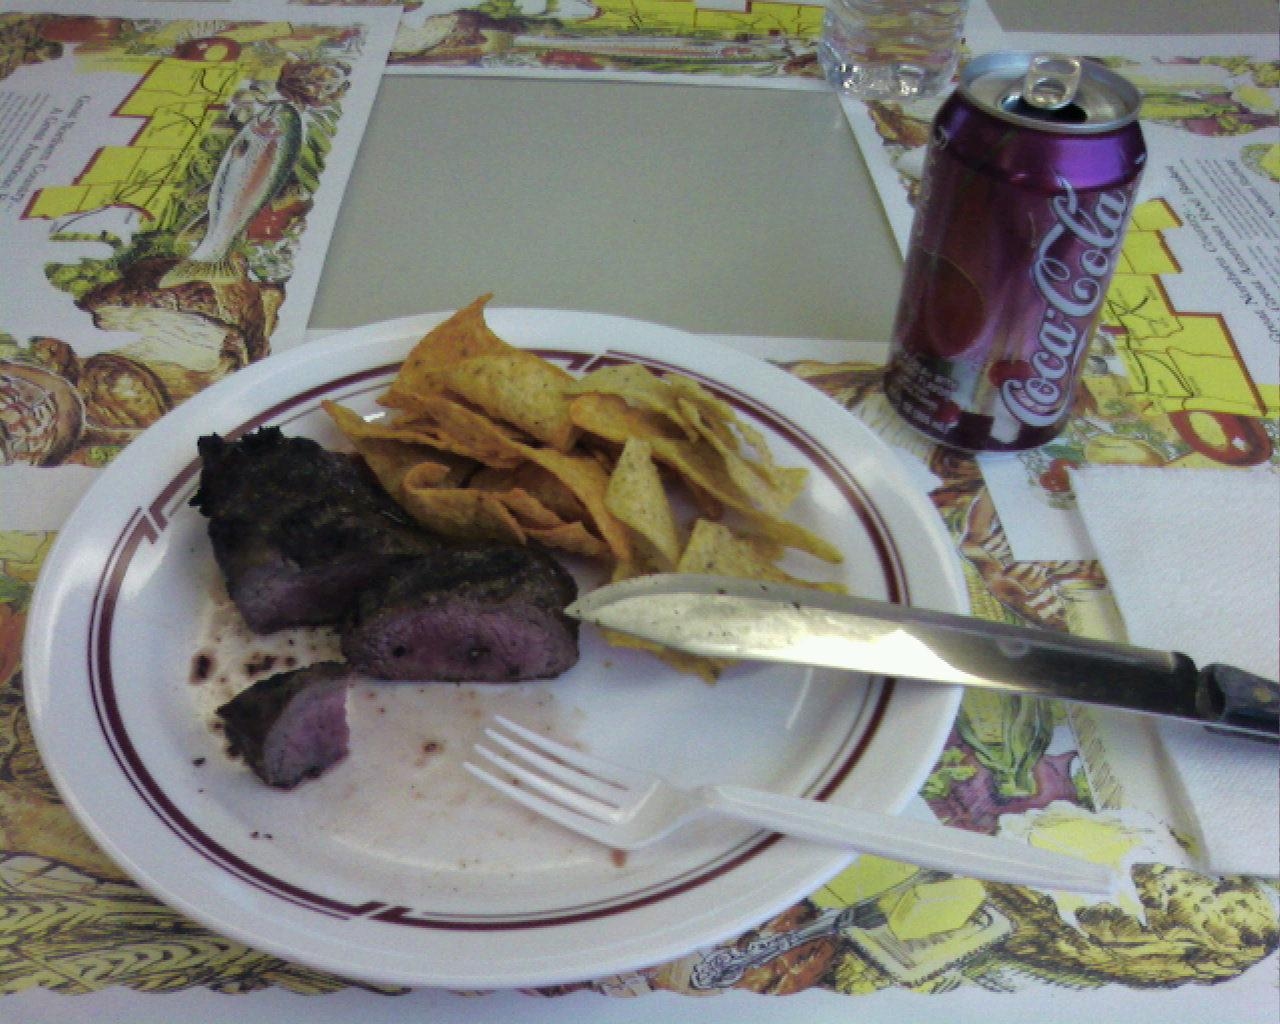 | Phil brought his own steak to grill, and it turned out really well. This was the first opportunity I've had to use the Amtrak china, and I found some inexpensive glass tumblers and wine glasses at Target. Next year hopefully I'll find real silverware. Phil Wellman Photo |
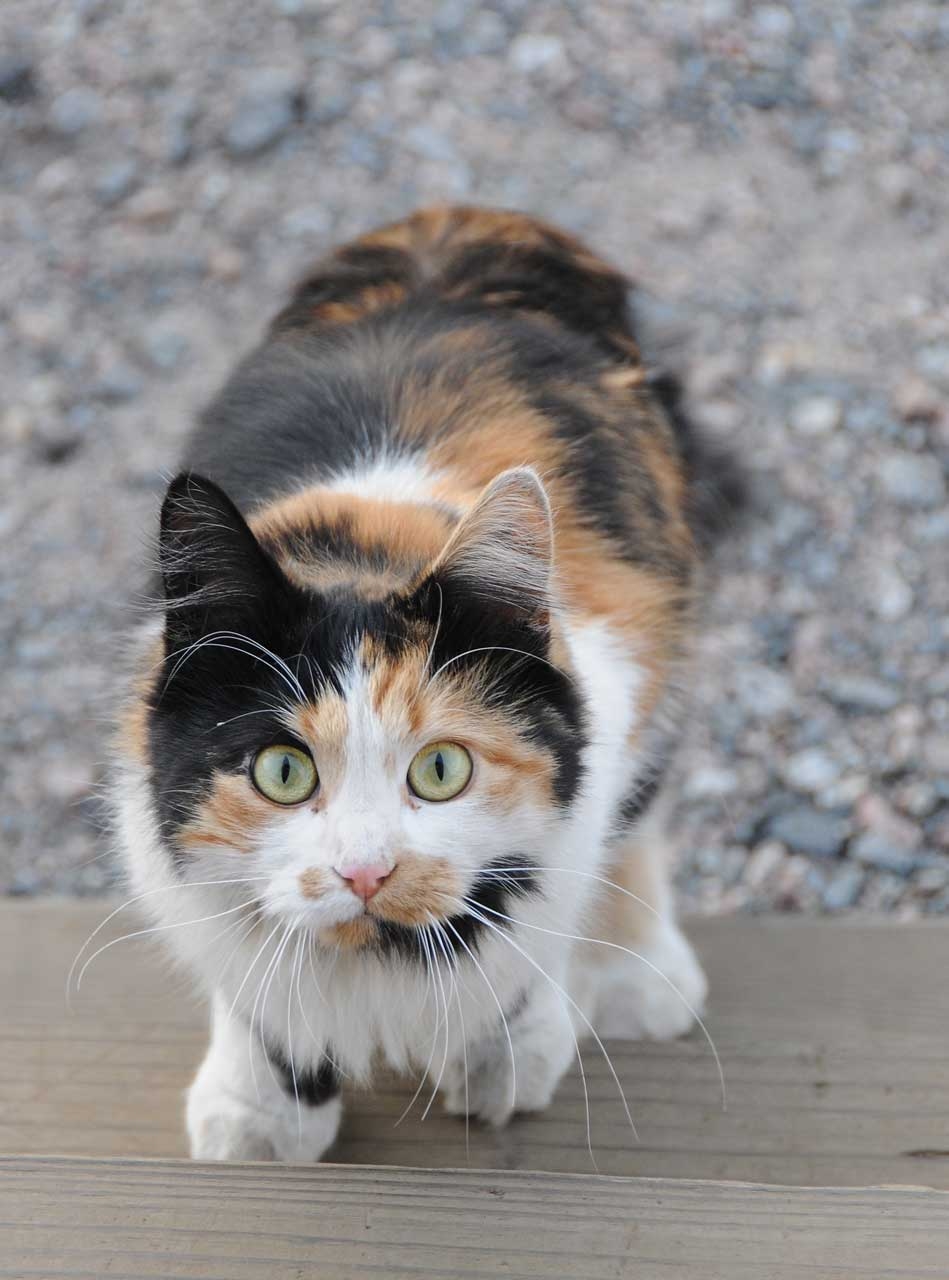 | "Turntable", the roundhouse cat, was hoping to help with the leftovers. One of the evening's funnier moments was when, walking along the window ledge behind people eating, she jumped down into the bench seats to explore, then popped back out and really surprised someone. (Ok, had to be there...) Dawn Holmberg Photo |
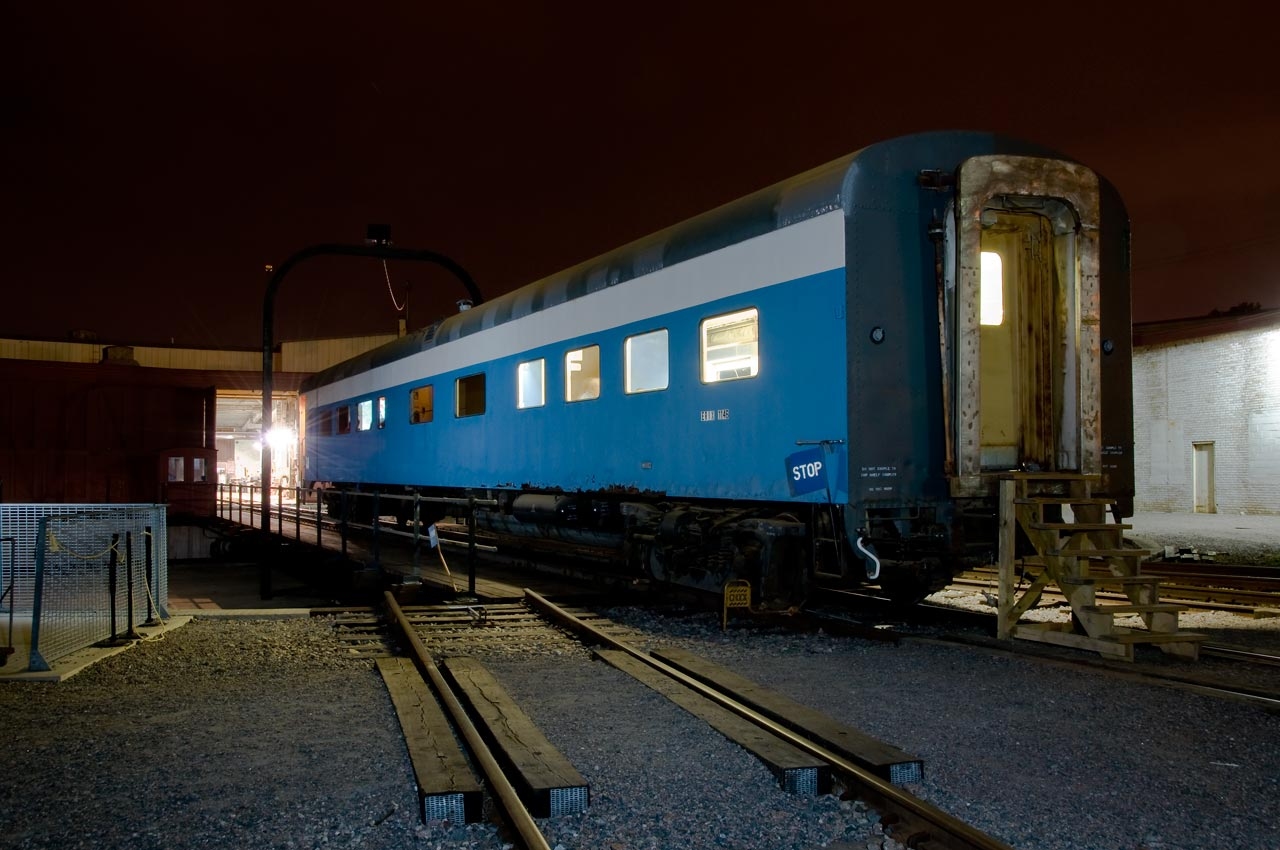
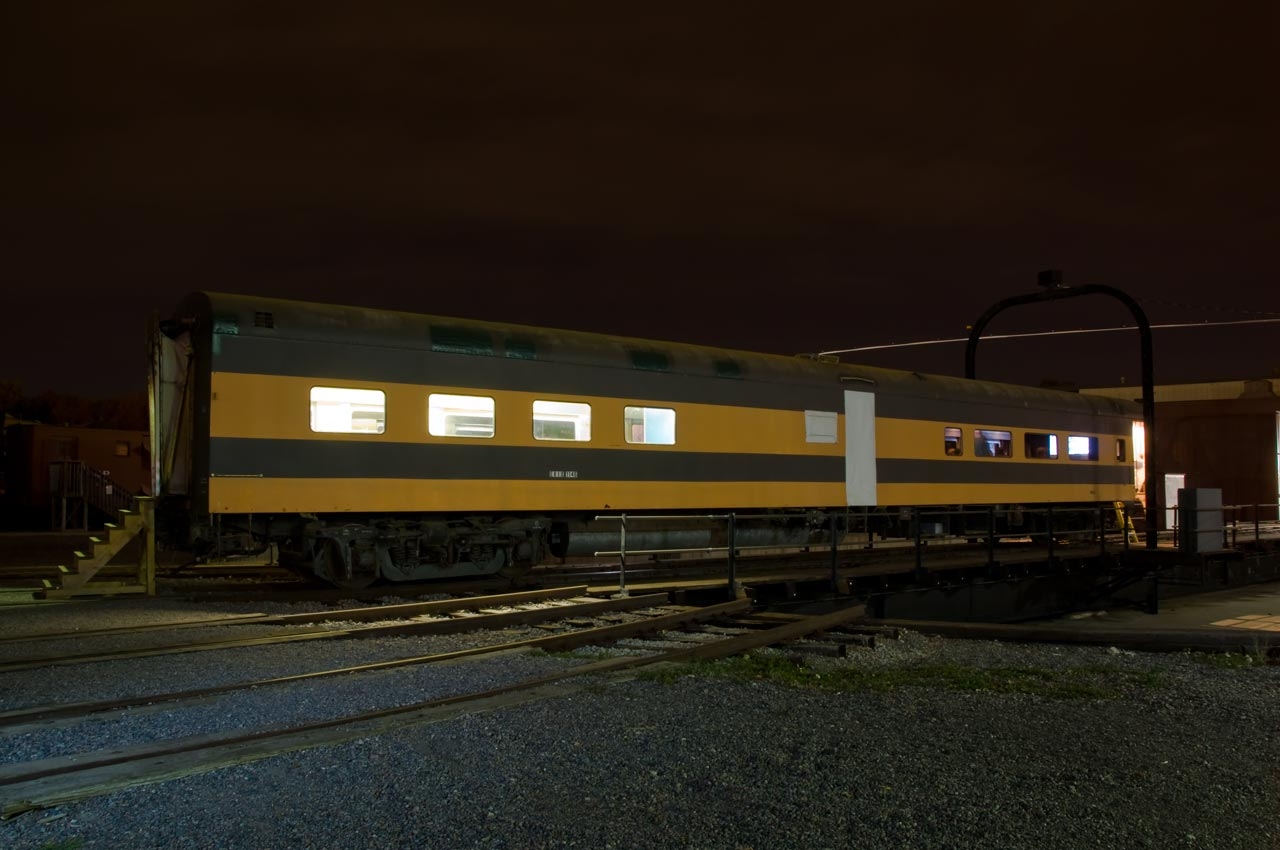 | Dawn brought her night photo equipment, and took a few pictures of 1146. She put her Nikon on a tripod, opened the shutter, and walked around "painting" it with flashbulbs. The steps are arranged to enter via the dining room, then we progressed to the theater. Since the vestibule steps are off, a stepladder served for emergency egress. Dawn Holmberg Photo |
 | This may be 1146's first time ever doing a night photo shoot. If anyone's wondering, it was pulled out so that sparks from the stove wouldn't set the 101-year old roundhouse on fire. Dawn Holmberg Photo |
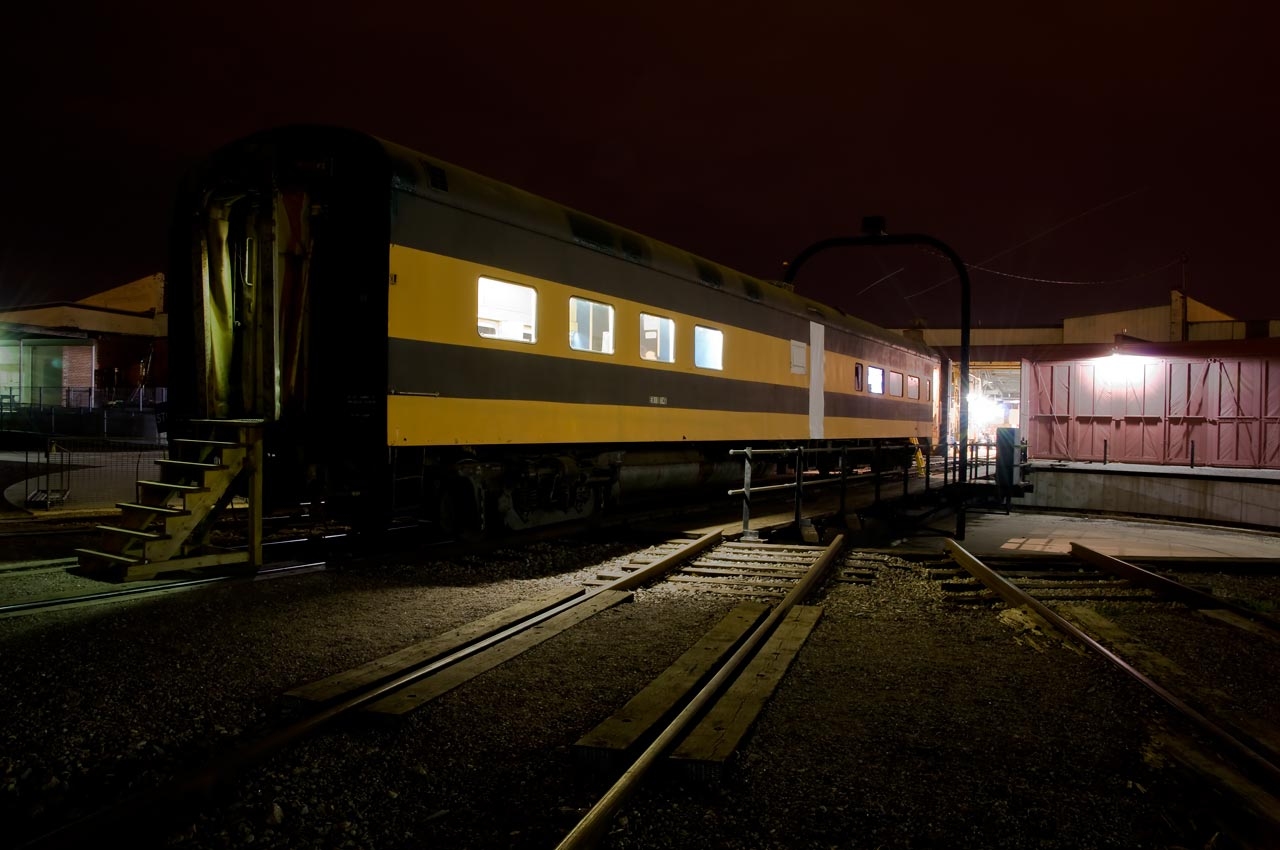
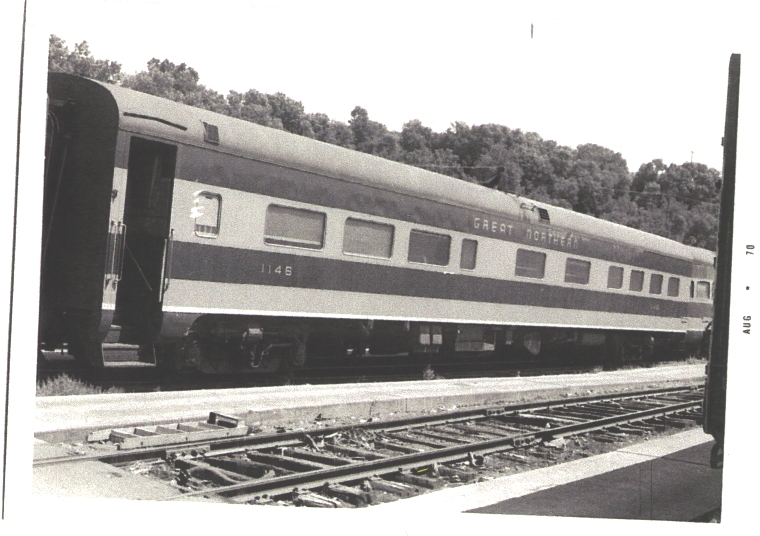
 | Opposite side. By the way, I may have proof that 1146 was never painted "Big Sky Blue". There are photos of one in blue, but the number isn't visible. However, there's a photo in the history section of 1146 still in Empire Builders colors in late 1970, well after they switched from blue to Cascade Green, so I conclude it was never painted blue. Darn - I was starting to like it. Dawn Holmberg Photo |
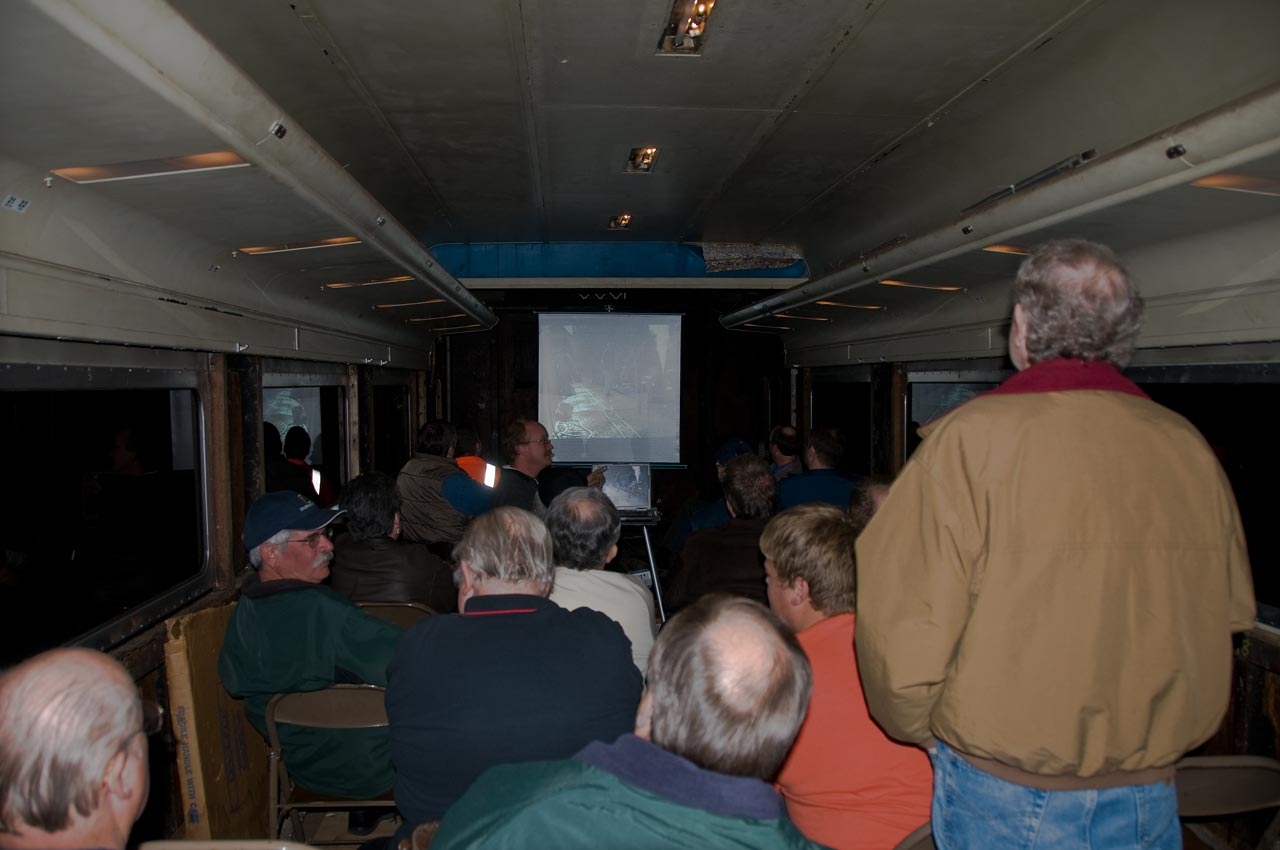 | Having people enter via the dining room allowed the screen to be pushed back, and we fit a larger crowd in the "theater". Dawn Holmberg Photo |
A couple technical disappointments occured during the slide show: The ballast on a fluorescent light in the hallway - an old one I never replaced - burned out. Also I discovered some of my main night/emergency light wiring in the electrical cabinet is too small - it was definitely warm to the touch. More work...
 | Back to work: Amtrak cut off the weather-vane hood above the kitchen ceiling fan, replacing it with a stainless cover. I wanted to do a better job than just caulking around it, so I got down to bare metal then painted with POR-15 and dark green from a spray-can. Note rust damage to the roof sheet at lower right. The roof sheets are only .075" thick. Sorry 'bout the dust on the camera lense. |
 | Amtrak's cover, upside down. I've already got the tar off the edging. They used window screen, held by spot-welded strips, which had fallen out. I didn't have time to replace it. |
 | The cover was reapllied with generous amounts of 3M Automotive Seam Sealant and large-head, 3/16" aluminum pop rivets. Note the lift - I prefer having something to fall onto when working close to the edge of a passenger car roof. |
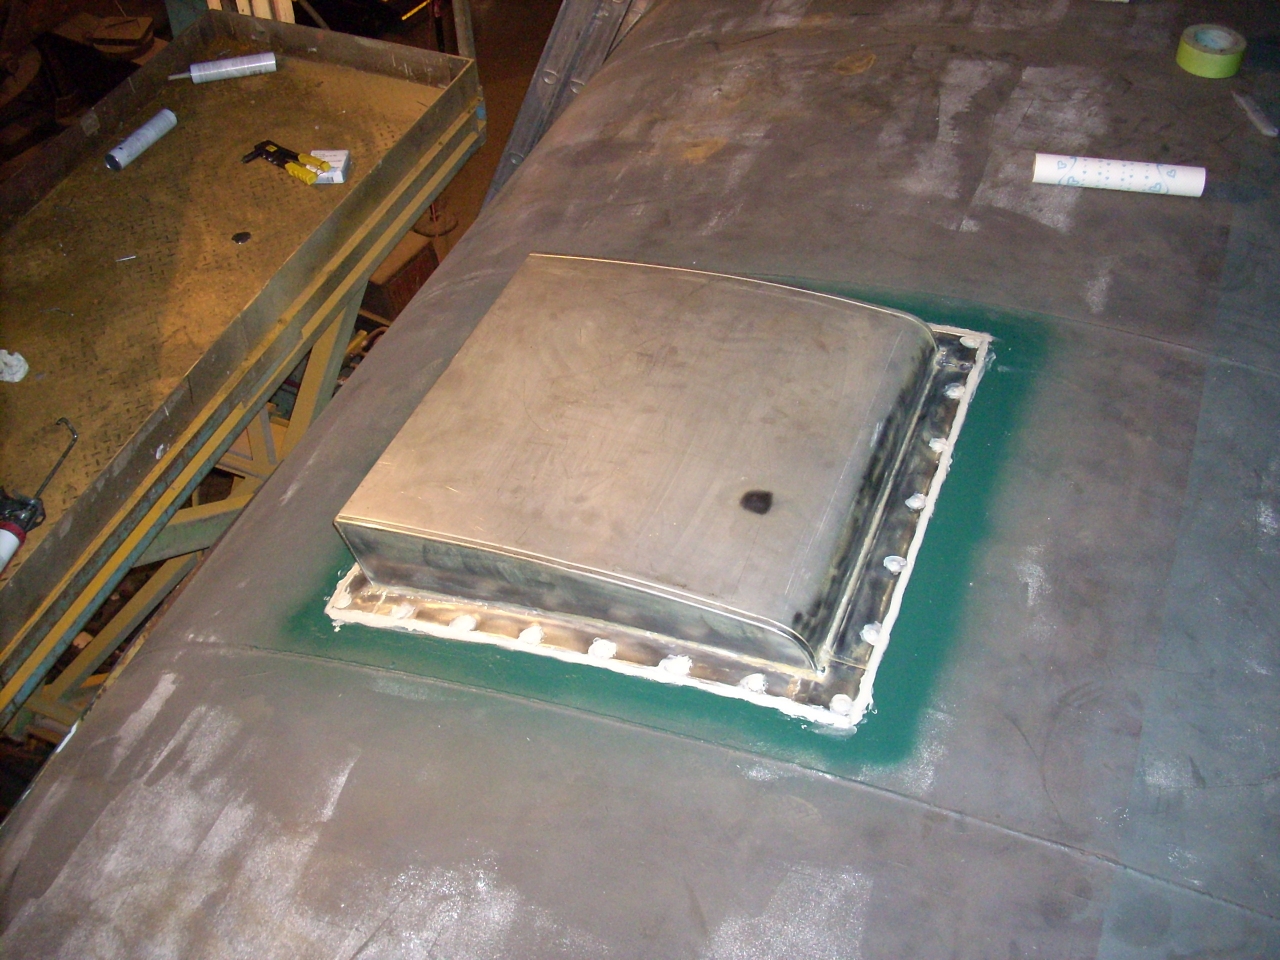
 | The kitchen window can't be installed due to rust damage, and sealing it up has been problematic. First I used painted plywood with rope caulk - water got into the end grain and the caulk leaked. Then weatherguard over the top, but wrinkles kept it from sealing completely. So, take it off and try again - after a summer inside, there was still water trapped! |
 | After cleaning off loose paint and rust, POR-15 and weatherguard. Note I'm applying 3M Automotive Seam Sealant to the edge of the weatherguard with my finger, trying to seal the edge. |
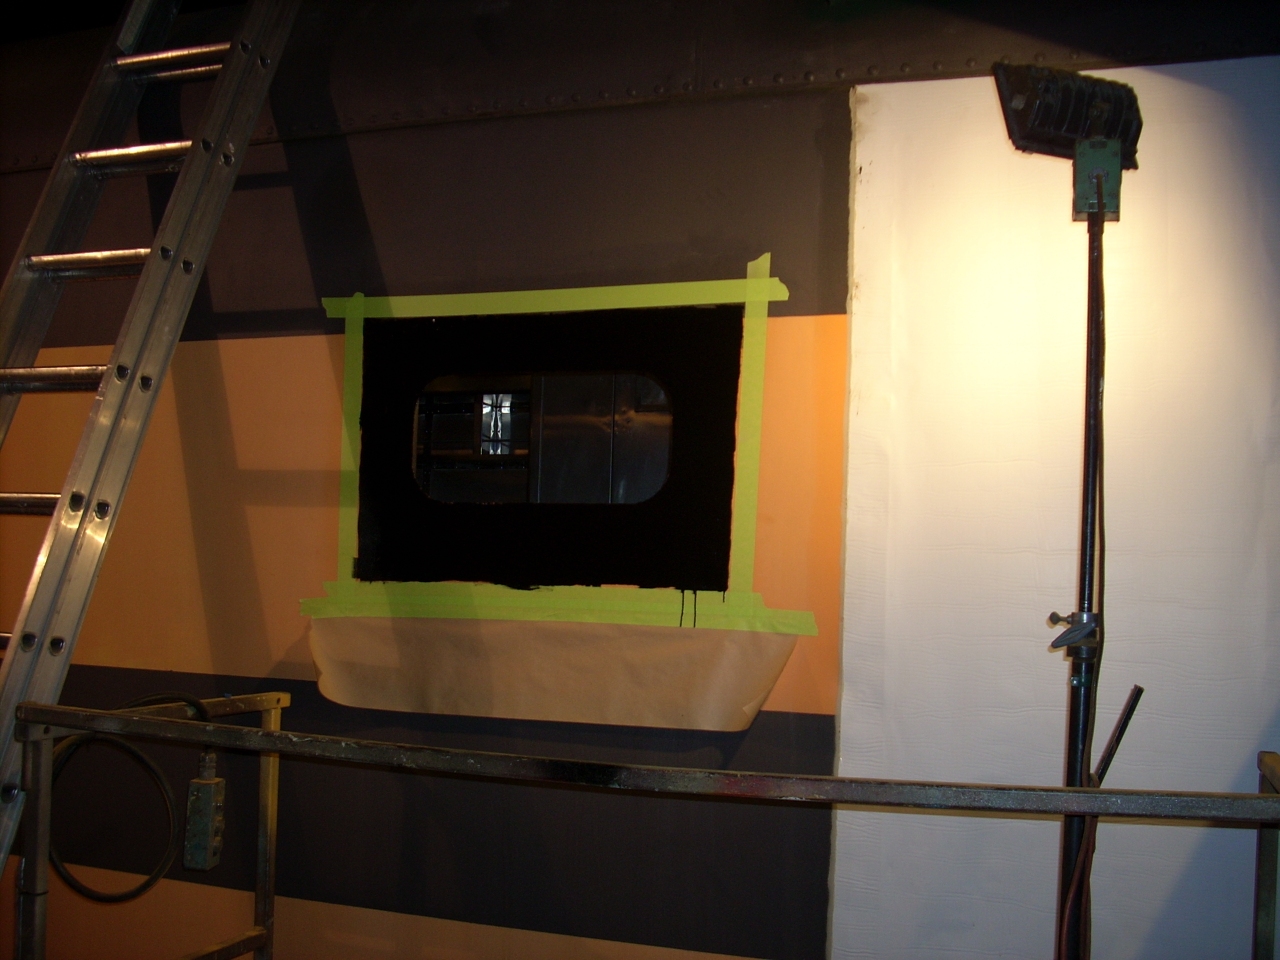
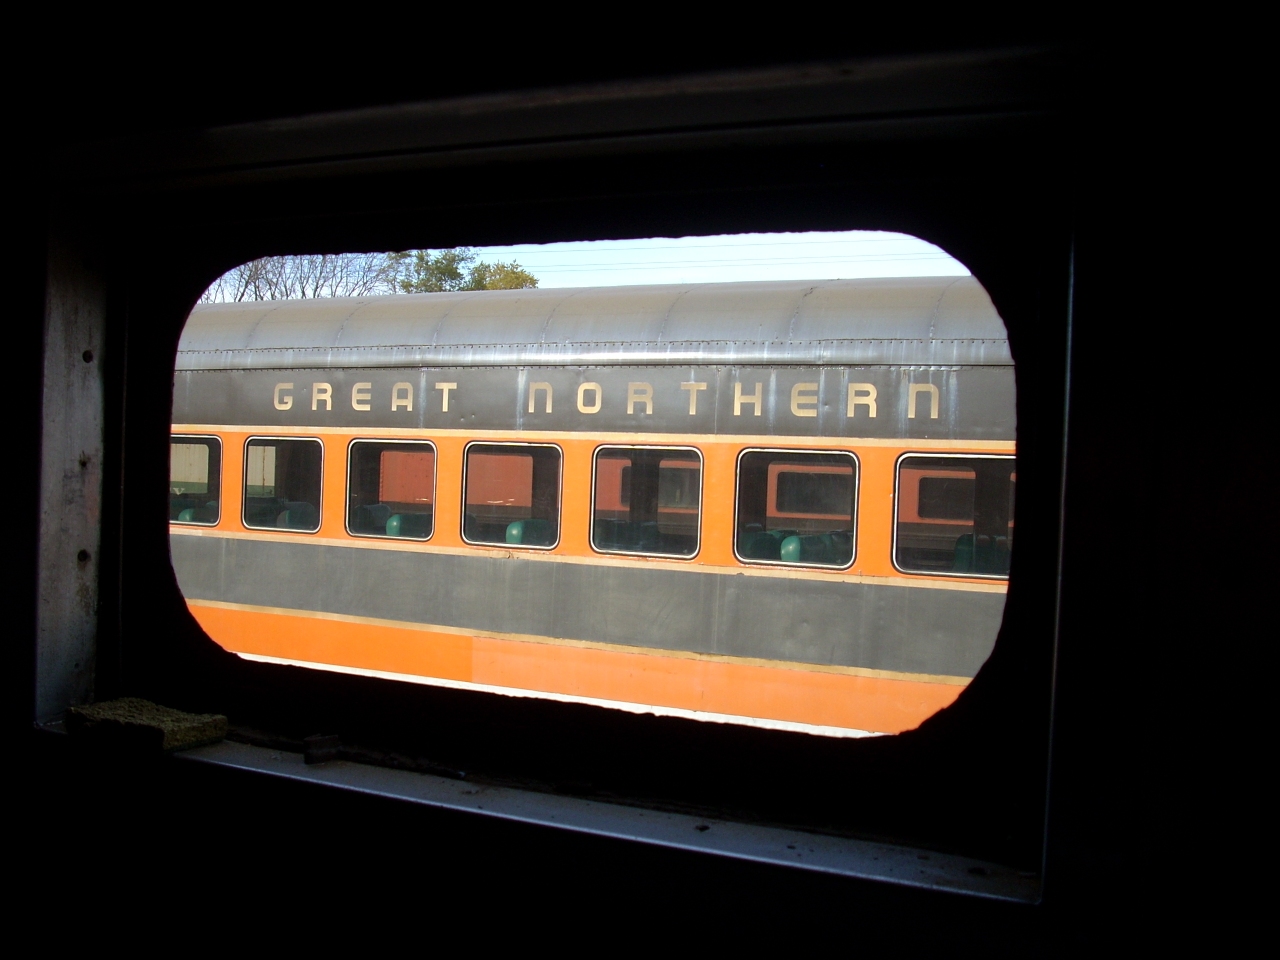 | I didn't go to lunch until getting stuck waiting for paint to dry. When I returned, 1146 was outside! (Talk about cutting it close.) So, the kitchen window was finished outside. That enabled this artsy shot of GN 1096 out the kitchen window. Seen through 1096, GN 1084 "Twin Ports" and GN heater car 16 make cameos. The Jackson Street Roundhouse is literally only yards away from the GN's Mississippi Street coach yards, so this is almost historical. |
To all my readers and friends who have helped me locate restoration hardware and historical documents for 1146: Thank you! Your help really helps.
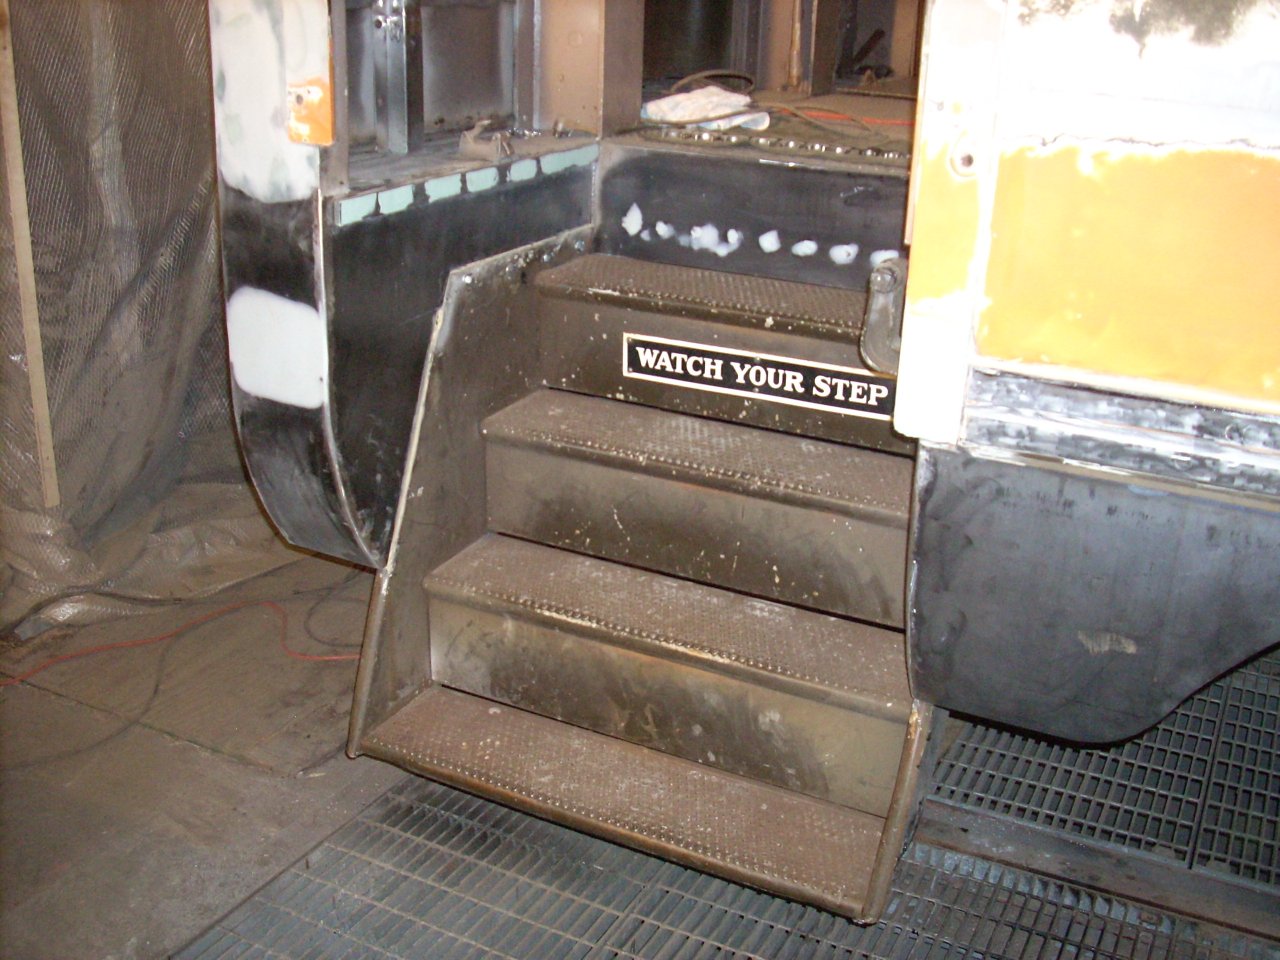
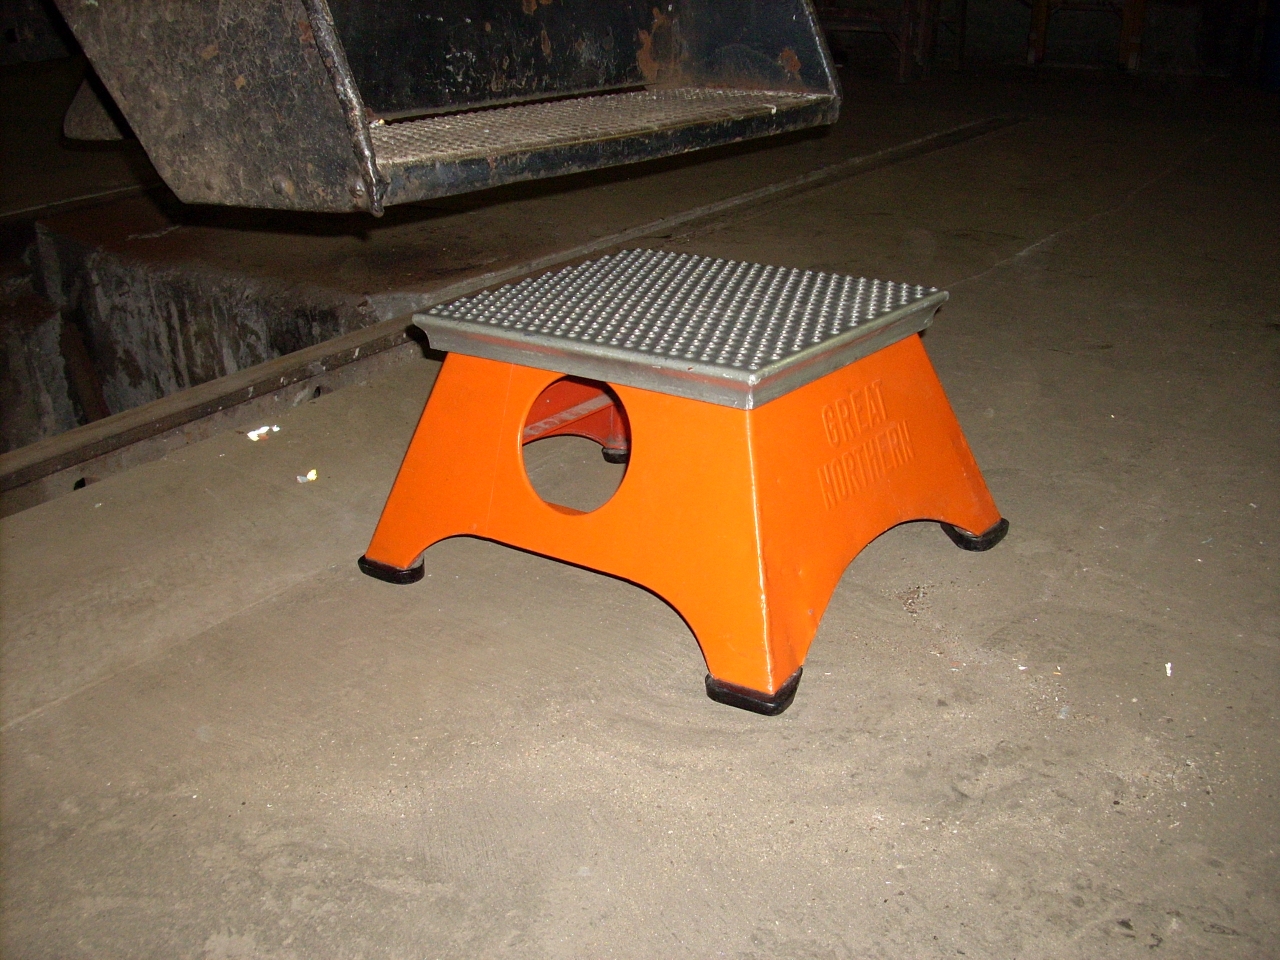 | Here's one find. A reader found this at a swap meet in Chicago, took pictures for me, and put me in contact with the seller. I was being picky about a couple dings, until I looked closely at an identical stepbox in the museum's collection. Vestibule steps courtesy of GN business car A11. |
Found, but not yet arrived, are ACF painting and plan diagrams (seller's photo) for the coach-diners and observation cars of the "International" (orange and green,) as well as two photographs of those cars running together in Amtrak colors in the Twin Cities.
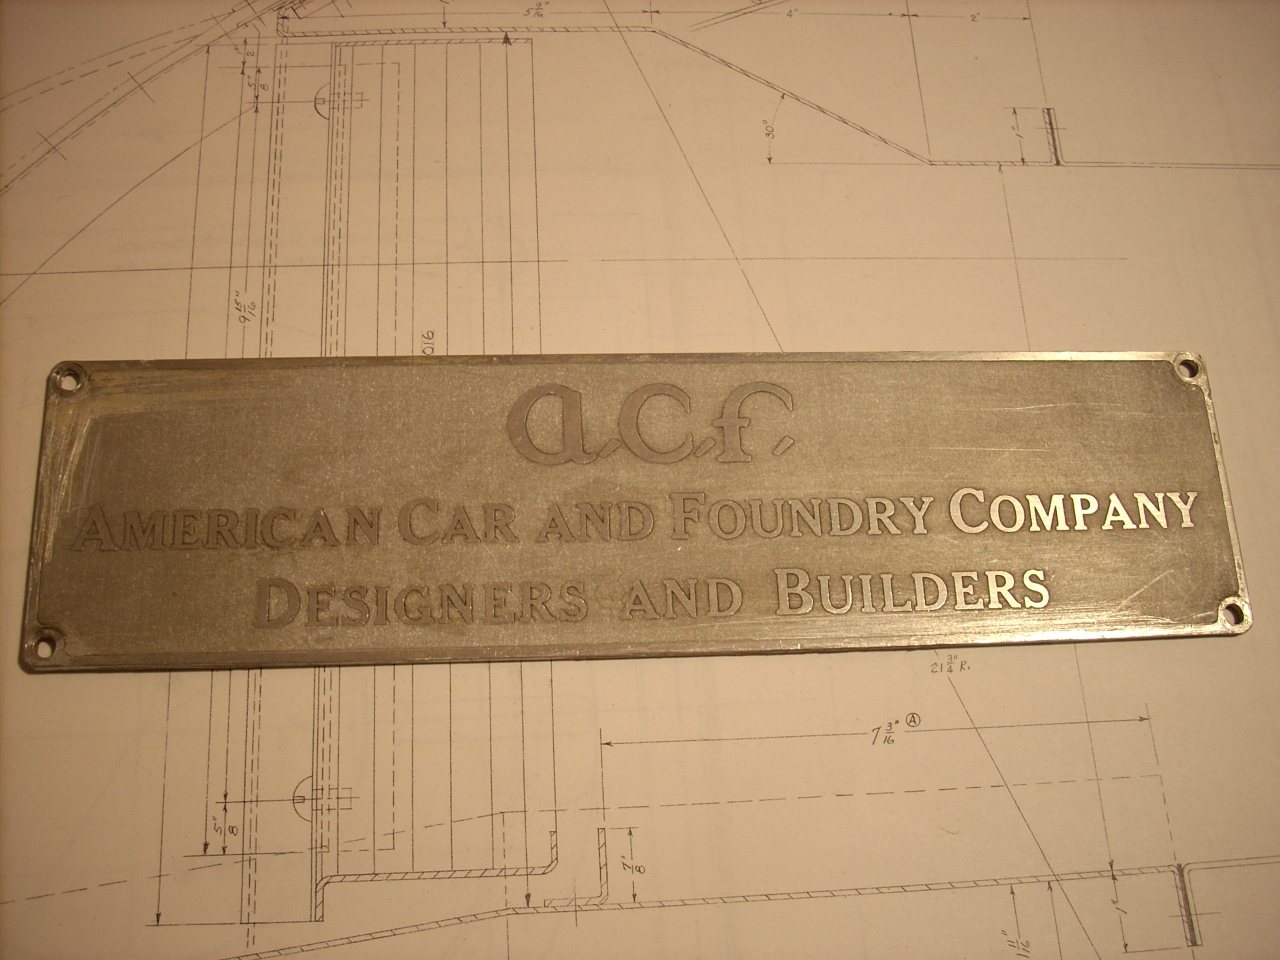 | A reader found this for sale on e-Bay, and pointed it out. It's an exact fit for the missing builder's plate. |
 | MTM is sprucing up GN business car A11 this winter. Work includes replacing one set of back platform steps, which got crunched and then straightened out. To roll the edge, I found some 4"x4"x1/4" L-channel, cut it into two equal lengths, and welded a 1/2" schedule-80 pipe to the edge of one. Add heavy steel for legs, Bolts for initial clamping, and we have a die for forming rolled edges. We used 1/8" steel sheet, and allowed 1 1/2" for the rolled portion. I plan to use this tool for 1146, and several of the museum's other cars. |
Beyond some small parts cleaning, there's not much actual work to report.
I just discovered this on YouTube - a family visited "Santa's Train Shop" at the museum, took a ride on 1096 - and look what's in the background!